Amber B Design Studio

Interior Design & Decoration for the South Florida region

  • Home
  • About
  • Services
  • Portfolio
  • Blog
  • Press
  • Contact

Love the Look: Double Islands

March 23, 2021 by Amber Filed Under: amber b design, design, design services, e-decorating, e-design, kitchen

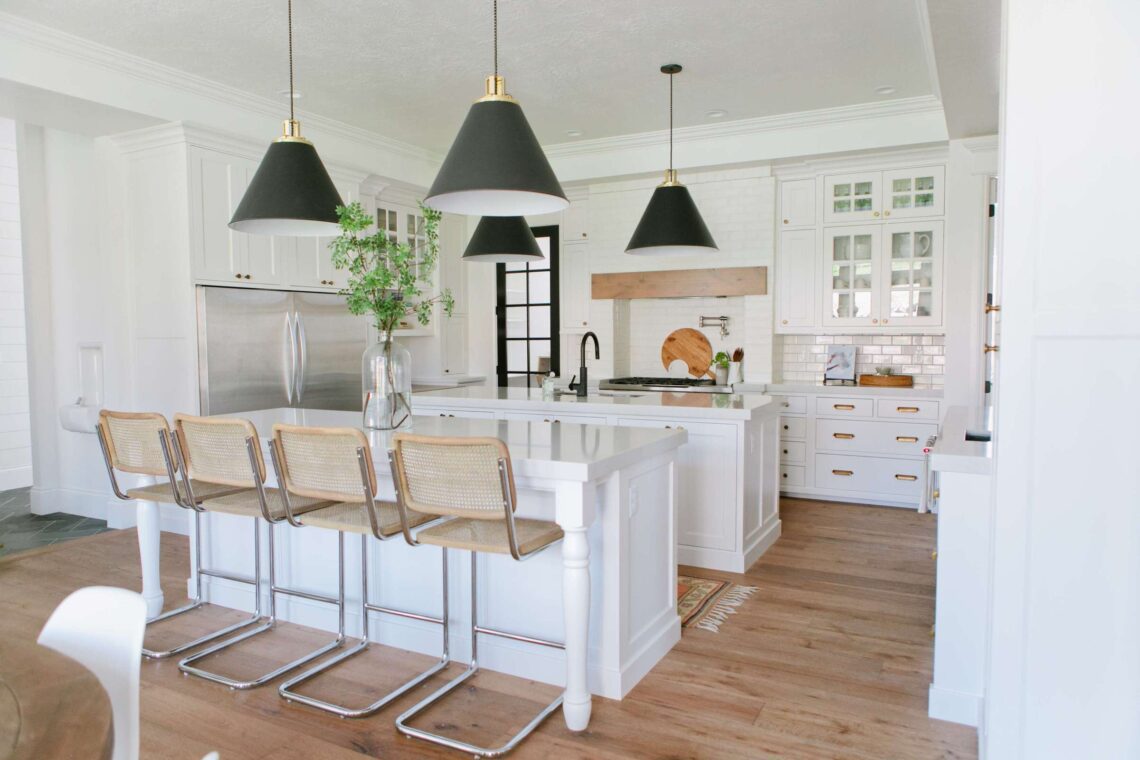
I hope you all are off to a great week! I am excited to share that for this past year, I have been working remotely on a new home build in New York. I have worked with these amazing clients in the past and they are currently in the process of building their dream home. When we looked at the kitchen layout, the builder suggested an island that had an oblong, non symmetrical shape. While it filled the space well, it made it tricky for pendant placement. I also love a symmetrical design whenever I can, so I knew I wanted to reconfigure the island layout. We had some extra room in the kitchen to work with, so I presented my clients with the idea of either a small sitting area in the kitchen or a double island.

Small sitting area in kitchen: Inspiration
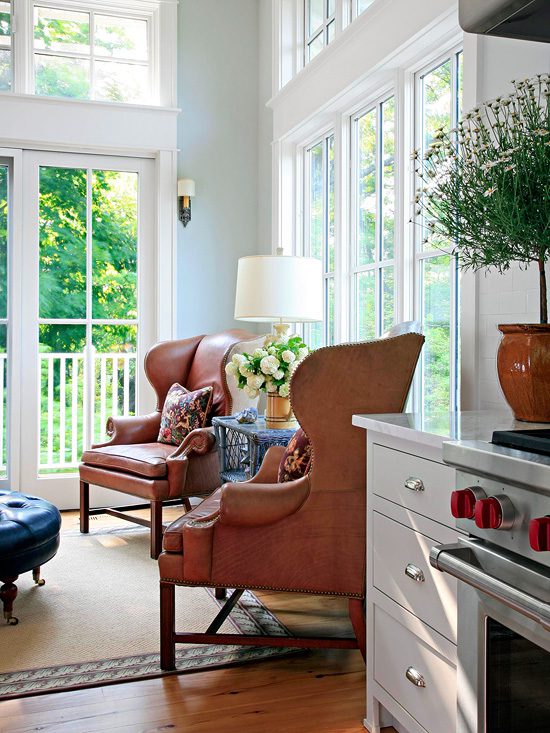
Image via Better Homes and Gardens

Double Island: Inspiration

Image via House of Jade Interiors

I honestly loved the look of both approaches, but they decided they did not need an additional lounging area in their kitchen. So a double island it is and I couldn’t be happier! This option will function so well for their family and how they will use their new home. The island closest to the range will be the work island and main prep space. The island after that will serve as the eating and hang out spot, with pretty counter stools for sitting. The functioning layout will be similar to the inspiration image above, but we will do pendants above the work island and recessed above the sitting island. I couldn’t be happier with the way the kitchen will look. We have selected most of the finishes and cabinet design and I can’t wait to see it all come together. The main cabinetry will be a creamy white shaker and the island will be a deep walnut stain. The marble like quartz will go on all of the counters, tying the spaces together. Except the bar area… that will be its own gem and I can’t wait to share more about that niche of the kitchen soon.

If you also live outside of Florida, my e-design option works best and can be such a cohesive, stream lined process! So much can still be achieved remotely, even an entire new build! Stop by my design services page to get started. I look forward to hearing from you!
Completed E – Design {the Dining Room}

June 23, 2016 by Amber Filed Under: amber b design, design, dining room, e-design


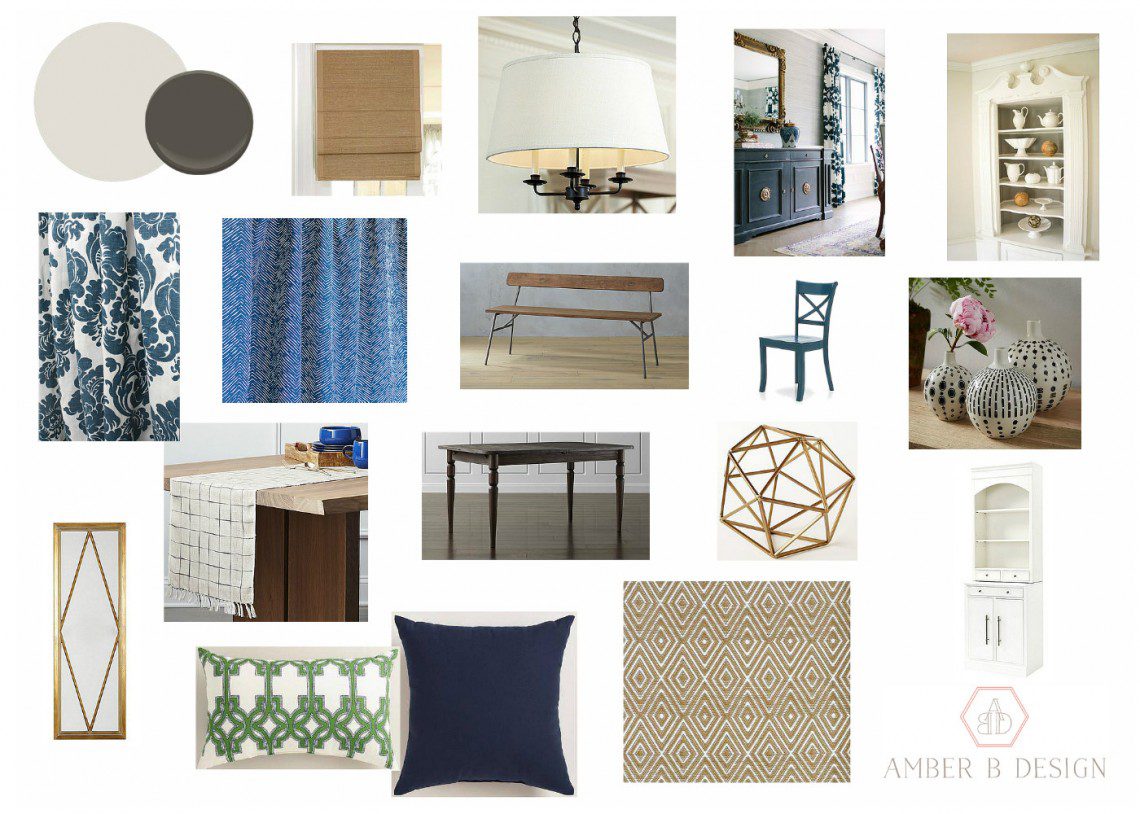
Sorry for my lack of posts lately! Once I take a week or two away from blogging, it becomes easier and easier to take the post writing out of the schedule. But I love checking in here, so you can be sure to find new blog posts {hopefully more often, from now on.} I have missed it!! Today, I have a completed e-design to show you. I have been working with these wonderful clients throughout their home and it has been so much fun. They are undergoing some renovations to the kitchen and bathroom and I have been helping to marry the renovated spaces with the design style from the rest of the home. The dining room, directly off of the renovated kitchen, is getting an overhaul with new furniture, lighting, rug and window treatments. They are taking down half of the wall between the two spaces, to create an open feel. Here is the design plan…

The Design Plan

A collage of furniture and accessories in various colors.


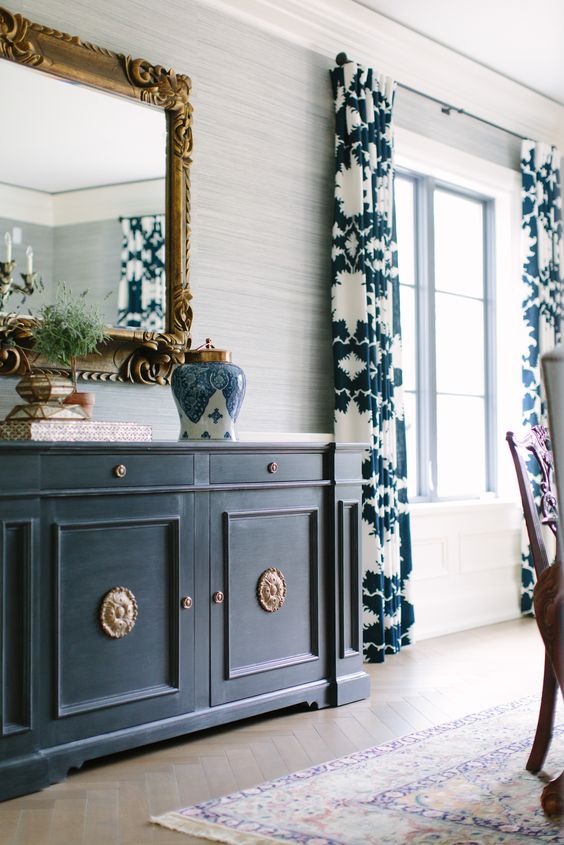
I love that the plan will be able to include colorful patterns, a neutral backdrop and upholstery mixed with wood and metal. My inspiration was this dining space by Kate Marker Interiors:


A blue cabinet in the corner of a room with curtains.

via Kate Marker Interiors

My clients were looking for more floor space in their dining area, so we moved the table and seating over towards the large window, creating a banquette/window seat look. This dining area is their main eating space, so I wanted to make sure it was durable with their young kids. The banquette pillows are made of an indoor/outdoor fabric, so they can easily be washed and are soil resistant. The area rug is also indoor/outdoor, so it can handle the spills it will encounter.

I hope you enjoyed the peek into this new design! I promise there won’t be this much time before my next post. ๐Ÿ˜‰

E – Design {The Kid’s Rooms}

April 7, 2016 by Amber Filed Under: amber b design, design, e-decorating, e-design, interior design, kids and design


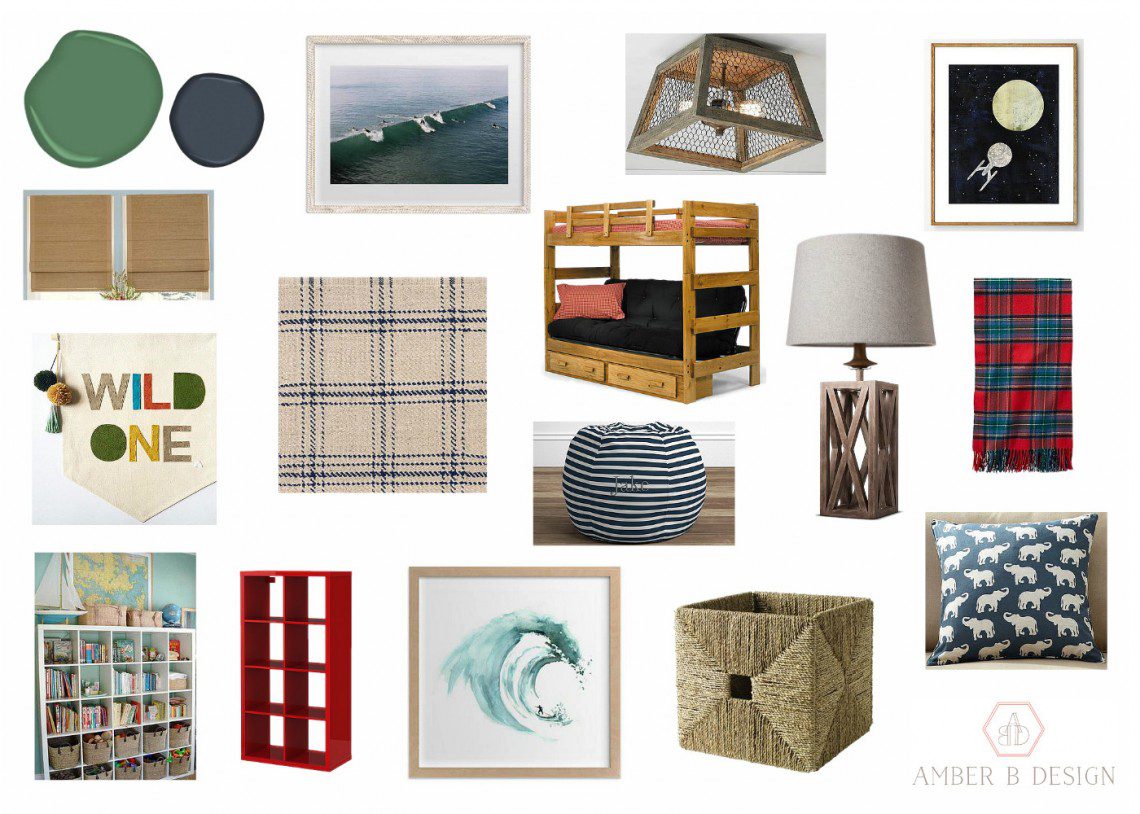
I mentioned in a previous post this week, that I had some new e-design projects to show! My client and I have been working on her basement and living room, but have also completed her son’s and daughter’s rooms as well. Kids rooms are so much fun to design. As a mom of two kiddos myself, I know it has to be fun, whimsical, meet their style and definitely have loads of function. There should be room for storage to corral all of those toys! But who said that the toy storage can’t be functional and super stylish?!? In a kid’s space, it’s all about having fun with color and taking it up a notch, so it still works with the rest of the house, but has its own unique flair. Up first, her son’s room! Her son loves outer space, snow boarding and the color red. His mom wasn’t too sure about using too much red, which I agreed, so we were creative and used it in small doses.

The Design Plan

A collage of pictures and furniture items.


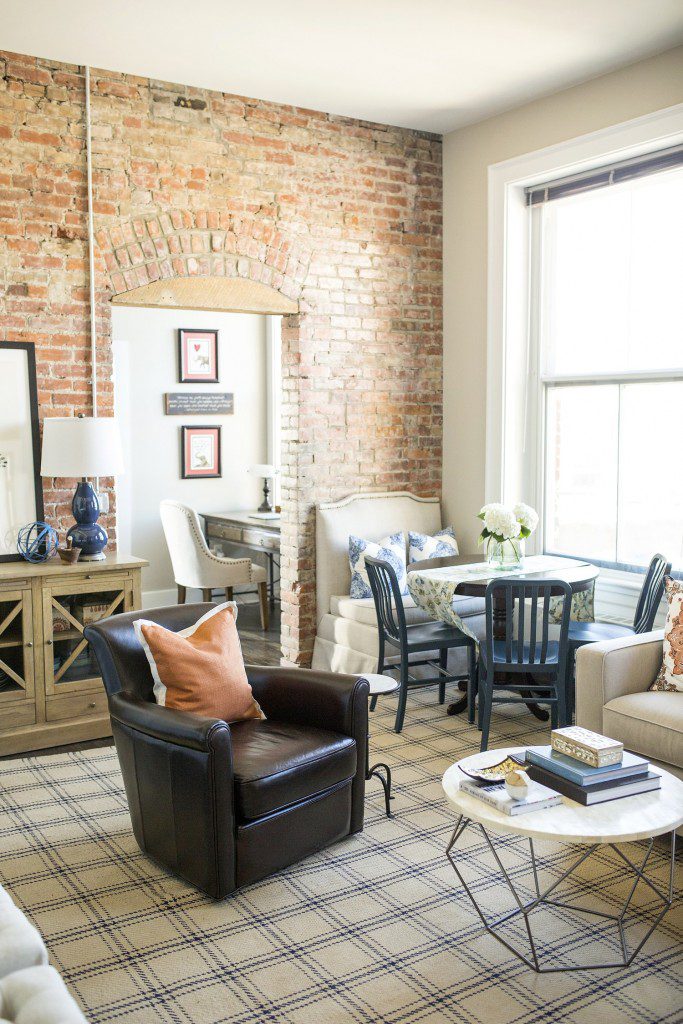
My client’s son desperately wanted a bunk bed and we found this affordable option that we plan to paint a deep navy blue. {Hale Navy by Benjamin Moore, to be exact.} The green you see at the top of the board will be the walls and is Raleigh Green, also by BM. The red will show up in the bookcase, throw blankets and in a subtle way through the art. Toy storage can definitely be fun and colorful and I just love the idea of this red bookcase filled with books and woven baskets! The plaid rug on the board is a favorite of mine and is the Cooper Jute Rug in Navy by Dash and Albert. I used it in Project Vintage Gem and I can attest to its durability and soft jute material.

Project Vintage Gem

A living room with brick walls and a table

Photo by Sarah Heppell Photography

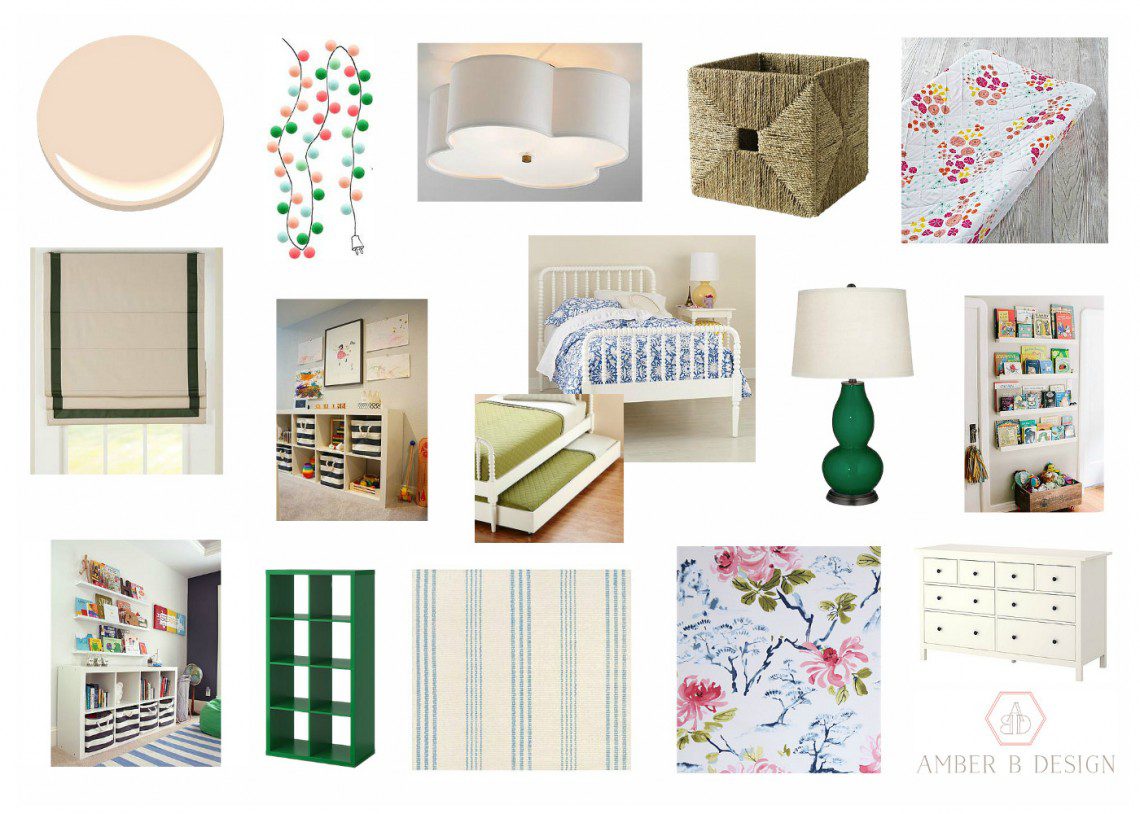
Next up, is the daughter’s room. She is transitioning out of a crib and this sweet, whimsical space will grow with her.

The Design Plan

A collage of different types of furniture and accessories.

Her space will have the entire color scheme shown in the round lights, changing pad cover and pillow fabric. The string of lights is so cool and is found HERE. With this site, you can customize the colors and length. I plan to have this installed above the dresser and around art that my client already has for the space. The stunning floral fabric is from my favorite go to source for fabric, Tonic Living. It is their Eastern Charm, Hibiscus fabric and it is gorgeous in person. That will be a huge throw pillow for the neutral bed. Green will play a role in this space, like the red did for the boy room. The same bookcase will be in a bright green for this room and I also replicated that color in the table lamp. Her bed will have a trundle component, so it has the same effect of a bunk bed, but can be tucked away when not in use. I have used the cloud like pendant in other rooms and I love that it is so versatile!

Aren’t kids rooms so much fun?!? 

Completed E-Design {The Basement}

April 5, 2016 by Amber Filed Under: amber b design, basement, e-decorating, e-design, kids and design, personal design style


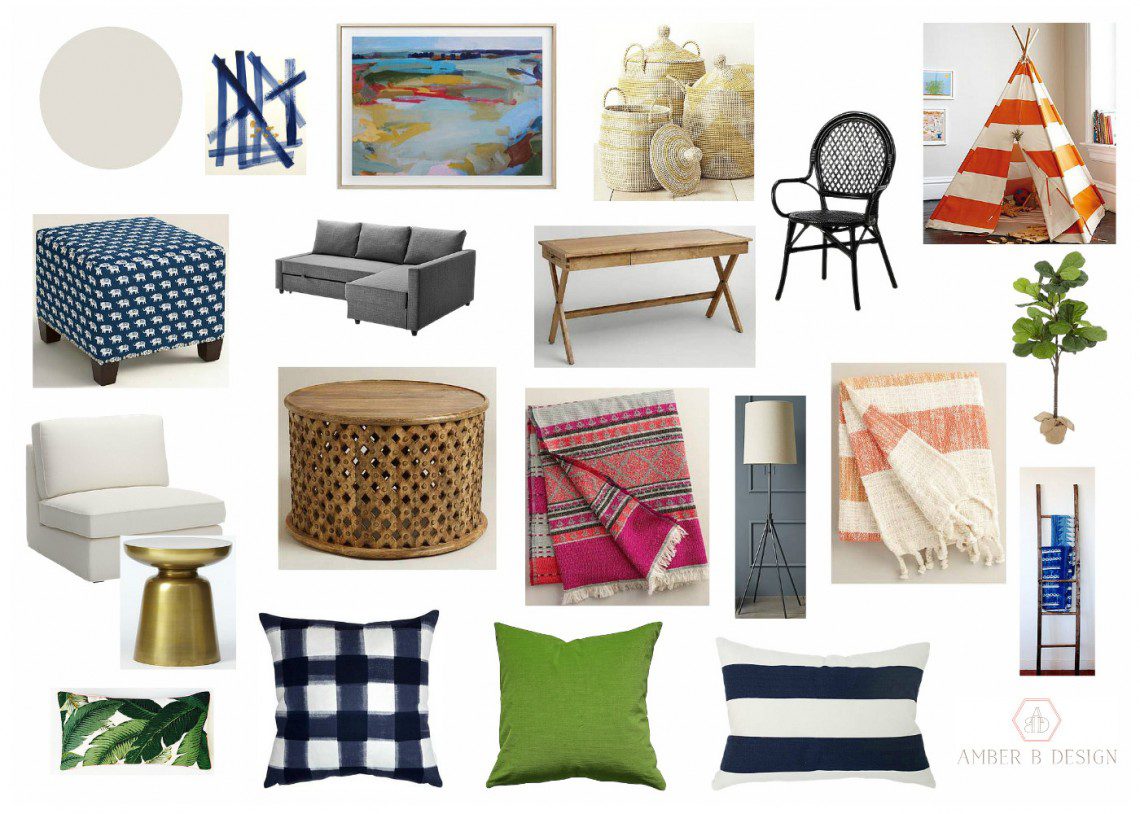
It is always fun to put together a design that both myself and the home owner love. As I constructed this basement plan in particular, I kept thinking, Wow, this is so them! I hope they feel the same way. Lucky for me, they did! This past year, I have worked with my long distance clients on their family room and children’s rooms. We have now moved on to their basement, which will do triple duty: play area for the kids, extra living space and a guest room. To save space and make this usable as a guest room, we chose a modular sofa that is a sleeper/sectional. My clients also wanted to go bolder with fun accent colors and make this room their style, but a more loud, eclectic version of their style. Here is the design plan I came up with…

The Design Plan


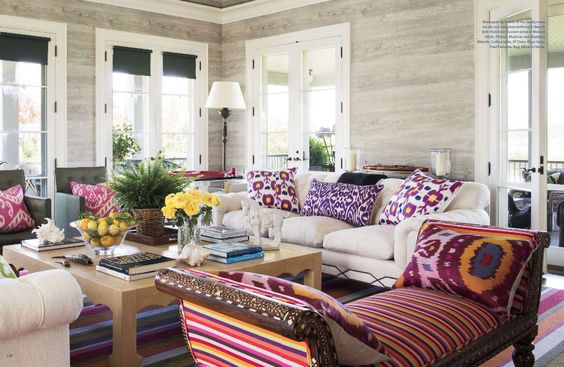
I just cannot wait to see this plan come together! I love the color mix from the pillows, throw blankets and accessories. The art print on the top of the board brings all of these colors together. I took inspiration from this fun, eclectic living space designed by the talented sister duo, Kirsten Kelli.

Inspiration

A living room with couches and chairs, tables and lamps.

Design By

What a fun jumping off point! I love that the base of this inspiration room is neutral, but the accessories are bold and don’t take themselves too seriously. It is a fresh, modern and eclectic space, which is what we were going for in the basement. To remind you of the family room design I did for my clients, I used the same fun colors that they enjoy, but in a more neutral way…

They wanted the upstairs to stay neutral and calm and take a more eclectic, bold approach in the basement. I will make sure to show any and all after pictures here! I will also reveal the kid’s room designs soon, too. Have a great day!

Completed E-Design {The Dining Room}

March 14, 2016 by Amber Filed Under: amber b design, design, e-decorating, e-design, personal design style


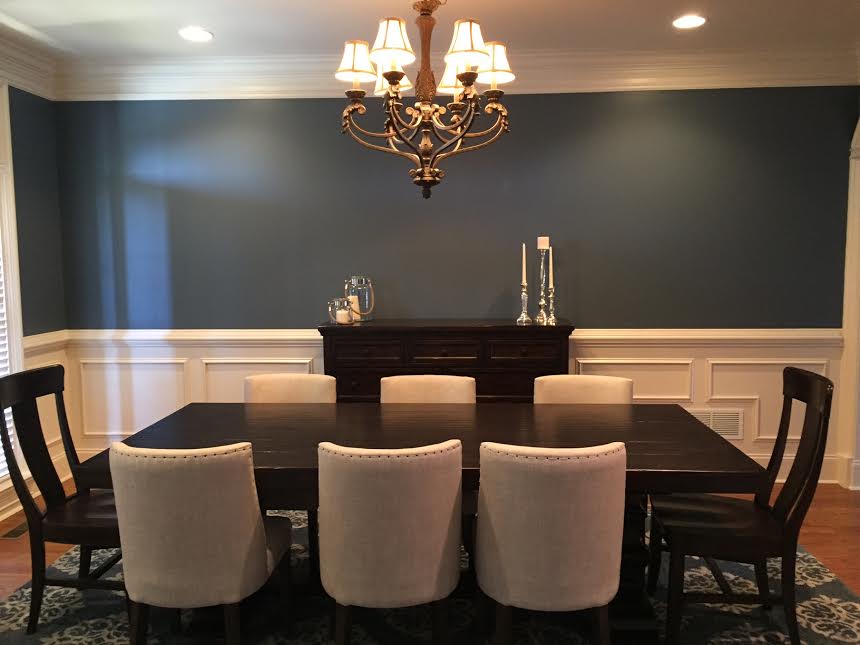
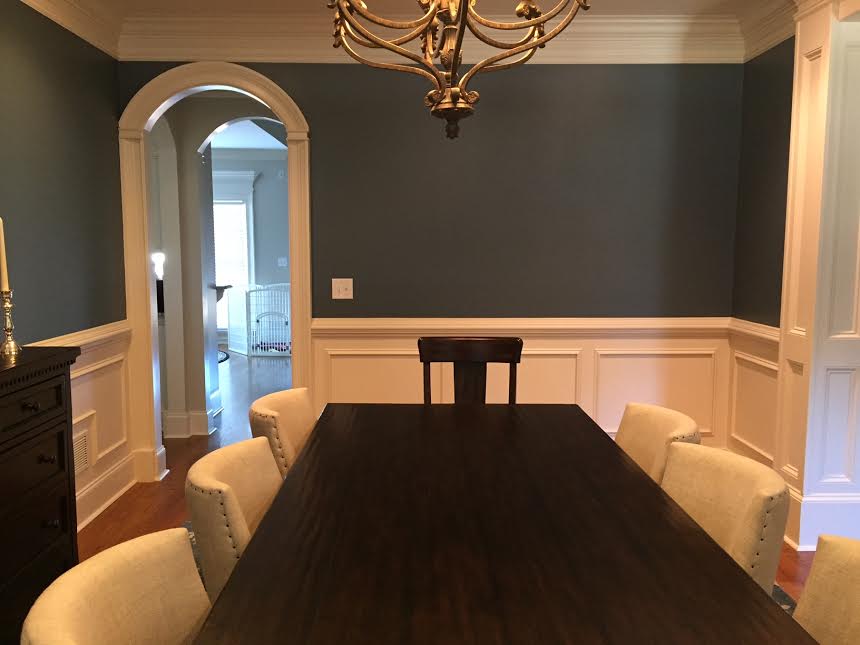
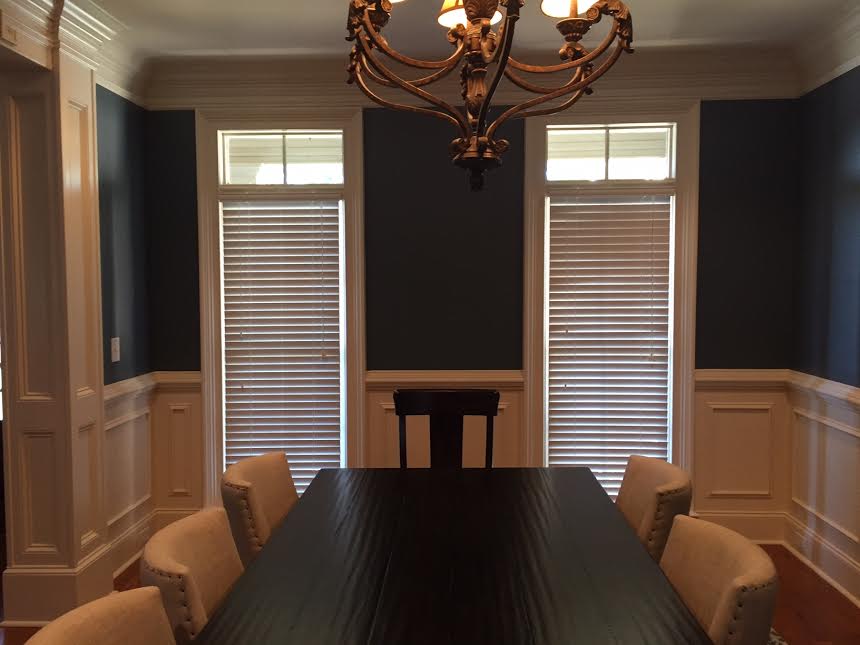
Today, I am excited to share a recently completed e-design project. I worked on a dining room design and my client was keeping some of the furniture and mainly needed help with the final accessories and pulling the room together. Here is the before pictures of the space…

Before…

A dining room table with chairs and a chandelier.


A dining room table with six chairs and a chandelier.


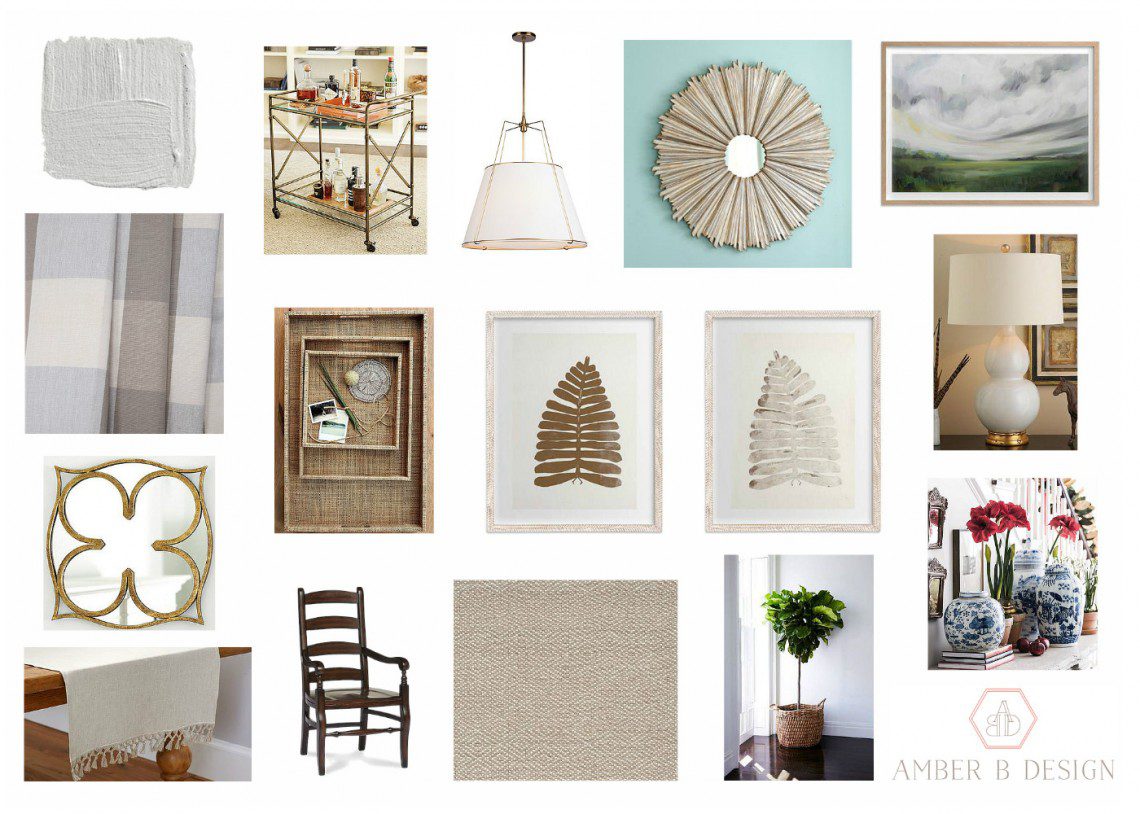
Isn’t this space absolutely stunning?!? I love all of the architectural details and molding. My client wanted to bring a more relaxed vibe into the room and make it a bit less formal. The moldings already take the room to a rather formal look, so I suggested lightening up the walls dramatically and adding some key accessories that will help make the space feel more casual and laid back, which is how the family lives in their home. My client definitely wanted to change out the chandelier to better fit their more simplistic style and I agreed. Here is the design plan I came up with…

The Design Plan

A collage of pictures with different types of furniture.


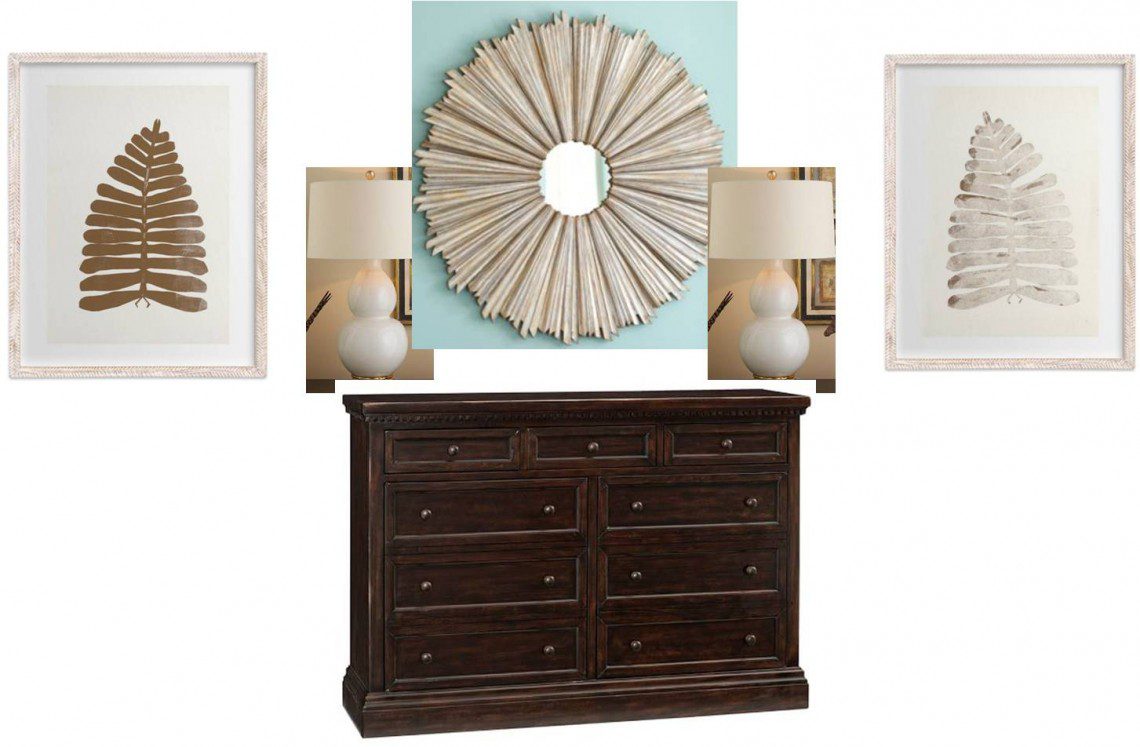
I am so excited that my client is thrilled with the design plan and is already in full swing with the changes. We are lightening up the walls, because although that deep navy is beautiful, it helps make the room feel formal. So we are replacing it with Horizon by Benjamin Moore, which is a very pale blue/gray. The new pendant from Rejuventation is the showstopper in the room. And the new textiles, including the four inch buffalo check fabric from Tonic Living will add a traditional, casual blend to the space. That fabric will be the new drapery panels and I can’t wait to see that transformation! We will replace the end chairs with similar options, yet with arms. I think the arm chairs will work better with the long table and overall scale of the space. Over the buffet, there will be a neutral vignette with an oversized driftwood sunburst mirror, gourd lamps and botanical prints. Here is a peek at the buffet vignette…

The Buffet Wall…

A dresser with two lamps and three pictures

A black and white logo of the letters b and d

I am excited to show some progress and after photos soon. And thank you all for your sweet comments about my mantel series post! It was a fun week and I was glad to be a part of it.

E – Design {Recreating the Master Bedroom}

March 4, 2016 by Amber Filed Under: amber b design, design, e-decorating, e-design, interior design, personal design style


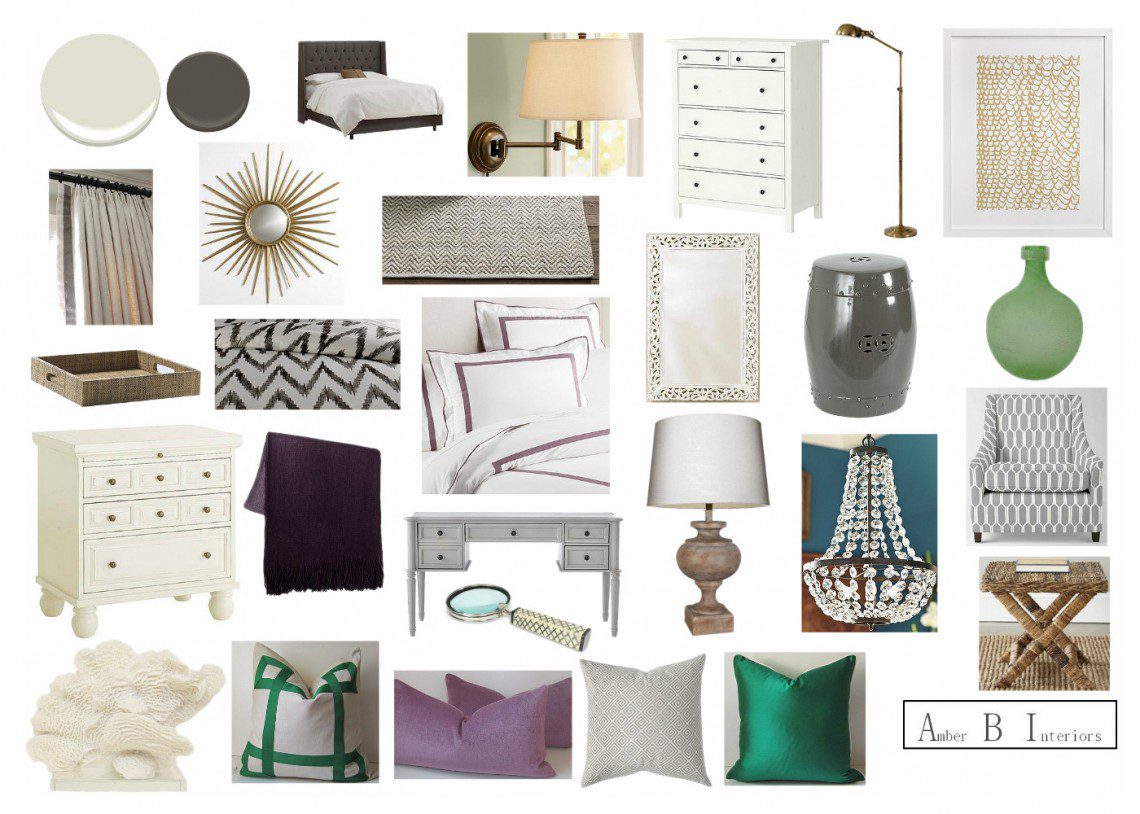
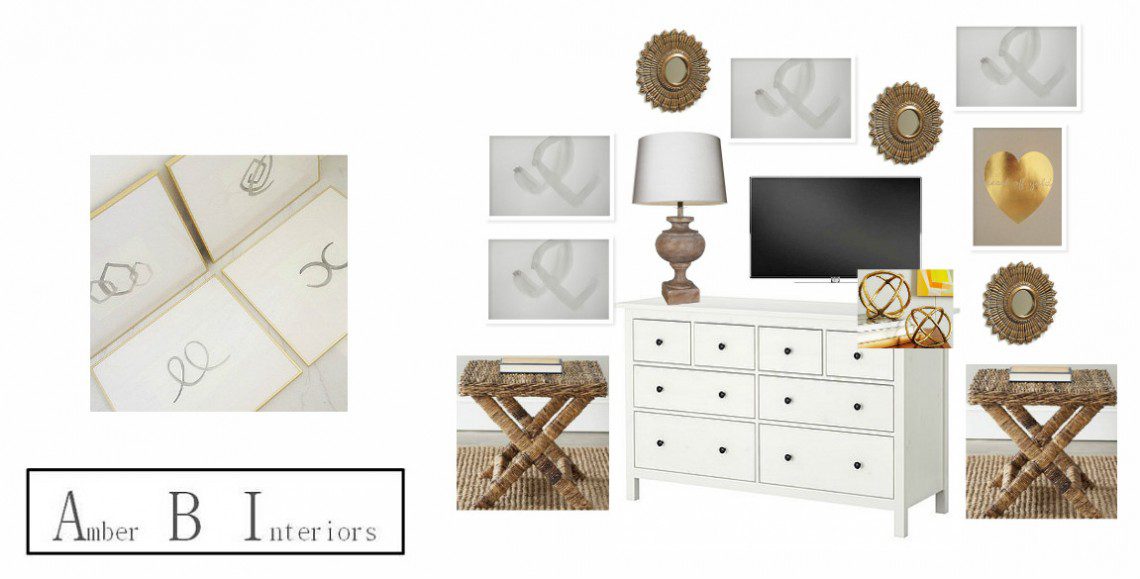
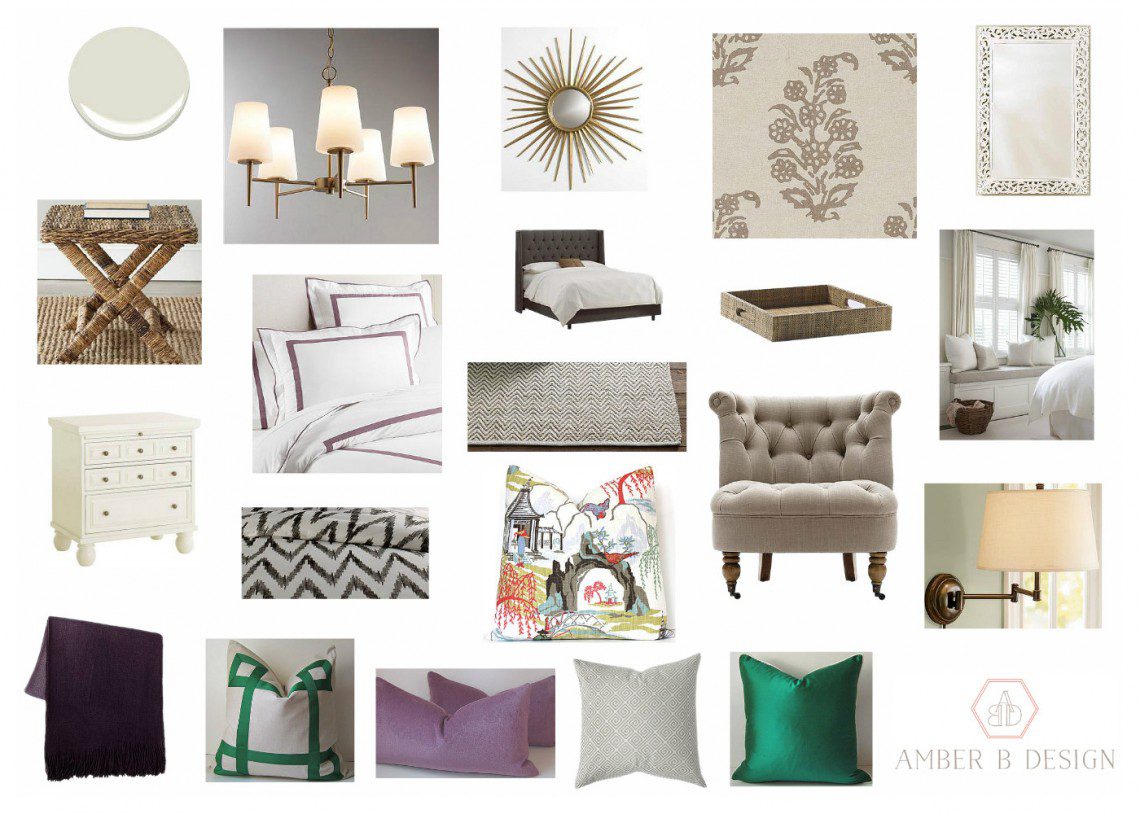
A while back, I created a master bedroom e-design for a client combining modern with traditional, chic with rustic and fun colors, such as lavender and emerald green. When my clients moved, they wanted to use as much of the design elements as possible for the new bedroom. We had to make a few small changes, so I thought it would be fun to compare the designs and see how items can transition from one home to the next.

The Original Design Plan

A collage of different types of furniture and accessories.


Dresser & Gallery Wall

A white dresser with a mirror and a lamp

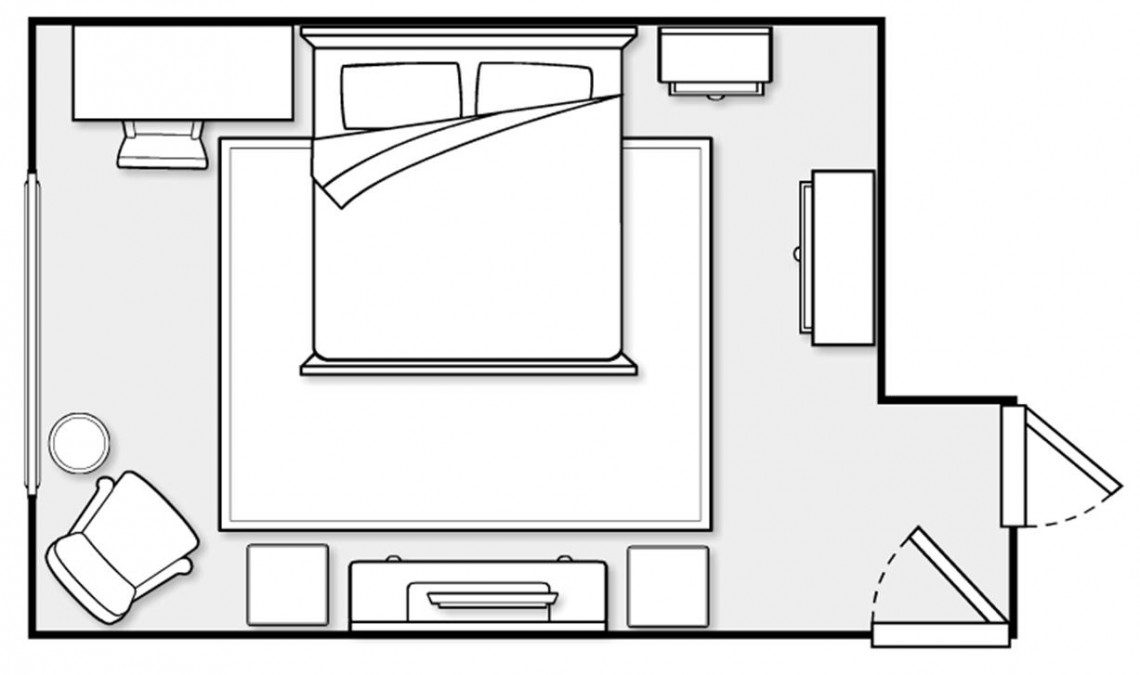
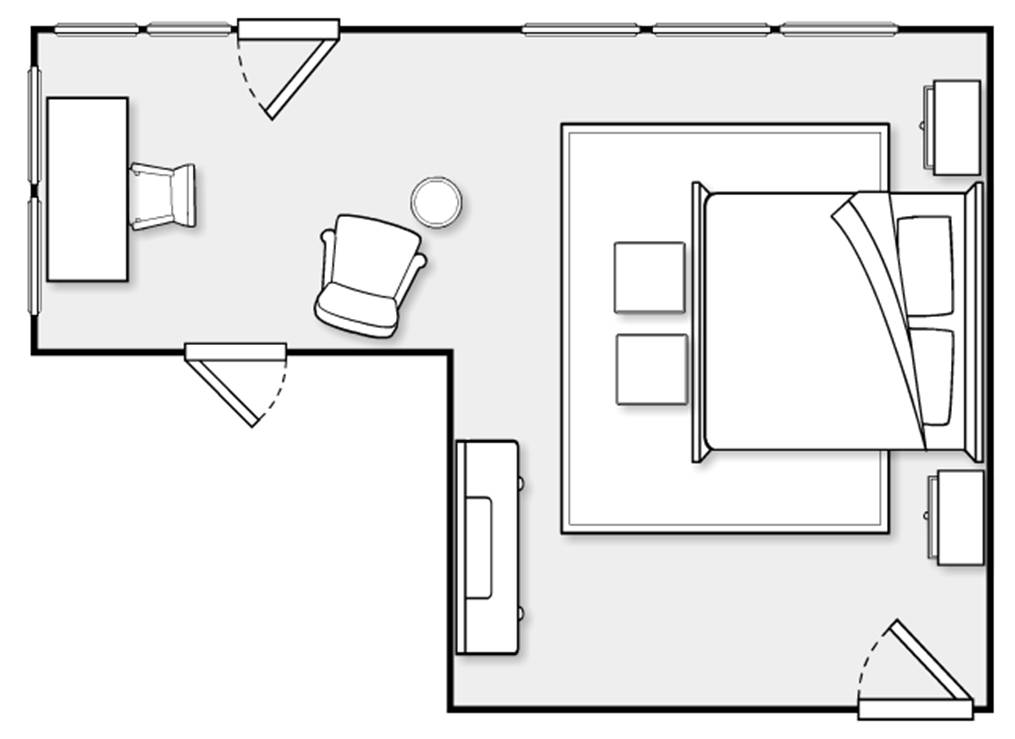
Original Floor Plan

A bedroom with a bed, dresser and tv.

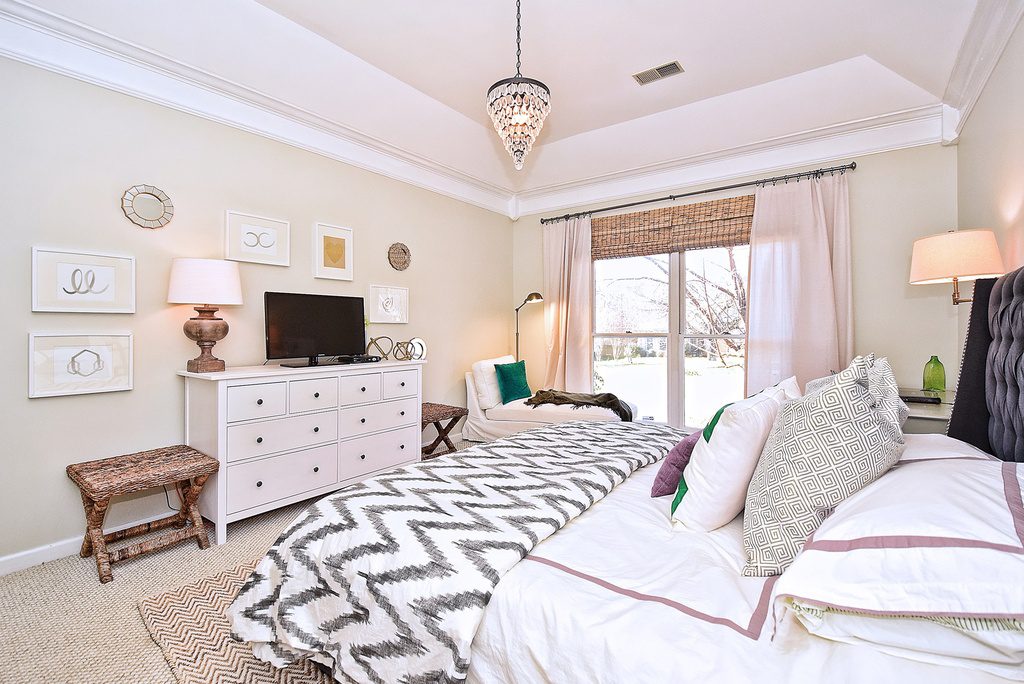
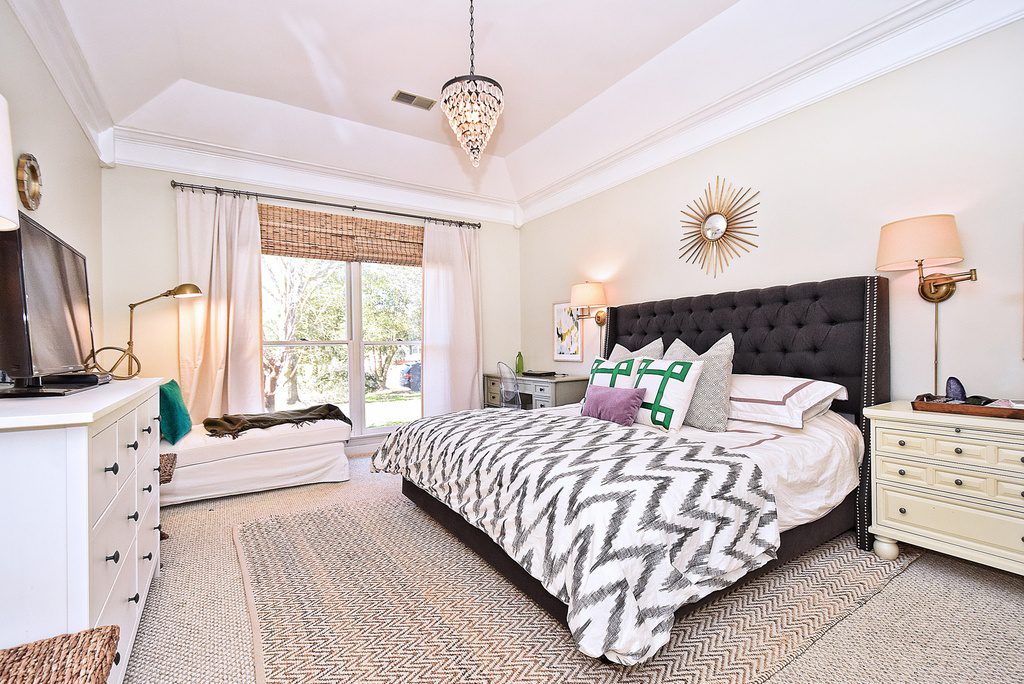
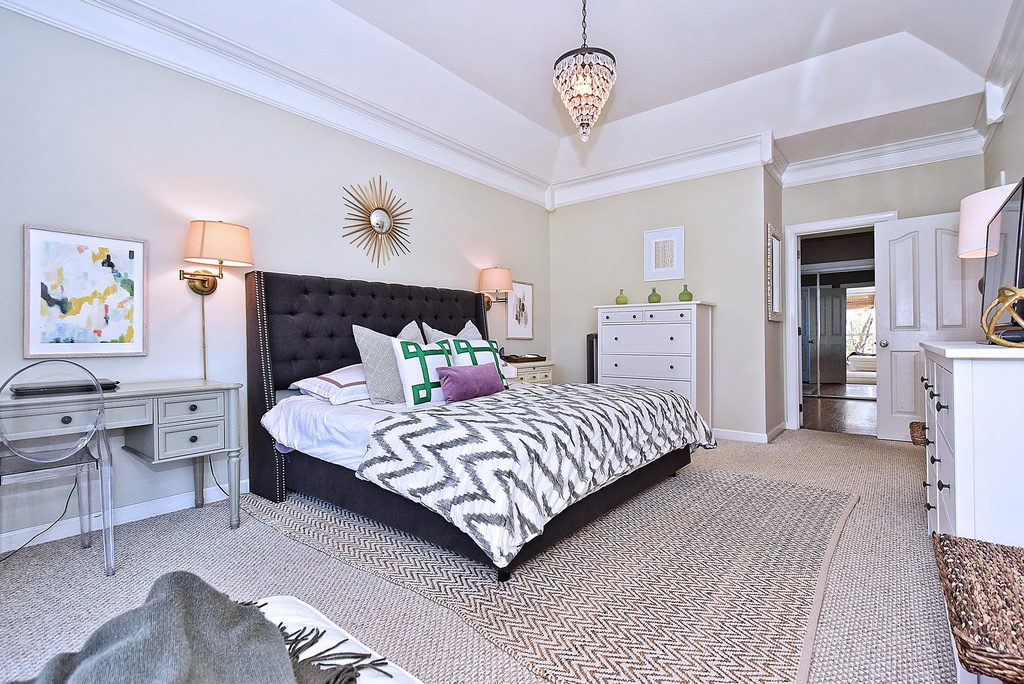
Do you remember when I wrote the post on this bedroom being photographed? To refresh your memory, here it is all complete, with photos by Danielle Benham…

A bedroom with a bed, dresser and tv.


A bedroom with a bed, pillows and a window.


A bedroom with a bed, dresser and mirror.

All after photos by Danielle Benham

The new master bedroom has a much different layout, so we made some changes to the furniture placement. Originally, the desk was a second night stand. With the new house, there is not enough room next to the bed for this wide desk, so we included the same second night stand, which was luckily still available. The desk will fit in the space, but in a small reading nook. I think it will be really pretty, as it will face out to a wall of windows! The tall second dresser will not fit in this space, so I suggested adding it in the closet. Here is the new design:

New Design Plan

A collage of different types of furniture and accessories.

The Floor Plan

A bedroom with a bed, dresser and tv.

Won’t that reading/desk nook be fabulous?!? There is so much natural light in this space. I can’t wait to see it all come together! We are going with the same wall color, Halo by Benjamin Moore, which she loved. We kept the bedding, but included a different pillow option, to switch things up. We had to select a new chandelier, and I love this Stiletto option from Shades of Light. The woven x benches will now go at the foot of the bed, as opposed to on either side of the dresser. All in all, we were able to work with almost everything the way it was. And that’s a refreshing thing to realize!

Make sure to come back next week for a fun blogger series I am excited to be a part of!

{Before and After} E- Design Reveal!!

February 17, 2016 by Amber Filed Under: amber b design, e-decorating, e-design, guest room, interior design


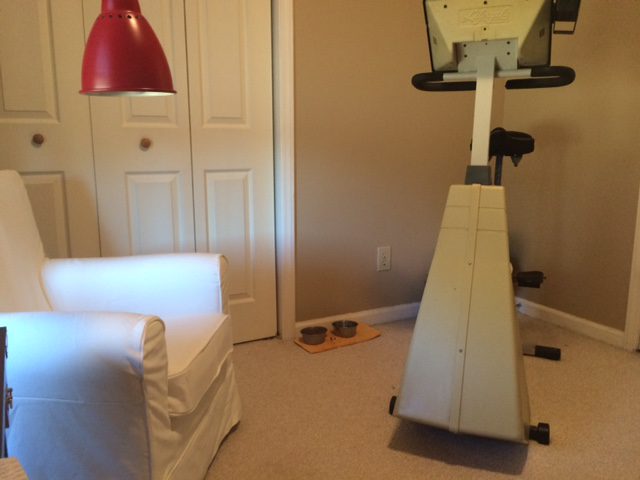
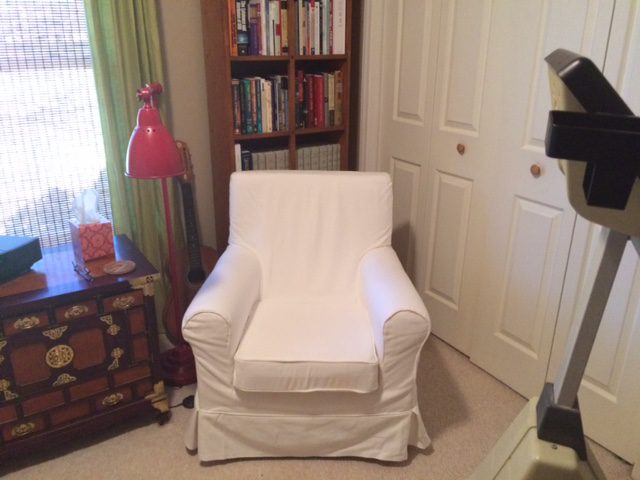
Before and afters are always so much fun to share! This particular client is near and dear, since we have worked together on most of the rooms in her home and even some spaces in her daughter’s home! She has always been one of the most supportive, sweet and gracious clients that I have had the privilege of getting to know. We worked on both her office and guest room during the same period of time and the guest room will be revealed today! We actually swapped the two rooms, as it made more sense to convert the office/hang out room to a guest room. It is in closer proximity to the shared hallway bathroom, which would be great for guests. So the before pictures will show an office, while the afters are all about the guest space! Here we go!

Before

A room with a chair and a television.

A white chair in front of a bookcase.


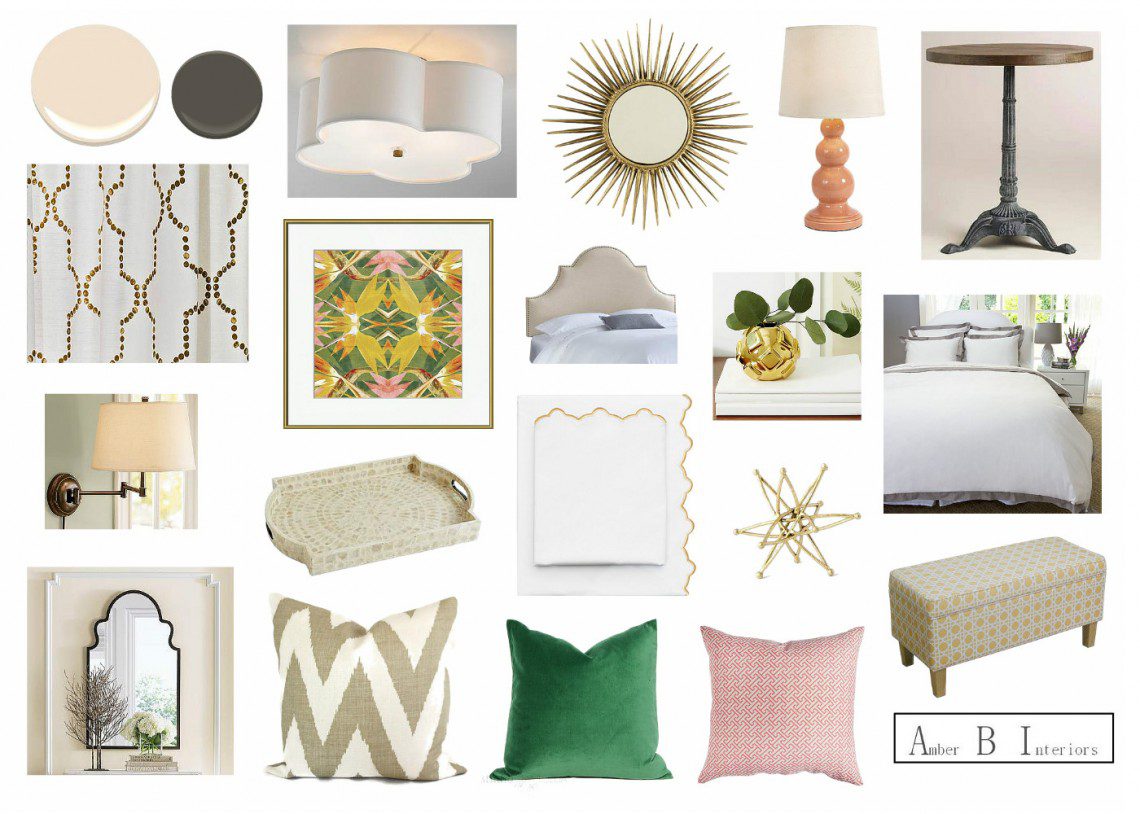
The Design Plan


A collage of different types of furniture and accessories.

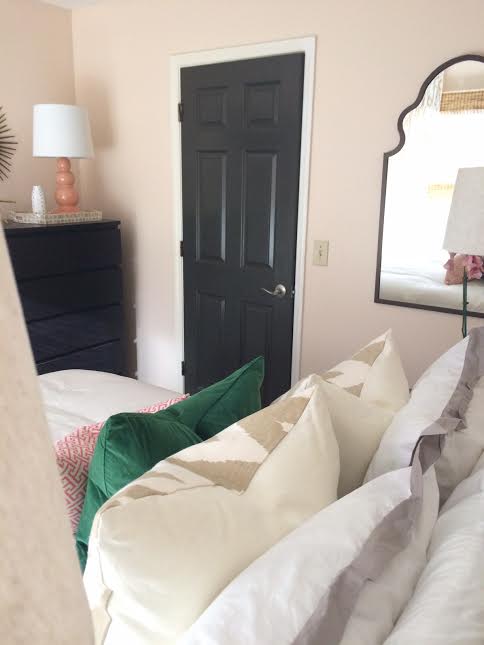
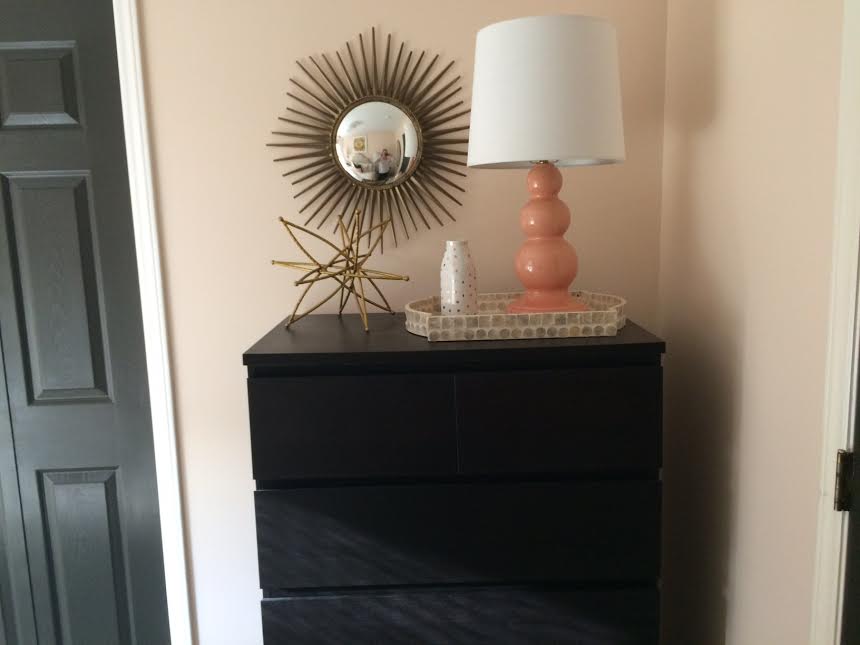
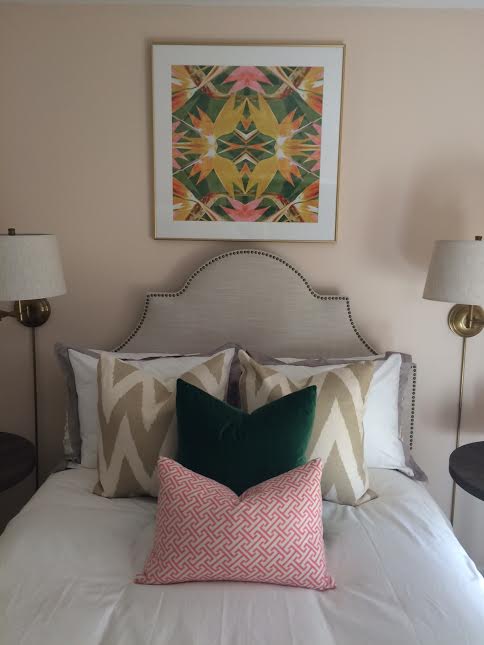
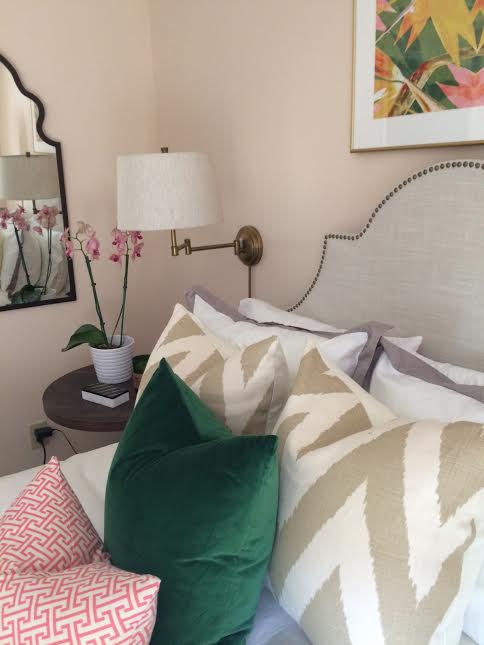
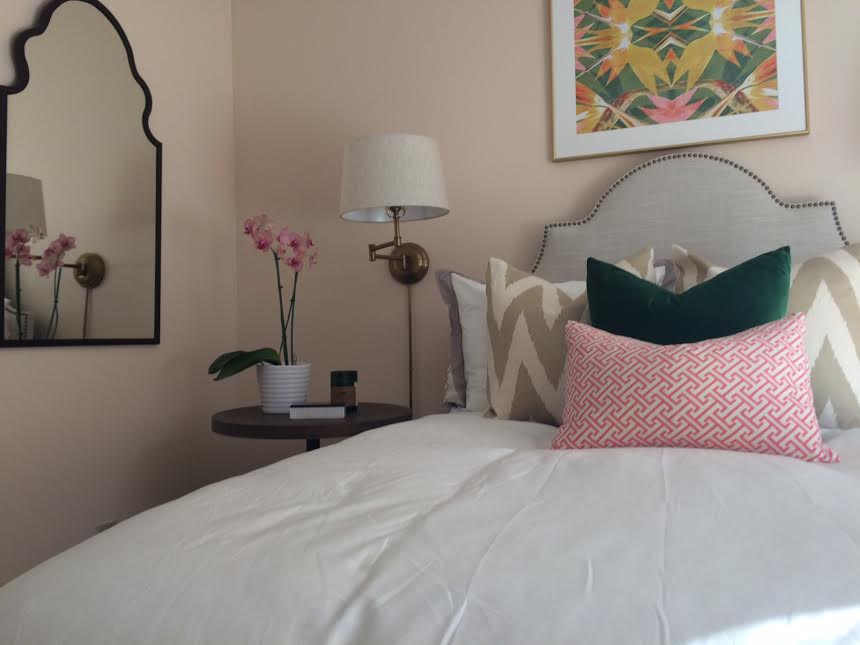
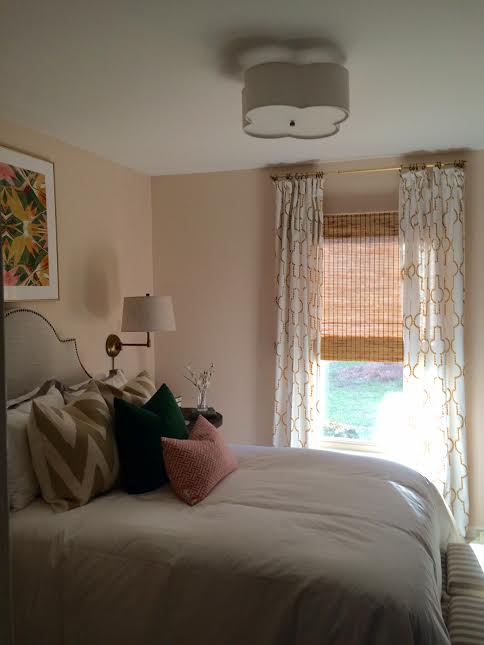
My client wanted a serene, delicate retreat. Her daughter will use this guest space when she visits, so the pink and green color combination was right up her alley! We kept the bedding and walls neutral and added color through the art, pillows and accessories.

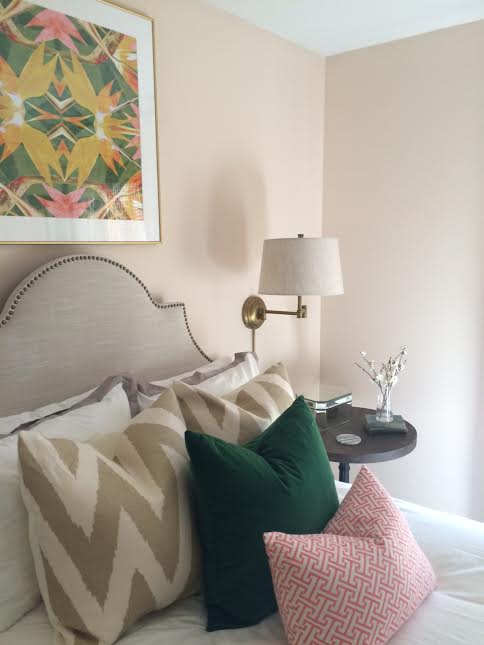
After

A bed with pillows and a lamp on the wall.

A bedroom with a bed, dresser and mirror.

A dresser with a lamp and mirror on it

A bed with pillows and a lamp on top of it

A bedroom with a bed, nightstand and lamp.

A bedroom with a bed, nightstand and lamp.

A bedroom with a bed, lamps and curtains.

I am thrilled they are so happy with the design! I love the whimsical cloud like ceiling fixture and the way the colors from the pillows work with the gorgeous art. Painting the doors a dark color makes standard doors feel more custom, which is always a fun trick. There are striped ottomans that double as storage, at the foot of the bed. That is so helpful in compact spaces. It is always fun to see an e-design project from beginning to end. Thank you so much to my client for sharing these with me!


Bonus Room E-Design Plan

January 29, 2016 by Amber Filed Under: amber b design, design, e-decorating, e-design, floor plan, interior design, kids and design


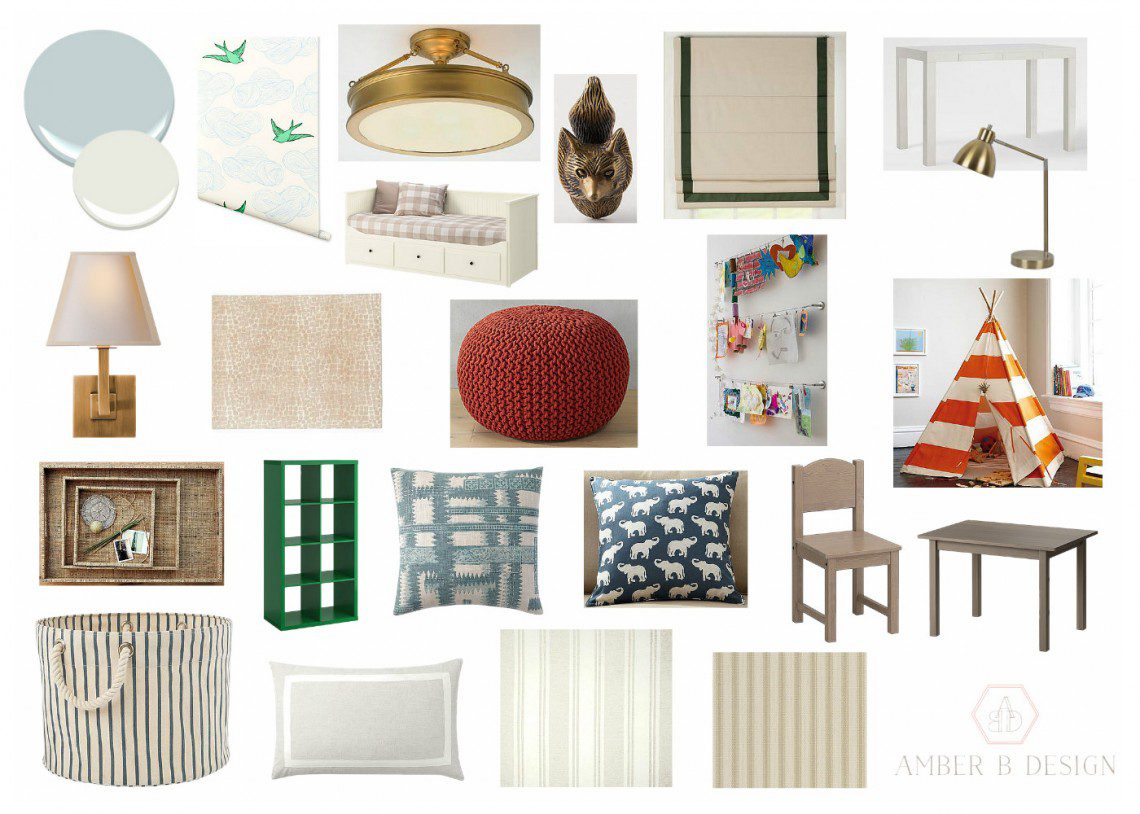
I am excited to reveal the design plan today, for a client’s bonus room! You may remember this client from her first home, HERE. We worked on a few of her rooms in her first home and I even got a chance to see the real estate after photos. Now with her new home, she’s looking to make one bedroom do double duty and have it as a play room for her kids, as well as a guest room. Let’s get right to the design plan…

A collage of different types of furniture and accessories.


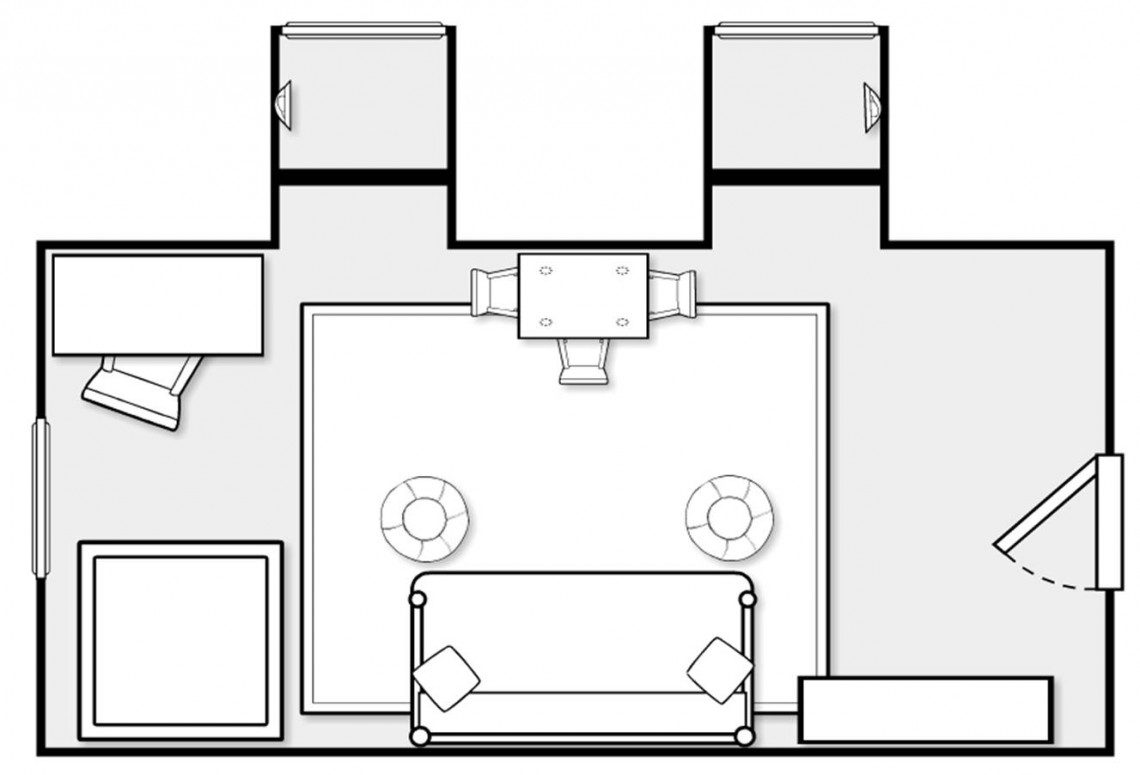
I just love that this space will be colorful, neutral and have loads of texture and function. There will be spaces for toy storage, creative play, a place to display art work and even a day bed that conforms to a double bed for guests! There will be a lot packed into this space and you get to see how it’s laid out in the floor plan, below…

A drawing of a living room with furniture.

Amber B Design

Do you see how the walls pop out with two windows? Those are the dormers in the space and will soon be spots for new built in seating, wall sconces and ledges for books! Eeeek I can’t wait! The room has dramatic slanted ceilings, which we will make more visually pleasing with Hygge & West’s Daydream wallpaper in Green. Ohhh so lovely!! I look forward to showing you the process along the way. Thank you to my amazing client for allowing me to show the journey! Stay tuned…

From Concept to Reality with E – Design

January 15, 2016 by Amber Filed Under: amber b design, before and after, design services, e-decorating, e-design


I am excited to share this post with you today, as it gives an inside look into the e-design experience. I have shared the projects that this client and I have worked on before, but this update is pretty special! I have been working with this sweet client on a few of her rooms and she just recently put the house on the market! She kindly shared with me, the photographer’s pictures of the home, including the rooms I designed! It was fun to see the photographer’s vision and also take a look back at where the room started, as well as the original design plan. So, here we go!

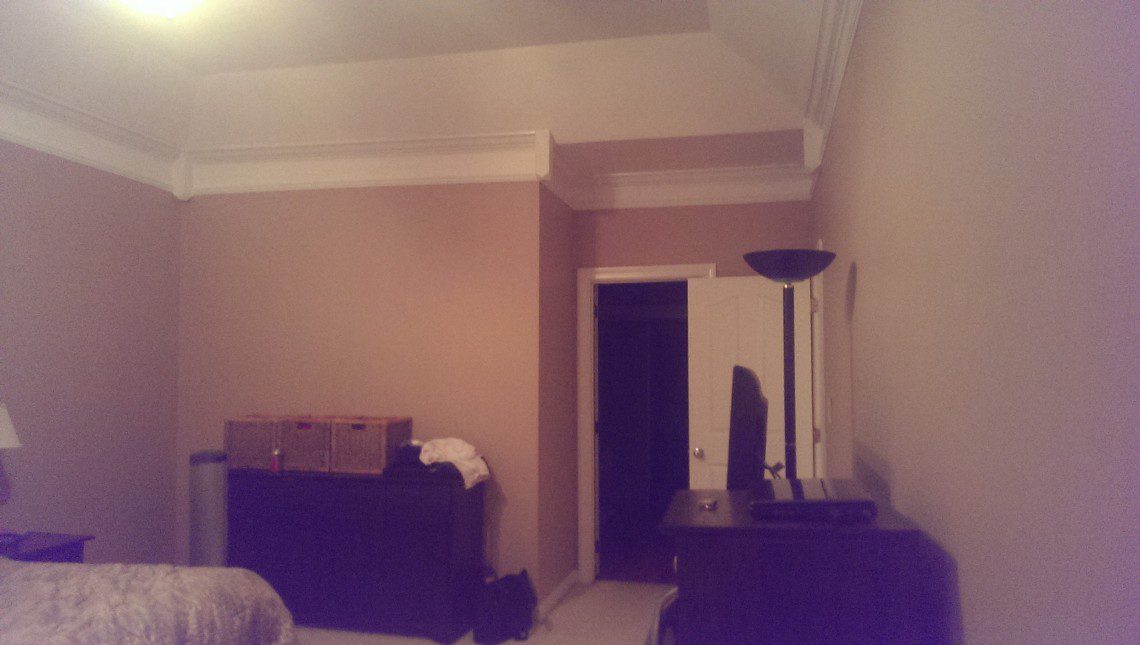
My client and I originally started working together when she asked for help with her master bedroom. Here is a before picture of the space…

Before

A bedroom with two windows and a bed


A room with a couch, dresser and tv.

My client loves a blend of modern with traditional and even a splash of eclectic bohemian. Here is the design plan I came up with…

The Design Plan

A collage of different types of furniture and accessories.

I also included a gallery wall mock up for the wall space around the television…

A white dresser with a mirror and a lamp

Here are the fun after photos taken by photographer Danielle Benham…

A bedroom with a bed, pillows and a window.


A bedroom with a bed, dresser and tv.


A bedroom with a bed, dresser and mirror.

After Photos by Danielle Benham

Isn’t that fun to see the concept all the way to completion?!? I just love it! But we’re not done yet! I also helped her with her first floor bathroom. This was an amazing transformation, with new flooring, additional molding and tiles removed from the walls. Here is where we started with the room…

Before

A bathroom with a toilet, sink and mirror.

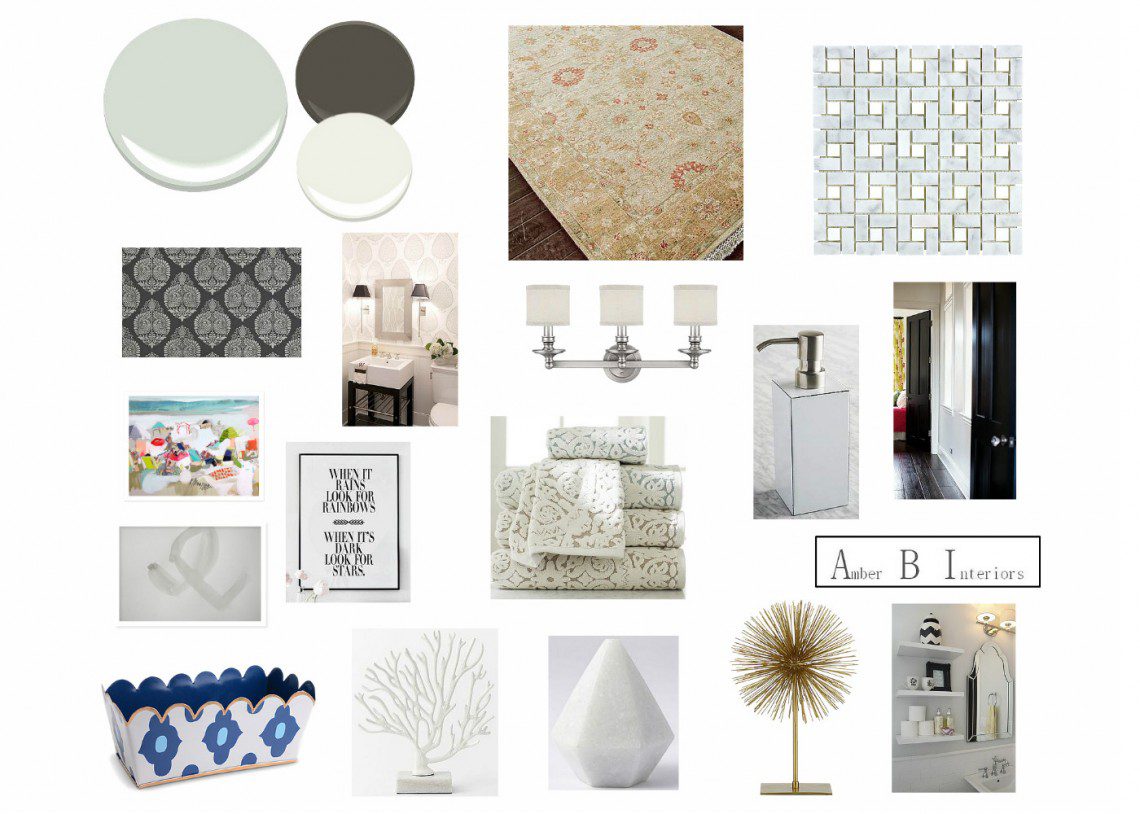
Almost everything was replaced in this space! Here is the design plan..

The Design Plan

A collage of different types of furniture and accessories.

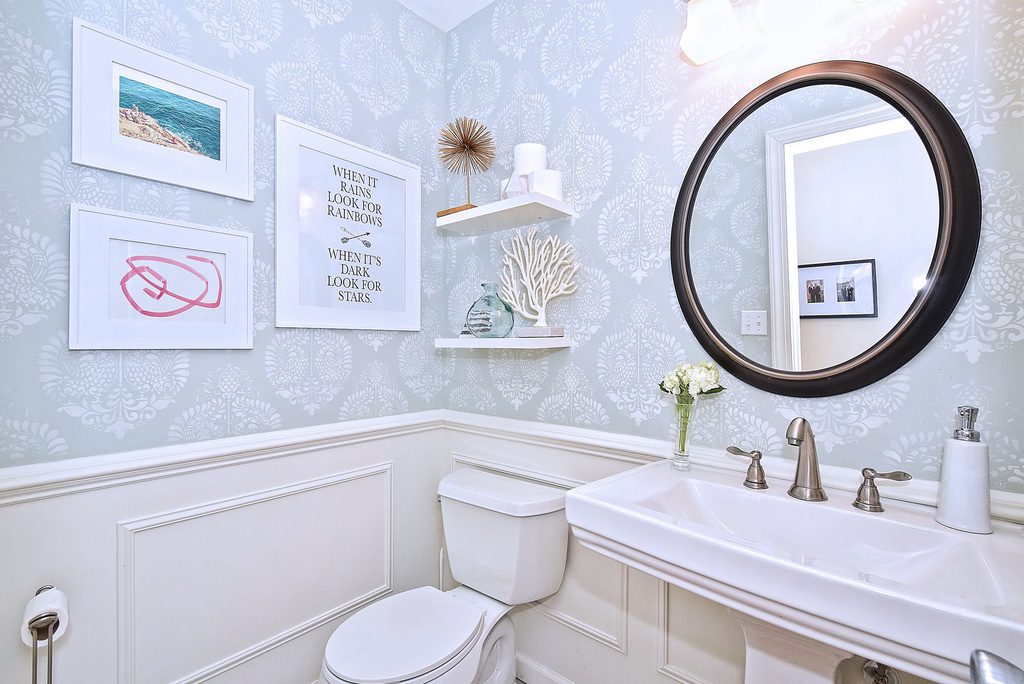
And here is an after photo, taken again by Danielle Benham…

A bathroom with a toilet, sink and mirror.

I am thrilled with how this room came out! There is also a new marble floor that you can’t see in this image, but what a transformation! And that is a wall stencil- not wallpaper. What a great impact for under $50! You can purchase that stencil HERE. I am so happy with how it came out and super excited to hear that her house sold very quickly! My amazing client and her husband both did a great job implementing these designs. I am currently working on her bonus room in her new home and I can’t wait to show you those plans!!

Thanks again to my client for allowing me to share these pictures and to the talented photographer, Danielle Benham, for also letting me share her talents!


E – Design {The Living Room}

January 7, 2016 by Amber Filed Under: amber b design, design, e-decorating, e-design, interior design, living room


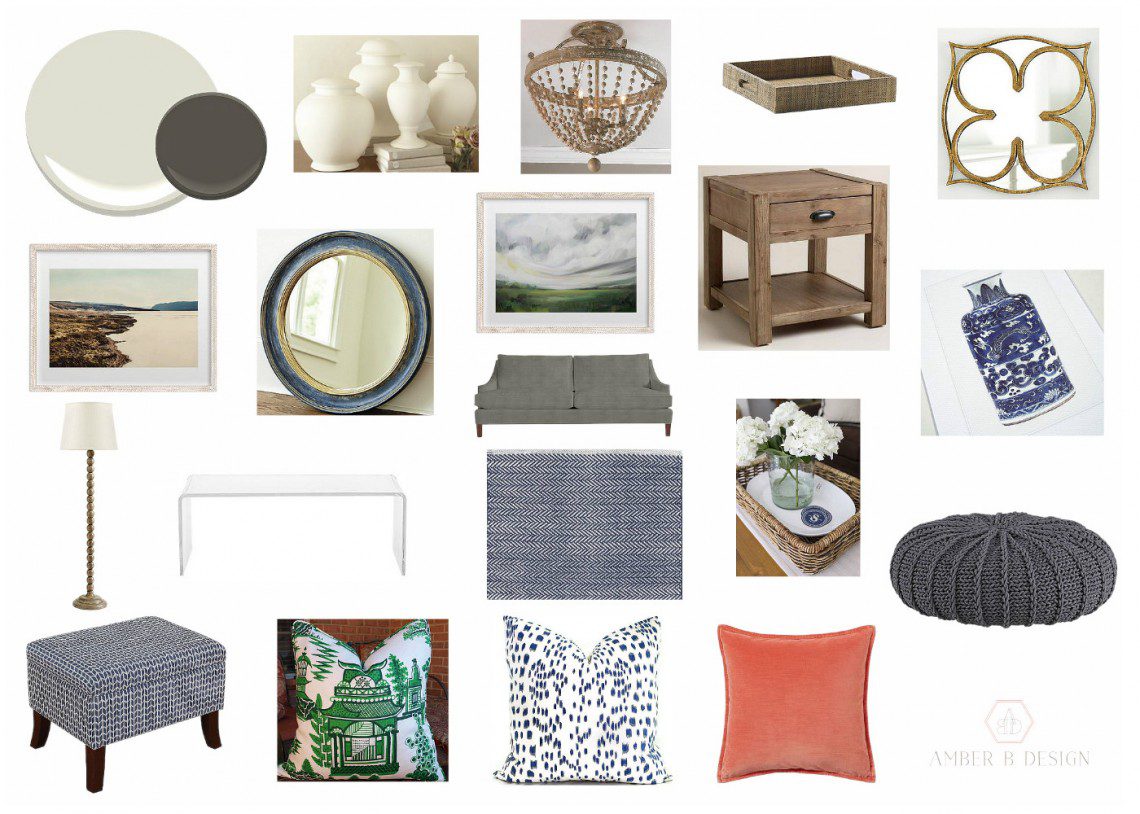
I recently completed a living room e-design for a family looking to bring some updates and changes to their space. Their living room is right off of the main entrance to the home, so it also does double duty as a small foyer. With the space being a bit compact, we had to get creative with space planning, the furniture size we used and accommodate functional design with their two small children. I am happy to say they are thrilled with the design plan!

The Design Plan

A collage of furniture and accessories in various colors.


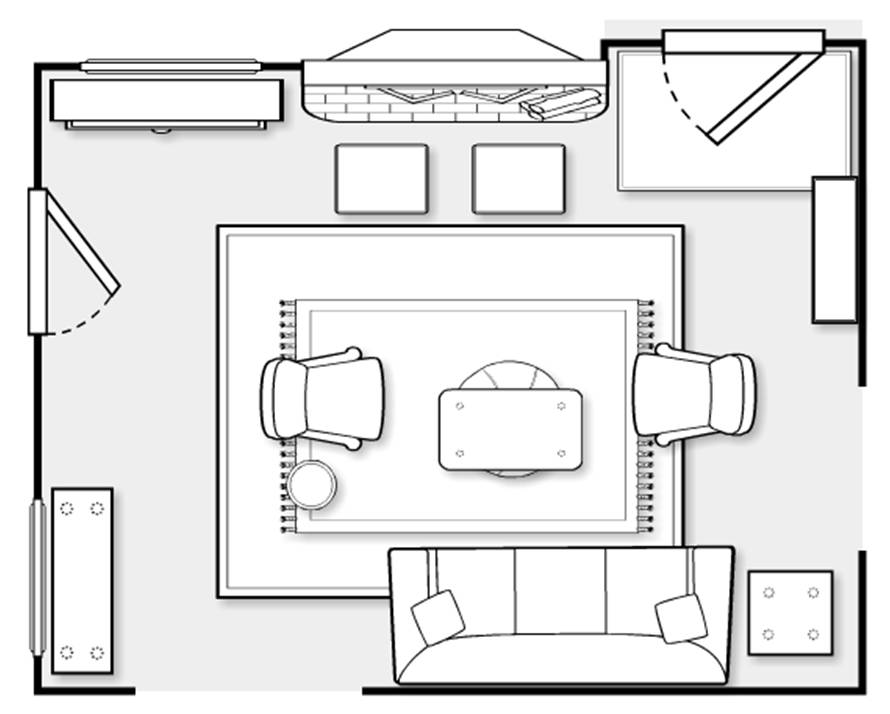
My client loves blue and green and adding those colors into an overall neutral scheme. Perfect, because that’s right up my alley! With their 8′ ceiling height, we wanted to replace their drab overhead light fixture with something fun. The semi flush pendant, shown on the top center of the board, will be a great replacement. The patterns and colors on the board are fresh and current, yet blend in with their traditional, rustic aesthetic, which is the combo they were hoping to achieve. I wanted to add an acrylic coffee table, to not take up too much visual space. Also, the gentle curves are functional with small kids running around. They can easily fit the gray knit pouf {right side of the board} under the table, when not in use. Luckily, we were able to fit a considerable amount of seating in this compact space. Using two upholstered navy blue ottomans {bottom left of board} in front of the fireplace, makes it easy to use as extra seating or a place to rest your feet. They are quick and easy to move around and they also do double duty as storage! Below, you will see the floor plan configuration that was selected…

The Floor Plan

A drawing of a living room with furniture.


The door on the top right corner of the floor plan is their main entrance. They already had a gorgeous antique hall tree for their coats and hats. We also used some of their vintage furniture pieces to bring that charm to the space and mix well against the modern fabrics. I can’t wait to see the result!

I am currently booking more e-design projects for 2016, but spots are filling up fast. E-mail me at [email protected] to get your project on the list. I look forward to working with you!
  • 1
  • 2
  • 3
  • …
  • 10
  • Next Page »
Welcome!
Hi, I'm Amber... a wife, mom and interior decorator. I am the writer of Simple Dwellings and the designer behind Amber B Design. Blog topics are all things design, with the occasional DIY attempt! Thanks for stopping by Read more...

  • Bloglovin
  • Email
  • Instagram
  • Pinterest
  • Twitter

Blog Posts, Straight to Your Inbox

Popular Projects

A dining room with white walls and wooden table.
A black door with white curtains and a red chair
A staircase with black and white chevron pattern on the steps.

Blog Love

  • Addison’s Wonderland
  • A Thoughtful Place
  • Alison Giese Interiors
  • Amber Interiors
  • Bailey McCarthy
  • Caitlin Wilson
  • Chris Loves Julia
  • Classic Casual Home
  • Cottage and Vine
  • Design Indulgence
  • Dwell by Cheryl
  • Eddie Ross
  • Elements of Style
  • Emily A Clark
  • Emily Henderson
  • Gallery No Eight
  • Hi Sugarplum
  • House of Jade
  • Jana Bek
  • Juniper Home
  • Kate Marker Interiors
  • Lucy Williams
  • Monika Hibbs
  • Our Fifth House
  • Pencil and Paper Co
  • Rachel Parcell
  • Rambling Renovators
  • Pure Style Home
  • Sita Montgomery
  • Studio Mcgee
  • The Makerista
  • The White Buffalo Styling Co
  • the Zhush
  • Traci Zeller
  • Young House Love

Copyright Amber B Design © 2025 ยท Design by Britt Douglas


Loading Comments...