Amber B Design Studio

Interior Design & Decoration for the South Florida region

  • Home
  • About
  • Services
  • Portfolio
  • Blog
  • Press
  • Contact

Customize Your Outfit With eShakti!

March 28, 2013 by Amber Filed Under: fashion trends


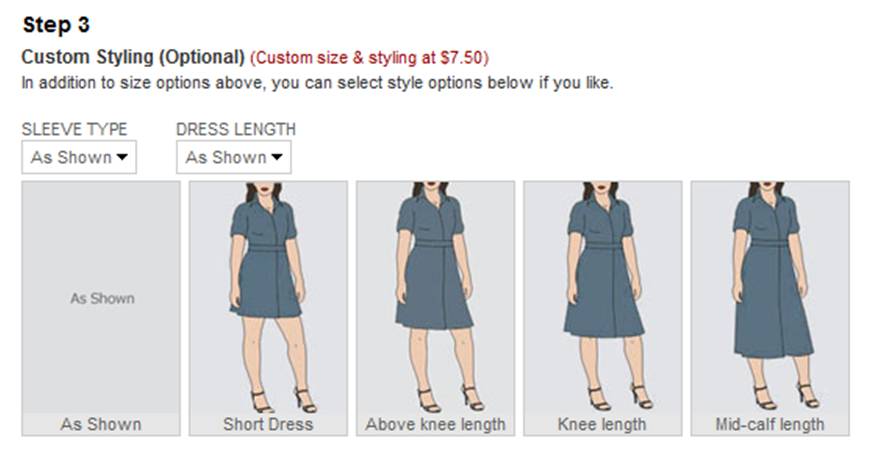
This is the second time I have had the privilege of working with eShakti, a clothing site where you can customize your order! It’s so much fun and so easy to do. When you’re on the site, you can click on a piece of clothing and make it your own… maybe you love the dress, but wish it had three quarter length sleeves instead of a cap sleeve. Or maybe you found the perfect blouse, but wanted to change the neck line to better suit your style. You can do that all of that on this site! When a representative from eShakti contacted me again to allow me to customize my own outfit, I was all for it! I wrote about my first experience with the company here, where I chose a pretty blouse. I was impressed with the quality and craftsmanship of the blouse, as well as the speedy delivery. This is what I chose this time around…

via
It is their Ruched Front Knit Dress and can be found here. It is currently out of stock, but if you’re interested, I can find out when it’s back in stock. I wanted to try their customized settings, to see how that process works. When you choose a dress, you can immediately scroll down and customize on that same page…
Style of Sleeve
I chose the sleeveless option, since I knew this would work great for the summer. The dress has a soft jersey knit/ cotton material, so it will come in handy all summer long.
Dress Length
I decided to keep the dress length as is, since I already liked the length. That’s all there is to it! So simple, and I love the result! Here is a photo of the dress via instagram…
You would never know there was another style before! When the dress came, I was pleasantly surprised with the hidden side zipper and pockets. The material is very soft, too!
There are so many options with this site! Start your shopping and customizing HERE!

{E-Design} Adding the Accessories

March 27, 2013 by Amber Filed Under: design, e-decorating, e-design, personal design style, styling


As I’ve written in past posts, putting a room together is really all about the accessories. I recently wrapped up an e-design project where the client had the main furniture pieces for her master bedroom, but just needed to add the fun details. We started with her nightstands. I wanted to create a his and hers side, to make the space feel more meaningful and work with their own personal styles. Here are the options I gave…

Option 1

Option 2

Both options include a vase of fresh flowers, because I think that’s a great way to bring warmth and personality to any space. Both options also include whimsical, rustic and glam elements, to create both a masculine and feminine style. Adding accessories that are unique and fun take a space to the next level. You can find great vintage accessories like these from this great shop.

Next up, we chose blankets for the foot of the bed. I gave options that were both serene and calming and those infused with color. Here is the board I presented…

I also threw in a great pillow option for good measure, because you can never go wrong with this textile line.

We also styled the dresser. Here are the two options I presented…

The room is already beautiful, so we wanted to accentuate that by adding texture and unique accessories.

She is thrilled with the boards and has already started the fun accessory shopping!

{DIY} Backing Shelves With Wrapping Paper

March 25, 2013 by Amber Filed Under: design, DIY, shelf styling, style


In my last post, I mentioned that I was looking for a floral paper to use for the back of my secretary shelves. After reading Emily’s suggestion to try a bright floral, I knew this would be a great option for the room. The wood is a very dark mahogany which I love, but the accessories were getting lost in the space.

Before the Paper

I didn’t want to choose anything permanent, because I didn’t want to ruin the wood finish on the antique piece. How can I make this paper removeable without compromising the wood underneath? Blog friend Pam suggested using double stick removeable poster tape. I went to Jo Ann fabrics, and did just that! While I was out, I thought I might browse through their fabrics to see if I could find something to line the back of the shelves with. I did find some great fabrics, but didn’t want to spend $20-$40 on something that I might want to switch out later. {By the way, did you know that Jo Ann Fabrics now sells an HGTV line of fabrics? They are pricey, but beautiful! I think I’ll wait for a great sale!} So back to the drawing board. I left with the tape and decided to go into Target, since they usually have pretty cool wrapping paper. And there it was- a beautiful vintage looking wrapping paper for $3.99! I immediately loved it and decided this was the one! And if I didn’t love it on the desk, at least it would be great for wrapping presents. Here is the paper and tape I found…

The Materials

Since this paper has a white background, I knew it would brighten up the dark wood and make a difference in how the accessories stand out. Luckily, the shelves slide right out, so it was easy to place one large piece of paper on the back of the shelves. Here is the process..

Without the Shelves

I needed about a 2×3 piece of paper for this project. I cut it to size and made minor adjustments to the paper before attaching the tape to the back of the desk. I placed about 9 pieces of double stick tape to the back of the desk, making sure I got the corners and the center. When the shelves are put back into place, I knew that would also hold it well.

Attaching the Tape

Those little square pieces you see are the double stick tape. It was great to work with, because if I didn’t get the paper in the exact spot I wanted, it was easy to remove and start over. {Which happened about 3 times!} Here is the paper all ready and wating for the shelves…

Paper is Up

And here is the desk with the shelves installed…

Shelves Are In

And now it’s time for the accessories! I have been changing the styling since the paper went up, so I may even edit it some more. Theare are many options for shelf placement in this desk, so I can always adjust that later on. But here are the afters for now…
After


I have been having fun with this new change. What I love most, is that it’s versatile and can easily be changed when I come across a new paper or fabric that I love! All of the accessories were already in my home. I just shopped around my house and changed things up a bit. I only spent $3.99 on the wrapping paper! Just to recap, here is another before, without the paper…
Before
And After
Have you ever tried to use wrapping paper for projects that don’t include wrapping presents??

{Trendspotting} Whimsical Design

March 22, 2013 by Amber Filed Under: design, flowers, personal design style, wallpaper


If you follow me on instagram {AmberBInteriors}, then you know we just got about 6 more inches of snow last night! Really?? I am definitely ready for spring. So even if we don’t have spring weather here yet, I can think about warm days through design ideas. The new trend in interiors is leaning more towards whimsical florals. I love the sweet, inviting charm of flowers in any form. Here are some great ways to splash some whimsical design into your home…

via
Not many people can pull off florals as well as Bailey!
via
via
via
via
Flowers can also be incorporated in just the accessories, like the two images above. The above living room is awakened with vases of fresh flowers!
 ï»¿Our foyer
Have you embraced the floral trend?? Large or small doses?
When I presented my dilemma HERE about what to line the back of my secretary shelves with, blog friend Emily suggested in her comments to find a bright floral paper to brighten up the dark wood. I love the idea and I’m on the hunt! 

Styling Tips and Tricks

March 19, 2013 by Amber Filed Under: design, e-decorating, e-design, personal design style, shelf styling, styling


When putting together e-design boards for my clients or decorating my own home, my focus is always on the accessories. They are the icing on the cake and take a space to the next level. The accessories are usually what gets noticed when company is over and can be a great way to show your personal design style. They are also great when updating a room on a budget, because amazing accessories can draw your eye away from an old sofa or outdated furniture. Here are my tips and tricks for styling!

Layering is Key
When thinking about shelves, art can lean on the shelf while smaller accessories sit in front. Layering your accessories adds depth and dimension to your shelves. And they actually make your shelves look bigger!

Our Family Room
Balance and Texture
When restyling your shelves, it’s best to take everything off and start fresh. {Which is also the time I dust the shelves!} Shop around your home for unique finds with different shapes and textures. I always tell clients to pair something flat with something sculptural and the everyday with something unique. A tried and true styling trick is to pair a stack of books with a pretty sculptural piece on top!

Source: bstylewise.blogspot.com via Amber on Pinterest

The picture above also shows how you can color code your books to give that rainbow effect. It’s a great trick when you have so many colorful books. All of a sudden, it’s well put together and thoughtful!

Turn Your Books Around
If you want to give your shelves a more neutral look, turn your books around so the pages show! It’s a subtle look and creates a softer, more subdued feel in the room.

via
Line the Back of Your Shelves
To bring texture and another color or pattern to your shelves, line the back with pretty paper! You could go as easy as attaching craft/wrapping paper with double stick tape or line the back with wallpaper. You could also paint the back of the shelves, like the image below. If the back of the shelves were the wall color in this room, the accessories would not stand out as much.
Source: google.com via Amber on Pinterest
via
Mix Tall and Small Pieces
This is a great way to get that layered, collected over time look to your shelves. Pairing tall vases with small accessory pieces adds more depth and looks great!
via
I am in the process of choosing something fun to line the back of my secretary shelves. Since this is an antique piece and I love the wood’s finish, I don’t want to paint or permanently cover the back in any way. I am thinking of using some type of paper and attaching it with double stick tape. Any thoughts on color or pattern?
Our Living Room
I saw a faux bois paper that might work. Also, if you have any other better suggestions instead of using double stick tape, I’m all ears! Whatever you think is best to preserve the wood.

This Piece Has History

March 14, 2013 by Amber Filed Under: this piece has history


I am happy to return with another post from my series, This Piece Has History. If you read last week’s post, then you know it’s been about a year since this series was a regular on the blog. I wanted to bring it back to remember the importance of collecting and having things in a home with memories and meaning. Today, I am showing our secretary desk.

I love this piece of furniture, because it definitely has a fun past to tell! When my husband and I lived in Germany, I started going to flea markets and antique fairs to begin to fill our empty nest. One weekend, we went on a trip to the Netherlands and Belgium for their famous antique markets. I stumbled upon our secretary desk while at the market in Tongeren, Belgium. I loved it right away, as I had been recently browsing through magazines with similar desks. We drove to the markets in an SUV, so this filled the entire back of our car on the way home! I knew it would be a practical purchase for us, because we didn’t have a ton of space in our apartment. We were living in a 700 square foot apartment, so smart shopping was key! Not only was it beautiful, it became our desk for our laptop. Now that we are no longer cramped for space, the desk is now a place to store books and meaningful accessories. The coral was a gift from my mom, and the book it sits on was a gift from a dear friend. You may have heard me say before, that I am constantly moving things around in this house. Accessories don’t sit in one place for long. So now that the coral is here, I may need to shop for a new accessory for my living room dresser! The shelves are filled with pictures, including one of my husband when he was little.  This desk also holds some of my blue and white china collection that I started while living overseas. This may not be a furniture piece that we use every day, but it has meaning and special memories attached!

Some Pins I Am Loving

March 12, 2013 by Amber Filed Under: design, inspiration, personal design style, pinterest, style


I have been pinning like crazy on pinterest! There is so much great inspiration out there, so I thought I would put together a little collection of my recent finds, ideas I want to try and all time favorites.

Here we go…

via

If there’s space in your living room, I love the idea of adding a console behind the sofa that doubles as a desk. Even better, using inexpensive materials to achieve the look. This looks like they used plumbing pipes to make the desk legs. I hope to make bookshelves with a similar look for our home. More on that later…

via
In the right space, I love dark, moody walls. It looks like this bedroom gets a lot of natural light and has a great balance of creamy white, to tone down the dark walls. I will go moody and dark in our office this spring. This color to be exact!
via
I have admired industrial style chairs like these for a while! Nicole’s dining room is fabulous, and there are so many amazing elements in this room. I love the balance of the metal with the wood. This is the plan for our kitchen someday!
via
This bedroom is both stunning and casual! I love symmetry in bedroom design, and this styling has it down to perfection! I am doing some similar styling for a client’s bedroom, and this is great inspiration. I am also loving bird art at the moment, and these whimsical framed prints are beautiful in this space.
via
How sweet is the above image?!? I used a similar idea for a client’s dining room table, and I might just have to do this myself. When my mom and I head out to the antique fest this summer, I will be on the hunt for vintage glasses and vases to recreate this look! It’s simple, can be inexpensive, and you can use greenery from your yard! I feel a new dining table centerpiece coming on!
So that’s my inspiration for the week! Any great finds lately??

{A Basement Project} E-Design Progress Pictures

March 10, 2013 by Amber Filed Under: e-decorating, e-design


I love seeing an e-design project well on its way! This client is adding new modern features to her finished basement and will also be installing a brand new bar area. Today, I can show you the progress on the wall color, new pieces and the start of something fabulous! Let’s back up and look at the design board…

The Plan

The basement is basically broken up into three separate areas in an open concept floor plan. My client loves a blue and orange color scheme and already has some furniture and accessories to work with! We just added some more decor, a new seating zone and pops of fun color. Here are the amazing progress shots…

The walls now have a soft gray color that the client loves. The picture above shows the newly striped walls and the new seating area! There will also be a new bar being built to the right of this picture, which will take up more space and be a great spot for entertaining. The new slipper chairs face the bar area and will work well for gathering and spending time with guests!

The above console is a great find from my client. It’s not too deep, so it allows for great flow into the TV area. We just styled it up and hung her meaningful art above the console. When guests are here, my client can place food platters and snacks on this console!

For this small wall space, I proposed square concave mirrors, and my client was able to find these beauties while out shopping. I think they work so well on this wall and add great texture and shape!

On the center right side of the board, I reference a large scale photography print. This is the idea I have for my client for the wall space above the sofa. Large scale photography print is meaningful and adds a personal touch to the space. The inspiration photo I used on this board can be found here.

I have more to show in the future, so stay tuned! A special thanks to my client for allowing me to share these beautiful progress pictures!

Check Out This Painted Backsplash!

March 7, 2013 by Amber Filed Under: painting a tile backsplash, painting ceramic tile, painting grout


I would love to share an update about my painted backsplash… I have scrubbed it, cleaned it with kitchen cleaner and splattered sauce and oil on it- and it still looks as good as when I started! If you are living with tile that is not your favorite color or is covered in a design you don’t like… paint it! I was ecstatic to receive an e-mail from Lindsay, who writes the blog Living, Laughing & Loving. She had beige tile in her kitchen that she didn’t like from the beginning. She writes in her blog that while they were signing the papers with the realtor for the house, all she could look at was the beige backsplash! I am happy to announce that she has painted her tile white, and it looks amazing! Here is the before…

Before

 And here are the afters!

After

Kitchen Images Here

I love how this project looks nothing like paint- it truly looks like a newly tiled backsplash! To see how she completed this project and the materials she used, visit her post HERE. I’m so glad she went for it!

I was so happy to come across Lindsay’s blog. She has a beautiful home and the photos from her wedding are amazing! Here’s a little glimpse into what you’ll see over on her blog…

Living Room Image Here

Wedding Images Here
I look forward to following Lindsay’s blog! Stop by and say hello!

A Very Special E-Design Project

March 6, 2013 by Amber Filed Under: e-decorating, e-design


There are some design projects that come by where I feel so lucky and fortunate to be a part of. This particular project is a great example of that. A little while back, I was contacted by a young couple looking to rebuild their condo and put their lives back together after Hurricane Sandy. There was damage to their home and they had to part with meaningful pieces that they were not able to salvage. When they found me, they were mostly finished with the construction side and it was time to unpack and start fresh. The client was so sweet and mentioned in her initial e-mail that she wanted to do this for her husband, who had already worked so hard putting their lives back together. They wanted to finally focus on the fun part of this renovation and put the hurricane behind them. My heart sank and I couldn’t wait to help with this project. They were looking for some new accessories and some furniture for their living and dining rooms, since they were able to salvage most of the main pieces in these spaces. They like neutral with pops of color, and this is what I came up with…

The Plan

The client’s husband is able to make some pieces with reclaimed wood, so he will be building a mirror similar to the one seen at the top right side of the board. I can’t wait to see how it turns out! They loved the plan and I couldn’t be happier with their response! I am so excited for them that they can finally have fun with their space again! Thank you so much to my clients for letting me share their inspiring story.  ๐Ÿ™‚

  • « Previous Page
  • 1
  • …
  • 26
  • 27
  • 28
  • 29
  • 30
  • …
  • 69
  • Next Page »
Welcome!

Hi, I'm Amber... a wife, mom and interior decorator. I am the writer of Simple Dwellings and the designer behind Amber B Design. Blog topics are all things design, with the occasional DIY attempt! Thanks for stopping by Read more...

  • Bloglovin
  • Email
  • Instagram
  • Pinterest
  • Twitter

Blog Posts, Straight to Your Inbox

Popular Projects

A dining room with white walls and wooden table.
A black door with white curtains and a red chair
A staircase with black and white chevron pattern on the steps.

Blog Love

  • Addison’s Wonderland
  • A Thoughtful Place
  • Alison Giese Interiors
  • Amber Interiors
  • Bailey McCarthy
  • Caitlin Wilson
  • Chris Loves Julia
  • Classic Casual Home
  • Cottage and Vine
  • Design Indulgence
  • Dwell by Cheryl
  • Eddie Ross
  • Elements of Style
  • Emily A Clark
  • Emily Henderson
  • Gallery No Eight
  • Hi Sugarplum
  • House of Jade
  • Jana Bek
  • Juniper Home
  • Kate Marker Interiors
  • Lucy Williams
  • Monika Hibbs
  • Our Fifth House
  • Pencil and Paper Co
  • Rachel Parcell
  • Rambling Renovators
  • Pure Style Home
  • Sita Montgomery
  • Studio Mcgee
  • The Makerista
  • The White Buffalo Styling Co
  • the Zhush
  • Traci Zeller
  • Young House Love

Copyright Amber B Design © 2025 ยท Design by Britt Douglas