Amber B Design Studio

Interior Design & Decoration for the South Florida region

  • Home
  • About
  • Services
  • Portfolio
  • Blog
  • Press
  • Contact

DIY Chevron Stairs!

December 24, 2012 by Amber Filed Under: DIY, diy stencil, Featured


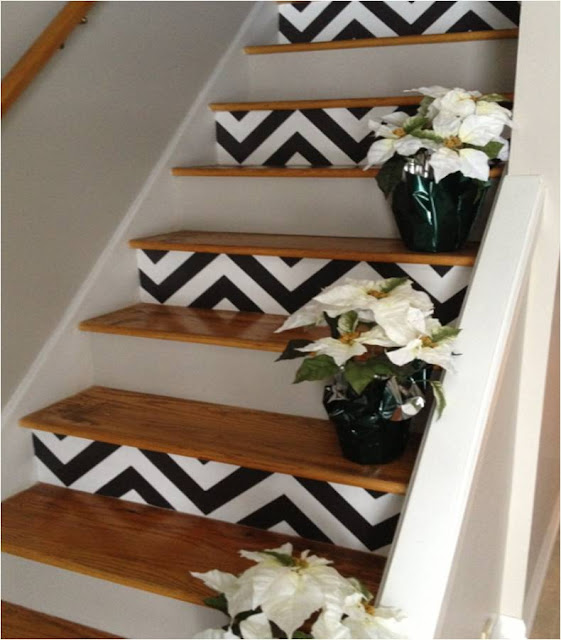
I wanted to check in and show you an amazing project my mom recently completed. This is one of those projects that I wish I could take credit for, but unfortunately, they are not my stairs. My mom painted these chevron stripes on the stairs, herself! I love the way they came out. It really stops you in your tracks the moment you walk in the front door.

Isn’t this project incredible?!? Chevron is no longer just for pillows and drapery! I also love this last image, which shows a glimpse into her wall stripes. I keep telling her she needs to start a blog and document these projects! I love that she painted every other stair. I think it’s the perfect amount of pattern. I also love that the alternating stairs are painted a soft gray, so there is not too much contrast. To follow the same step by step instructions she did, visit HERE.
An E-Design Before and After!

October 5, 2012 by Amber Filed Under: design, design services, DIY, diy stencil, e-decorating, e-design


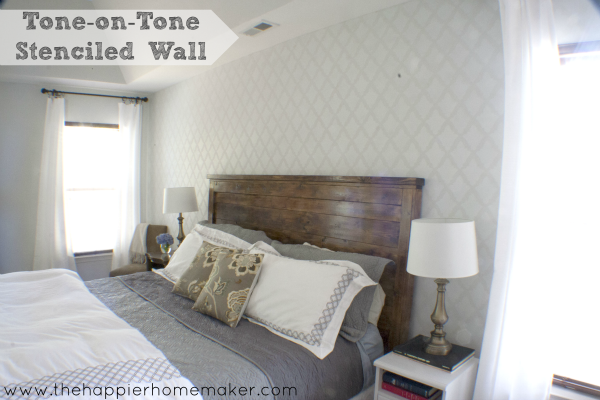
A while back, I ran a room design giveaway on my blog, and Melissa was the winner! She chose to make changes to her master bedroom, and she is well on her way! She has made so many great changes and accomplished a lot in a short time. Here is the before:

Before:

After in Progress:

After: Stencil Wall Complete!

Melissa has made amazing progress on her master bedroom! The stencil was tedious work, but she did a fabulous job. Originally, we were going to go with stripes for the bed wall. When Melissa had the opportunity to use a stencil, we went for it! I am so glad she took on this project- the results are so worth it! Melissa has a great DIY blog, The Happier Homemaker. Make sure to stop by and check it out. She discusses her stencil project HERE. She is currently running a stencil giveaway, so make sure to enter today!

Look What I Did – Stencil Alert!!

November 14, 2011 by Amber Filed Under: diy stencil, fall fix ups


Happy Monday! I am so excited to share this project with you today. I just wrapped up my first stencil project on a wall in our dining room. I have wallpapered before, as you can see here, but never stenciled. I was very excited when I was contacted by Royal Design Studios to do a stencil review, where I could choose my own pattern and create the project however I choose! I was definitely ready to try it, as I have always wanted to see what a large, graphic stencil would look like on my wall! I chose a main wall in our dining room for the stencil treatment. The bones of this space are traditional, and I wanted to infuse some modern elements. So when searching for the right stencil, I know I wanted a large, bold print that read more modern in style. I chose a moroccan print called Large Chez Sheik. This print looked beautiful on the computer and even more amazing in person! Here is what the space looked like before:

Before:

  Another before with newer accessories:

And now for the afters: (Get ready- there’s a lot!!)

I am so appreciative to this amazing company for giving me the courage to try my hand at stenciling! Now, let’s get to the details of this project and my honest opinion on stenciling! Truthfully, I am soooo glad I tried it! It was time consuming, but so worth it in the end! For me, stenciling is definitely doable for a partial wall. It gave the space a focal point that it didn’t have before. For those that might not want to tackle a wall, stenciling is great for details, like dressers, tables, behind bookcases and drapery. Here are some during shots of this project:

During:

What I used for this project:

– Creamy white semi-gloss paint that I already had for the room’s trim work.
– A stencil brush for the smaller patterns and a small paint brush for the larger patterns.
– Blue painter’s tape. (You could also used spray adhesive, but I already had the tape and it worked great!)
– Drop cloth (just in case!)
– Small bowl for paint.
– Lots of paper towels for rubbing off extra paint on brushes.

I started at the top of the wall, so I could get my initial stencil patterns straight and lined up with the crown molding. I added the painter’s tape to the edges of the stencil and began with only the small stencil brush. I wanted to make sure I wasn’t using too much paint in the beginning. You can always add more paint later, but it’s much harder to remove it! Once I was confident in the amount of paint I needed on the brush, I began to add the small paint brush for the larger patterned areas. This made the project move along much quicker. Just make sure you take off as much of the paint as you can, from the brush! If it bleeds through the stencil, you have a bigger problem on your hands!

When stenciling, I would try to paint from the outside of the stencil in, helping to keep the pattern in place. If I was going to move my stencil to the right for the next set, I always made sure to stencil that side first. That way, the paint would be dry when I had to overlap. The stencil comes with pre-cut dotted lines, so you are always on track for matching up your stencil. It leaves no margin for error! I left the corners and trickier areas for the end of the project, to make sure the back of the stencil was completely dry when I had to move and bend the stencil. I just took a break at that time! I only used one coat for this stencil. The shading does look darker in some areas, but that just adds to the character of the treatment. (Hopefully) it gives the wall some depth and character. With a bit of the darker wall color showing through, it almost gives the white paint a silvery effect, which shimmers when the lights are on! In time, I will do some touch ups, but they are very minimal and can be done at some point! Overall, it was pretty easy to use!

Thanks so much to Royal Design Studios for their generous idea! Their site also has very helpful tips for your stencil projects! And stay tuned… there will be a chance for you to win your very own stencil soon!

I’m linking this up to the wonderful blog, Savvy Southern Style, for her Wow Us Wednesdays!

Photobucket

Welcome!

Hi, I'm Amber... a wife, mom and interior decorator. I am the writer of Simple Dwellings and the designer behind Amber B Design. Blog topics are all things design, with the occasional DIY attempt! Thanks for stopping by Read more...

  • Bloglovin
  • Email
  • Instagram
  • Pinterest
  • Twitter

Blog Posts, Straight to Your Inbox

Popular Projects

A dining room with white walls and wooden table.
A black door with white curtains and a red chair
A staircase with black and white chevron pattern on the steps.

Blog Love

  • Addison’s Wonderland
  • A Thoughtful Place
  • Alison Giese Interiors
  • Amber Interiors
  • Bailey McCarthy
  • Caitlin Wilson
  • Chris Loves Julia
  • Classic Casual Home
  • Cottage and Vine
  • Design Indulgence
  • Dwell by Cheryl
  • Eddie Ross
  • Elements of Style
  • Emily A Clark
  • Emily Henderson
  • Gallery No Eight
  • Hi Sugarplum
  • House of Jade
  • Jana Bek
  • Juniper Home
  • Kate Marker Interiors
  • Lucy Williams
  • Monika Hibbs
  • Our Fifth House
  • Pencil and Paper Co
  • Rachel Parcell
  • Rambling Renovators
  • Pure Style Home
  • Sita Montgomery
  • Studio Mcgee
  • The Makerista
  • The White Buffalo Styling Co
  • the Zhush
  • Traci Zeller
  • Young House Love

Copyright Amber B Design © 2025 ยท Design by Britt Douglas