Amber B Design Studio

Interior Design & Decoration for the South Florida region

  • Home
  • About
  • Services
  • Portfolio
  • Blog
  • Press
  • Contact

Crafting With Paracord!

April 28, 2014 by Amber Filed Under: blog review, DIY


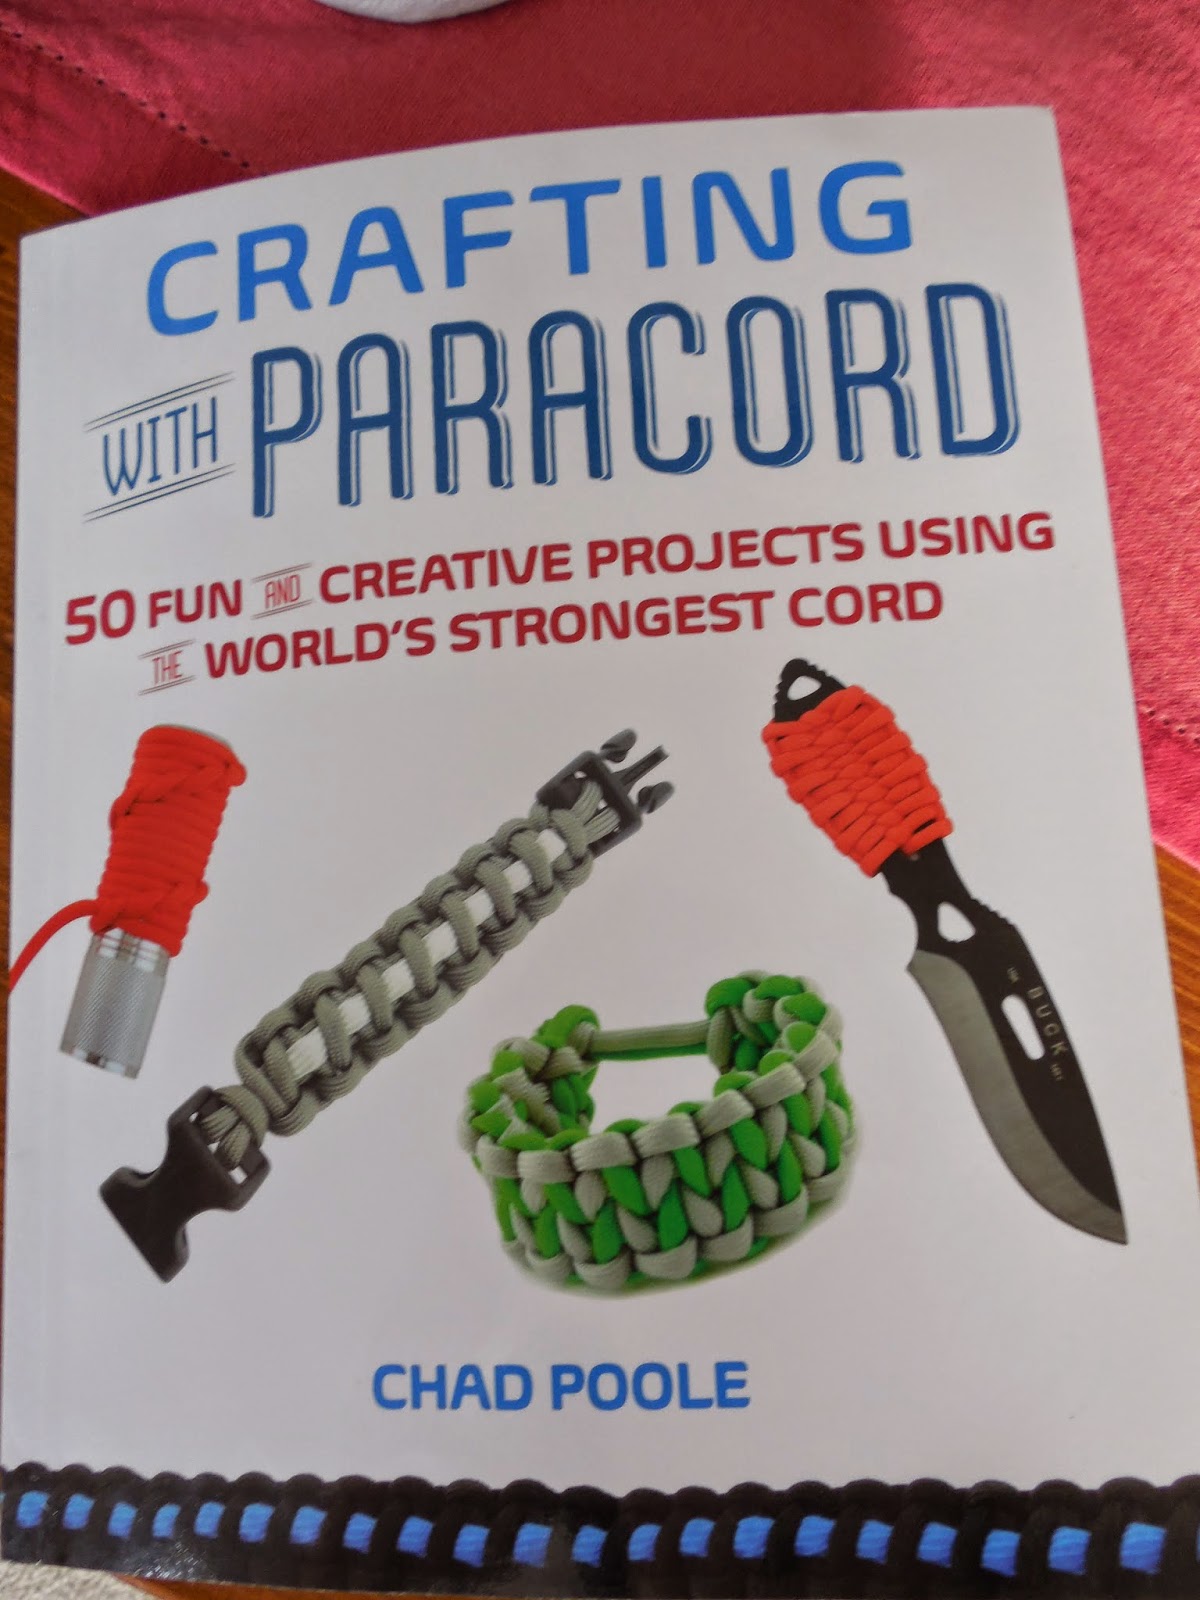
If you have kids, you probably have a ton of rubber bands around your house from those rainbow looms. They were a huge craze for a while and some of the bracelet patterns were tough to make and required hours of patience. Luckily, help came at the right time. I was recently contacted by a representative from Ulysses Press to review a creative, fun crafting book using paracord. This was a style of crafting I have not tried before and I was up for the challenge. Paracord is the world’s strongest cord and is also starting to become the newest crafting material. When my kids saw this, they couldn’t wait to see what knot design and keychain they could make first! Originally used during World War II as parachute line, Paracord’s colorful cord selections has made this the coolest new crafting material of choice! Author of the amazing book, Crafting With Paracord, Chad Poole gives us step by step instructions on how to make 50 fun, creative projects!

Of course, we got right to work, making our own creations. And happy to report, the keychains were easy to make and fun to create!

Twisted Soloman Bar Keychain

Ladder Rack Knot Keychain


Here are some others we want to try in the future, because the names are just too cool…

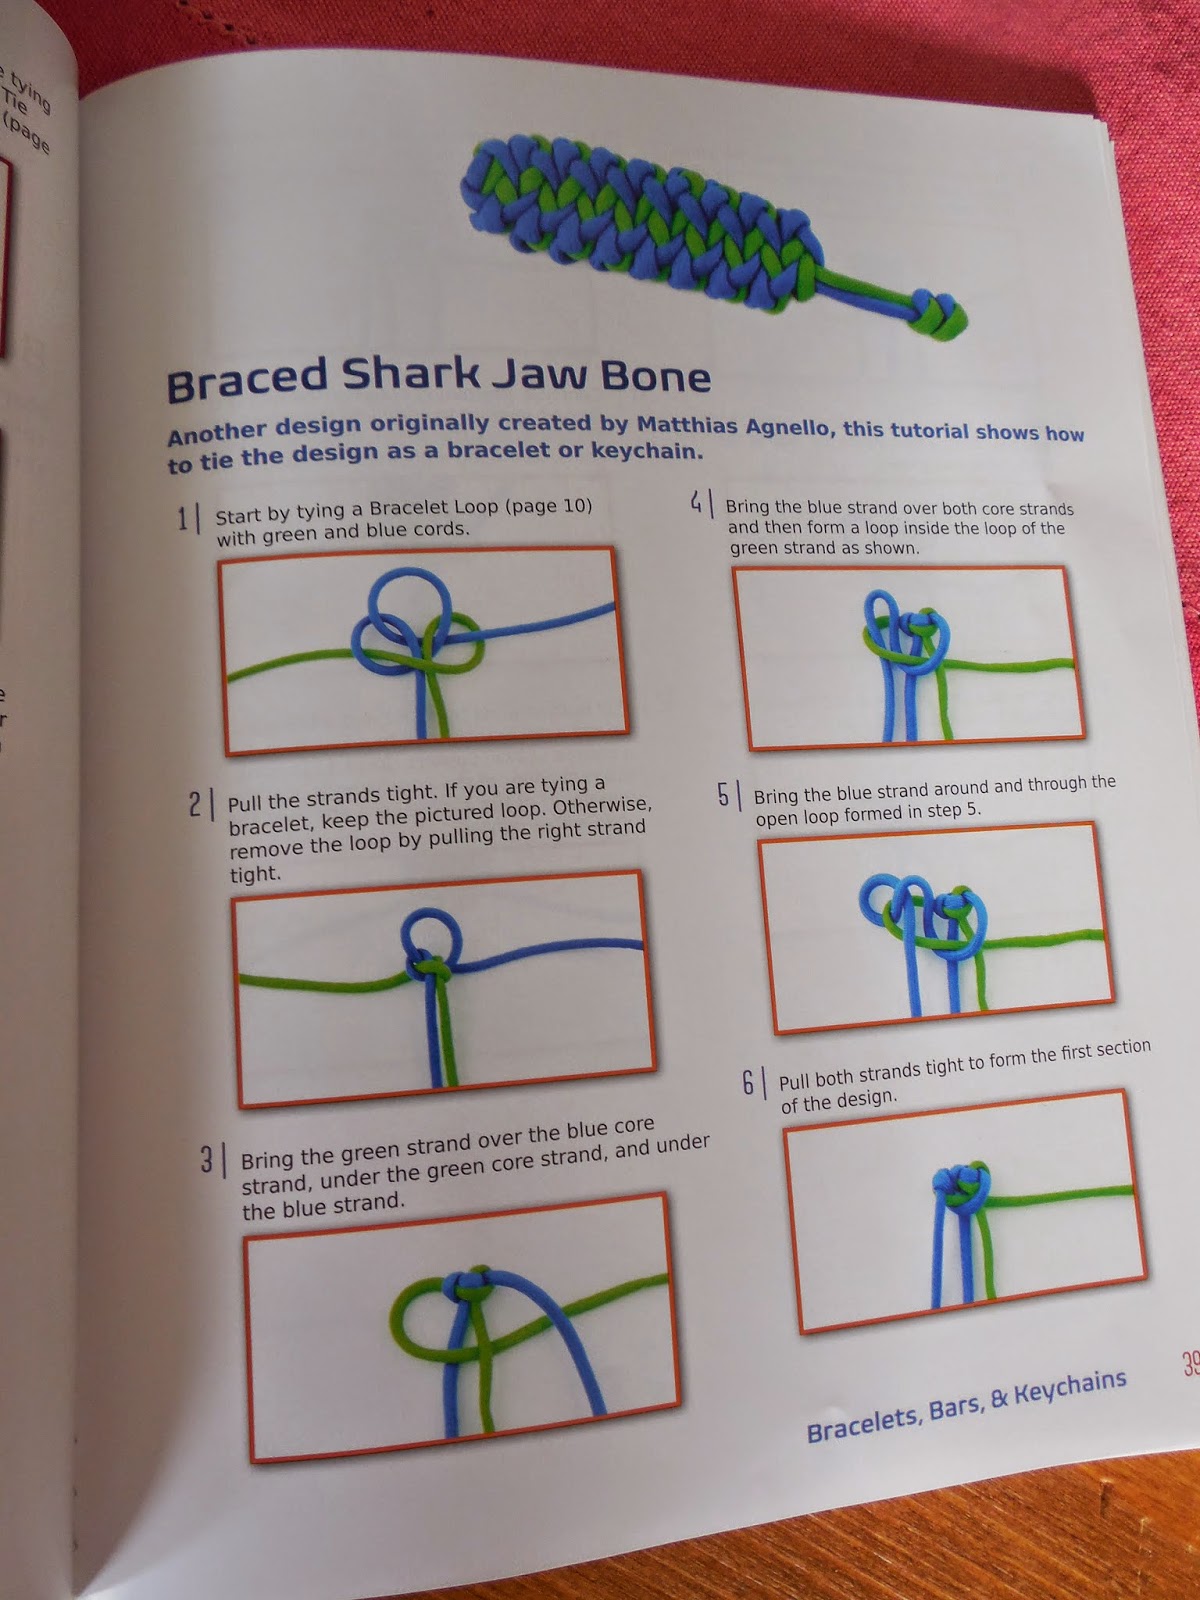
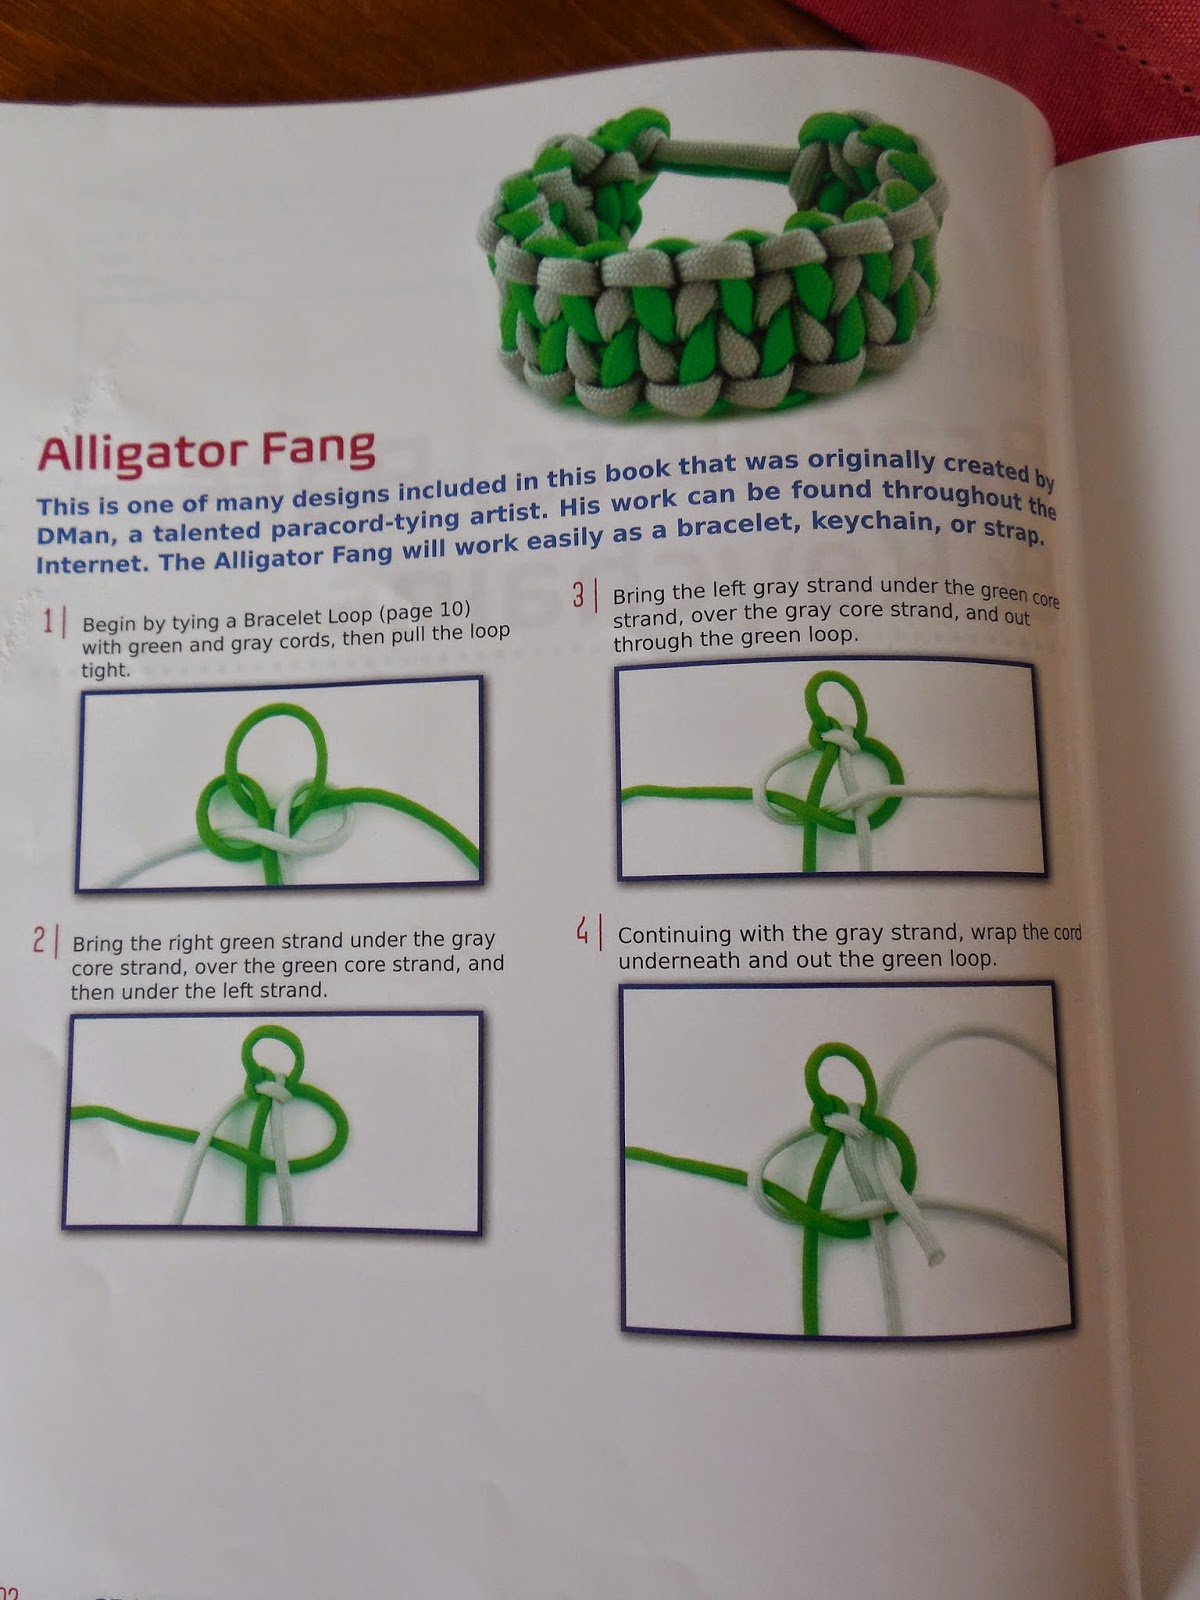
To walk around with a shark jaw bone or alligator fang bracelet is a thumbs up in any kid’s book!  ๐Ÿ™‚

This was a great crafting project that involved the whole family. You are only limited by your imagination with this product! Thanks to Ulysses Press for the introduction to this cool, new {to me} crafting idea! To get your own copy of this book and start crafting, visit HERE!!

Ulysses Press supplied the book and paracord, but all opinions are my own, as always!

A Simple, Creative DIY Art Piece with Jordan!

February 20, 2014 by Amber Filed Under: art, design, DIY


I am so excited to have a special guest blogger here with us today. Jordan, from the blog The 2 Seasons, is here to share a very creative art project and a colorful way to fill a wall space in your home. Jordan shares a fun design/DIY blog with her mom Janette. Not too long ago, Jordan and I realized we lived near each other and share so many of the same interests! I can’t wait for you all to see this creative art project…

Hello, everyone! I am Jordan, the daughter half of the mother/daughter lifestyle blog called The 2 Seasons. My mom Janette and I have been writing our blog together for the past three years. I am so pleased that I discovered Amber and her blog. Plus, we found out that we live very close to each other, and we had the opportunity to meet in person. That was fun!


DIY Modern Art using leftover house paint

As a southern girl who now lives in central New York, I have learned the winters here are very long. I try to do things that will keep me busy, and this is the perfect winter-time project. We love color here at The 2 Seasons and making modern art during the gray months is one way to incorporate color into our traditional homes. My mom made a couple of modern art projects (here and here), and I followed to make my own. We have a blank wall in our study, and I definitely wanted to add some spring color in the form of DIY art. Some people say this isn’t art but that instead it is making home decor. Whatever it is called, it is a great way to create color and interest for your walls while the winter blasts away outside. Plus, it’s an automatic conversation piece.


DIY Modern Art using leftover house paint

We discovered the artist Cassandra Tondro and all of her amazing work. I found out she also had some Youtube videos that teach how to make your own art out of left over house paint. It looked like a fun project, and I decided to give it a try. I am happy to report that I had great success following her method, and I am about to share it with you.

Modern Art Set Up

To get started, you need a canvas, plastic drop cloth, old house paint, gloves. The first step is to find an area where you can spread out a couple of layers of the plastic drop cloth. I worked in my basement so the photos are not the best.

    Make your own modern art

Once the plastic drop cloth is on the floor, take your canvas and map its size. I just marked the sides/size with Frog tape. You can also use a felt-tip marker if you don’t want to use tape.

  Make your own modern art

Here is the plastic marked with the size of the canvas. This serves as the guideline for where the paint goes.

    Make your own modern art

The next step is to get your paint ready to go. Remove the lids and stir each can of paint so that it is well-mixed. Put on some fun music, and take your first color and start pouring. This is when you determine if you want to make a design and how you want your colors to blend and mix.

    Make your own modern art

The next couple of pictures all show me adding the color to area.

    Make your own modern art Make your own modern art Make Your own modern art Make Your own modern art Make your own modern Art Make your own modern art Make your own modern art

I had a lot of paint samples that I used. This project uses a lot of paint. The Habitat Restore sells house paint at a deep discount so if you need additional colors be sure to check out your Restore. Also, you can sometimes find discounted cans of mistake paint at Lowe’s and Home Depot.

    Make your own Modern Art

Once you are happy with your colors and design, gently place the canvas on top of the paint. You can do an undercoat on the canvas beforehand if you want, and allow it to dry first. That is a way to add an additional color to your creation.

    Make your own Modern Art

Take your hands and rub them on the canvas to get out any air bubbles and to spread the paint around and cover the canvas.

  IMG_6291

When you think you have covered the whole canvas, pull the canvas directly up from either a side or straight up. I pulled up from a side. Take it to an out-of-the-way area to dry for a couple of days. The colors need to dry and set so they won’t run when you hang it on the wall.


DIY Modern Art using leftover house paint

My canvas measured 24 x 36, but I also had a small canvas on hand. Since I had a lot of paint on the plastic, I decided to make another small creation using the same colors.


DIY Modern Art using leftover house paint

The possibilities are endless, and this would be fun for all ages.


DIY Modern Art using leftover house paint

The painting now has a home in our study and I LOVE it!


DIY Modern Art using leftover house paint

I would like to thank Amber for allowing us to guest blog for her today. We hope you stop by our blog and feel free to like us on Facebook or follow us on Pinterest.


Cheers!

That is definitely gorgeous art to me!! And I also love to put on some music when I paint. ๐Ÿ™‚ Thanks so much to Jordan for stopping by and sharing this amazing DIY paint project with us! Be sure to check out The 2 Seasons blog to see what Jordan and Janette are up to next!

Instacraft: A Must Have Book for Simple, Fun DIY Projects

October 14, 2013 by Amber Filed Under: design, DIY


Just like my cooking, I like to keep design projects simple, easy and to a minimum of four steps or less! So when I was recently contacted to take part in a book review of this amazing new book that handles crafting in a similar format, I was all for it! Instacraft is a new book that shows us quick, stylish craft projects for the crafter at heart, right on down to those of us without an artistic bone in our body (the latter is more like me!!) The book was written by Alison Caporimo, writer and crafter that introduces us to projects that are attainable and quick, for those of us on the go! The projects she featured made me realize they would be great starter crafts for kids and a wonderful way to bond together through art. The amazing photography throughout the book was done by Meera Lee Patel, who is able to capture the projects beautifully and in a way that makes you want to try it yourself.

The book’s set up is very user friendly and breaks the crafts down into fun project categories: Spray, Cut and Hang, Write and Paint, Pin and Fold, Tape and Glue and Dip and Stamp.

For each project, the picture is on one page, while the materials and simple directions are on the other. I can definitely handle this type of craft book! Let’s get to some of my favorites…

Farm to Table Butter Dish (Spray Section)


You may already have some of these items on hand, such as a glass butter dish, plastic farm animal, strong glue and spray paint. By spraying everything white and attaching the animal with strong glue, you have a vintage looking butter dish that would be perfect at any farmhouse table!

Gold Pencil Holder (Spray Section)


By simply spray painting a ball of twine with gold spray paint, you can have a chic new pencil holder for your desk!

Sneaky Holiday Storage (Cut and Hang Section)

This is my favorite and will definitely be our new Christmas/New Year’s decoration this year! Have an empty frame lying around your house? Paint a festive message on the outside with a paint pen and fill the frame with fancy gold garland. I could also see this as an amazing birthday decoration, too!

Color Me Thumbtacks (Write and Paint Section)


When it’s time to redo my office and add a new bulletin board, you bet I’m borrowing this idea! If you have thumbtacks and nail polish, you can tackle this project!

Stocking Flowerpot (Cut and Hang Section)


Did you get a run in your stylish stockings? Don’t throw them away… use them for this adorable craft project. This project only requires stockings, a flowerpot and some scissors. I will definitely have to give this one a try!

I think it’s safe to say that I am a little obsessed with this book! I could go on and on about the wonderful ideas, but you really should have one of your own to flip through and enjoy. Seeing these easy crafts photographed so beautifully is a real treat in person! A cool little extra about this book… the author decided to make the book even more fun, by including some great songs to listen to while crafting and a quick recipe to try while your project dries. How sweet is that?!? I think what I appreciate most about this book, is that the author wants you to recycle and use items you already have on hand. There is no long supply list needed for these projects, and I love that! To get started on a new project, order your copy HERE at an amazing price!!

I can’t wait to see which project you try, first!!

Happy Crafting!! 

* a special thanks to Beth and the PR team for gifting this incredible book to me!!

Creative Ways to Use Leftover Pieces of Fabric

October 3, 2013 by Amber Filed Under: design, DIY, fabric, fall colors, seasons


I recently entered a contest through Tonic Living, in which I made a project using leftover pieces of fabric. You could take the contest literally or come up with a creative use for the fabric scraps. Let’s get this little disclaimer out of the way, right now… I am not a DIY expert by any stretch of the imagination. I have always been in the camp of If I can do it, anyone can!! So I am here to show you my super simple and fun ways to use those leftover pieces of fabric you have.

Fabric Wrapped Pumpkins


For this project, I used an artificial pumpkin. {That’s important, so the decoration can be used year after year.} I just plopped the pumpkin in the middle of the fabric and started gathering up the sides to the stem. I used one of my pony tail holders I had laying around the house to keep the fabric pulled at the top. The fabric ended up being a little short on the sides. Not to worry, since it’s pretty easy to hide that with some tucking and folding. You will most likely get some bulging of the fabric in spots. I just took some sewing needles and pinned down the bulging sections, to get it to lay more flat. At first, it looks very messy. Don’t give up just yet… you can smooth the fabric down and display the side that looks prettier! I cut off some of the leftover fabric on top and used some brown grosgrain ribbon, to hide my pony tail holder. {I know I will be looking for that one morning, when I have a bad hair day!} All in the name of DIY, I guess. ๐Ÿ™‚

Onto the next project… fabric wrapped canvas.

Fabric Wrapped Canvas

* Both fabric samples provided by Tonic Living *

At first, I had no idea how to tackle this one, since I don’t own a staple gun. I bought some spray fabric adhesive, but didn’t end up using it. I bought an 8×8 canvas board from a local fabric store and then got to work. I followed this tutorial HERE but used small nails instead of the staple gun. I just hammered the nails in the back.

-The key is to make sure the nails are very short, so they don’t poke through the canvas.

-You also must make sure you iron your fabric first, so you don’t have a wrinkly canvas art piece.

-You must also pull the fabric tight as you go along, so it ends up looking as if it was always a part of the canvas.

I thought that I had centered the fabric, but it’s a bit off. I told you I was no DIY expert!! The new canvas piece adds some texture, color and pattern to the back of the shelf.

So there you have it… about an hour of my time for two new accessories!

Have you crafted something recently?? Would love to hear about it!

{Before and After} An X Bench is a Better Fit

April 4, 2013 by Amber Filed Under: before and after, design, DIY, foyer, personal design style, project


I recently posted about my pom pom fringe curtains, and as I was looking at the pictures, I noticed the bench was now a bit too long. Well, I actually noticed it when seeing it in front of me, but the pictures drove the point home even more. It was time for the bench to go somewhere else in the house and this spot needed a smaller seat. Here is what the foyer looked like about two days ago…

Before

The curtains were being pushed to the side by the bench. Once we install the tiebacks for the drapery panels, I think it would be that much more apparent. I love the bench and its new home. It is now in the guest room, where it be a great spot to place towels, small suitcases, etc. And here is the new option…

After

I have had my eye on this X bench for a while. It was finally on clearance at Target, and I scooped up the last one! Originally on sale for $69 and I bought it for $41!! I love their Threshold line of accessories and small furniture pieces. Yet again, Target is brining their ‘A’ game! The seat is actually much deeper than the black bench, so it will be much more comfortable when taking off shoes. We will actually use this one! And if I ever feel the need to move it around, X benches are one of those versatile pieces that will work anywhere. I love seeing two under a console and at the foot of the bed. Since I have only one, it will also work great as a side table, with the additon of a small tray. You may have noticed that I also switched out the pillow for the suzani print. I brought up this conversation on instagram, and my blog friend Holly liked the suzani option here better. I would have to agree, so here it is! In my last post about my master bedroom, I mentioned that if you keep a fairly consistent color scheme throughout your home, you will easily be able to switch out accessories from room to room. I was mainly referring to this pillow. Since I have had this suzani print pillow, I have been pulling colors from it and sprinkling it throughout the home. This new bench has the same coral color as in the pillow, the living room wall color has the same brown, the secretary desk lamp has the same turquoise, etc. This way, I can easily shop around my home without worry if it will work in each room.

Still to do… add the curtain tie backs and replace the polyester pillow insert with a down filled option. Always a better alternative! Oh yeah, and paint the stair railing black! And that door in the last picture, too. So much to do, so little time!

{DIY} Adding Pom Pom Fringe

April 2, 2013 by Amber Filed Under: DIY, Featured, foyer, personal design style, project


When I {or I should say my husband) installed a curtain rod above our front door, I chose the same drapery panels that are in our kitchen and family room. I wanted to do a little something more to them, so I decided to add black pom pom fringe to the edges of the panels. I am happy to report that this was super easy to do! It took about 20 minutes one night to get both panels finished!

After

Here’s a little step by step if you are thinking of adding a little pizazz to store bought drapery panels…

The Materials

You Will Need

1. Black Pom Pom Fringe cut to size
2. Aleene’s Fabric Fusion
3. Drapery Panels
4. Scissors

I had the lady at Jo Ann Fabrics cut the pom pom fringe to size for each panel. She was great and added an extra few inches, which I cut off after the project was complete. It was nice to have that extra bit of fringe in case one side had an unfinished edge.

First, I layed the fringe in place to make sure I liked the way it looked. When I knew I had enough and it was just the way I wanted, I moved the fringe to the side and started to add fabric fusion to the panels. I love this stuff! I have used it to attach trim to lamp shades and now this! The fabric is washable after 24 hours and can also be dry cleaned! I don’t have a picture of this step, since I was using both hands, but I applied the fusion about 1/4 ” from the edge of each panel.

I started this project on the carpet, and then realized I might be getting permanent glue on the carpet! Not good. Luckily, I didn’t… but I came up with another way to do this project just to be sure-

I decided to place an old sheet under the panel where I was working. Both are terribly wrinkly, but nothing is perfect during the process, is it??

I waited about an hour to make sure the glue was secure to the panels. This stuff is amazing. It adhered so well and I could tell it wasn’t going anywhere. I decided to add a little fabric fusion to the top and bottom of the fringe, to prevent fraying. The lady at the store said I could stictch the edges to prevent fraying, but this girl doesn’t sew! So, the fusion will also work like a charm. I was too excited to wait until the next day to attach the panels to the curtain rings, so I went for it!

Next up, is painting the stair railing black! One of these days!  ๐Ÿ™‚ Oh, and of course adding drapery tie backs and steaming those panels. Is it ever done???

{DIY} Backing Shelves With Wrapping Paper

March 25, 2013 by Amber Filed Under: design, DIY, shelf styling, style


In my last post, I mentioned that I was looking for a floral paper to use for the back of my secretary shelves. After reading Emily’s suggestion to try a bright floral, I knew this would be a great option for the room. The wood is a very dark mahogany which I love, but the accessories were getting lost in the space.

Before the Paper

I didn’t want to choose anything permanent, because I didn’t want to ruin the wood finish on the antique piece. How can I make this paper removeable without compromising the wood underneath? Blog friend Pam suggested using double stick removeable poster tape. I went to Jo Ann fabrics, and did just that! While I was out, I thought I might browse through their fabrics to see if I could find something to line the back of the shelves with. I did find some great fabrics, but didn’t want to spend $20-$40 on something that I might want to switch out later. {By the way, did you know that Jo Ann Fabrics now sells an HGTV line of fabrics? They are pricey, but beautiful! I think I’ll wait for a great sale!} So back to the drawing board. I left with the tape and decided to go into Target, since they usually have pretty cool wrapping paper. And there it was- a beautiful vintage looking wrapping paper for $3.99! I immediately loved it and decided this was the one! And if I didn’t love it on the desk, at least it would be great for wrapping presents. Here is the paper and tape I found…

The Materials

Since this paper has a white background, I knew it would brighten up the dark wood and make a difference in how the accessories stand out. Luckily, the shelves slide right out, so it was easy to place one large piece of paper on the back of the shelves. Here is the process..

Without the Shelves

I needed about a 2×3 piece of paper for this project. I cut it to size and made minor adjustments to the paper before attaching the tape to the back of the desk. I placed about 9 pieces of double stick tape to the back of the desk, making sure I got the corners and the center. When the shelves are put back into place, I knew that would also hold it well.

Attaching the Tape

Those little square pieces you see are the double stick tape. It was great to work with, because if I didn’t get the paper in the exact spot I wanted, it was easy to remove and start over. {Which happened about 3 times!} Here is the paper all ready and wating for the shelves…

Paper is Up

And here is the desk with the shelves installed…

Shelves Are In

And now it’s time for the accessories! I have been changing the styling since the paper went up, so I may even edit it some more. Theare are many options for shelf placement in this desk, so I can always adjust that later on. But here are the afters for now…
After


I have been having fun with this new change. What I love most, is that it’s versatile and can easily be changed when I come across a new paper or fabric that I love! All of the accessories were already in my home. I just shopped around my house and changed things up a bit. I only spent $3.99 on the wrapping paper! Just to recap, here is another before, without the paper…
Before
And After
Have you ever tried to use wrapping paper for projects that don’t include wrapping presents??

{Client After} DIY Art

March 3, 2013 by Amber Filed Under: art, DIY, e-decorating, e-design, project


I have another after photo to show from one of my recent projects! I love being able to see projects come to life. This is for a client looking to add new modern touches to her lower level space. We are adding a gallery wall of photos on her stairway going down into her basement. Here is our inspiration for that…

Source: blog.foundstyle.net via Amber on Pinterest

I love that gallery wall image- gets me every time! With a large collection of photos on the stair wall, I wanted the wall at the end of the stairs to have a graphic impact with typography art. I thought that would balance well with all of the family photos. I instantly thought about a DIY subway sign project! Since this is a space to gather and entertain friends and family, why not greet them with personal art once they walk downstairs! She loved this idea, because she could make the piece meaningful by adding places they have lived and traveled. Here is the completed subway sign:

After…

Didn’t she do a great job?!? She said the project was super simple. In my design presentation, I included a tutorial from my blog friend, Courtney. When Courtney completed this project, she gave a full explanation of what to do and the materials to use on her blog.

Since this photo has been taken, the walls have been painted a gorgeous gray color! I can’t wait to show you more soon. I might just have to try this project myself. It would be so much fun to look at all of the places we have lived and traveled in one piece of art.

So how about you… have you ever made your own art??

DIY: Wrapping Paper Art

February 17, 2013 by Amber Filed Under: design, DIY, great deal, project


As I was in TJ Maxx the other day, {my favorite brick and mortar store} I came across pretty striped wrapping paper. While some may just view it as great paper for wrapping presents, I had other plans! Our fireplace mantel still had frames with Christmas paper inside, so I thought I should switch that out fairly soon. {I know… Christmas was over long ago!} Here is our mantel, starting to get ready for spring…

All I did was open the frame and cut the wrapping paper to size! I decided to use the same paper for both frames, but change the direction of the stripes to make it look a bit different. I still have a ton of paper left for wrapping presents for any holiday! The green would work for any age and gender! {I could even save it for Christmas presents for next year. Imagine this paper with a big red bow!}

Since I already had the matted frames, that’s two pieces of art for $3.99! Not bad.

Have you finished any inexpensive decor projects lately??
Do tell… I will include them in a new post!

How To Create a Custom Look When Hanging Drapes

January 21, 2013 by Amber Filed Under: design, DIY, personal design style


I have always loved browsing through magazines and seeing how beautiful custom drapes look and how effortlessly they hang on the rod. Love the idea, just not the cost of custom drapes. So, I tried to come up with a way to hang my drapes to give them that custom, pinch pleat look. I’m sure this is nothing new and there are probably so many other great ways out there to do this, but here’s mine…


These are dupioni silk drapes bought from JC Penney about 7 years ago. I wanted to make them look more polished and they also puddle on the floor a bit, so my new trick helped in both areas. I took drapery clips and pinched the back of the fabric, while clipping in place. I clipped them in place about a half an inch down from the top, helping to bring the fabric off the floor a little. I also used 11 drapery clips for each panel. The panels are about 54″ in width and 11 works out great! The odd number allows the clips to be evenly spaced throughout, creating a more unified look. That was my mistake in the past. Take for example, my kitchen curtains…

Trying to save money, I only bought a pack of 7 rings for each panel. See the result… floppy curtains! When these kitchen panels get four more rings each, we’ll be in business! Here is my breakdown for ya…

– If your panels are 54″ wide, go for 11 curtain rings!
– 50″ wide panels, go for 9 rings!
– Stay with odd numbers!
– If your curtains are a bit too long, try this method before taking out the sewing machine!

  • 1
  • 2
  • Next Page »
Welcome!

Hi, I'm Amber... a wife, mom and interior decorator. I am the writer of Simple Dwellings and the designer behind Amber B Design. Blog topics are all things design, with the occasional DIY attempt! Thanks for stopping by Read more...

  • Bloglovin
  • Email
  • Instagram
  • Pinterest
  • Twitter

Blog Posts, Straight to Your Inbox

Popular Projects

A dining room with white walls and wooden table.
A black door with white curtains and a red chair
A staircase with black and white chevron pattern on the steps.

Blog Love

  • Addison’s Wonderland
  • A Thoughtful Place
  • Alison Giese Interiors
  • Amber Interiors
  • Bailey McCarthy
  • Caitlin Wilson
  • Chris Loves Julia
  • Classic Casual Home
  • Cottage and Vine
  • Design Indulgence
  • Dwell by Cheryl
  • Eddie Ross
  • Elements of Style
  • Emily A Clark
  • Emily Henderson
  • Gallery No Eight
  • Hi Sugarplum
  • House of Jade
  • Jana Bek
  • Juniper Home
  • Kate Marker Interiors
  • Lucy Williams
  • Monika Hibbs
  • Our Fifth House
  • Pencil and Paper Co
  • Rachel Parcell
  • Rambling Renovators
  • Pure Style Home
  • Sita Montgomery
  • Studio Mcgee
  • The Makerista
  • The White Buffalo Styling Co
  • the Zhush
  • Traci Zeller
  • Young House Love

Copyright Amber B Design © 2025 ยท Design by Britt Douglas


Loading Comments...