Amber B Design Studio

Interior Design & Decoration for the South Florida region

  • Home
  • About
  • Services
  • Portfolio
  • Blog
  • Press
  • Contact

{E-Design Progress} The Painted Desk

May 16, 2013 by Amber Filed Under: design, e-decorating, e-design, painting


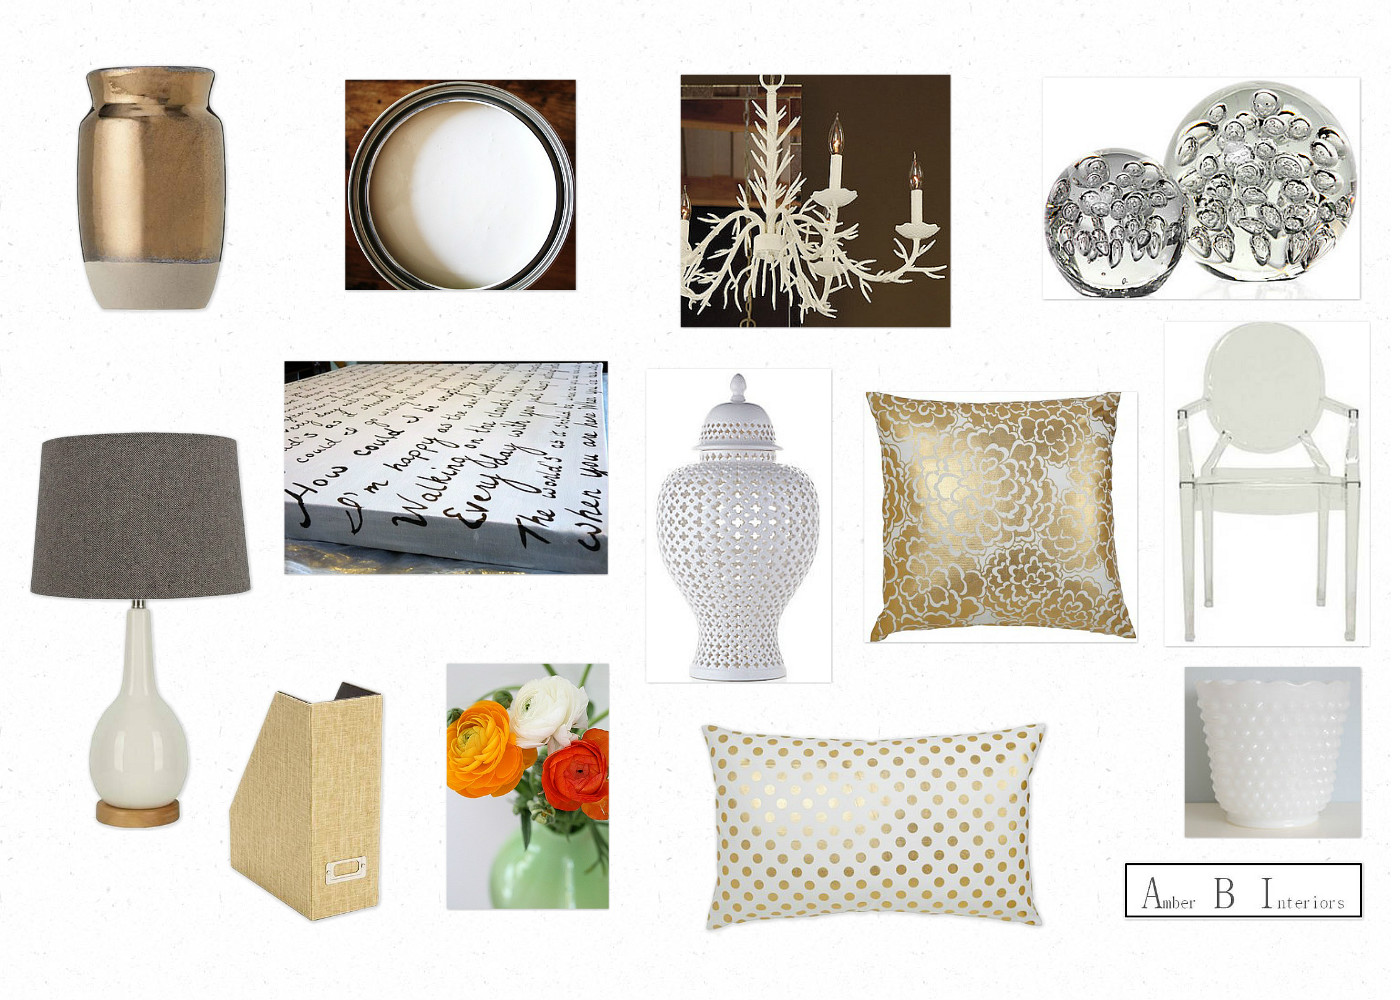
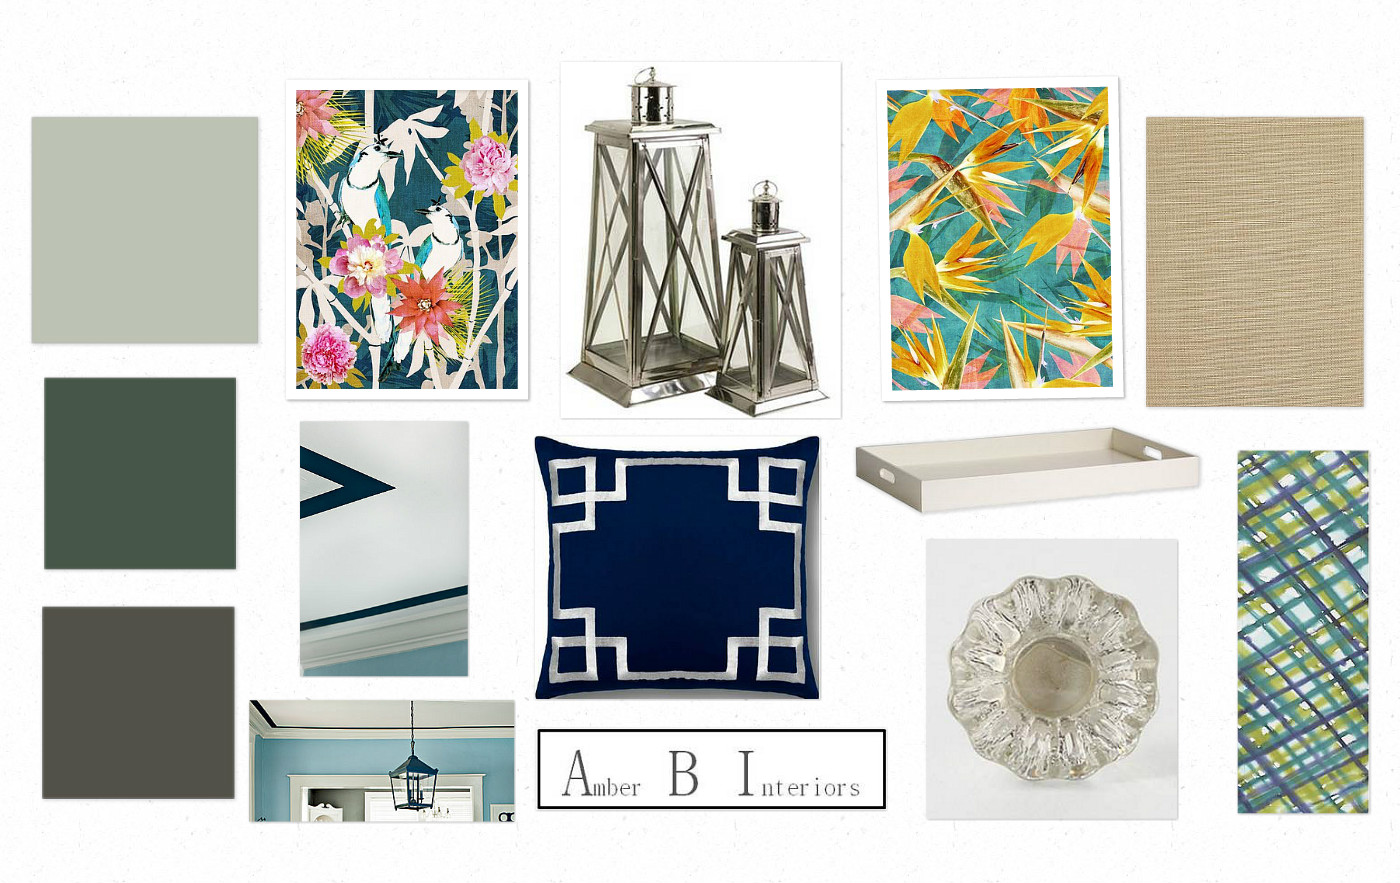
In a recent post, I showed the wonderful progress my client has made in her office. She already had most of the existing furniture pieces and was looking to add some modern touches through paint and accessories. To recap, here is the design board I came up with…

 The Plan {click on image to make larger}

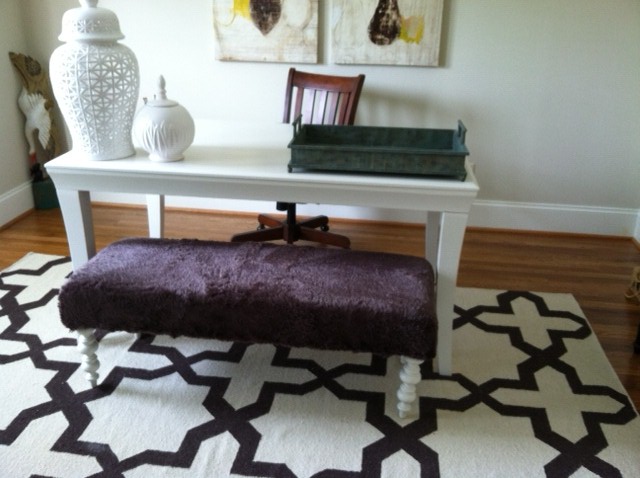
One of the things we wanted to do in this space was paint her desk. It was a deep espresso finish that also matched the desk chair. We wanted to lighten up the space and a great way to do that is through paint. Here is what her desk looked like before…

Before

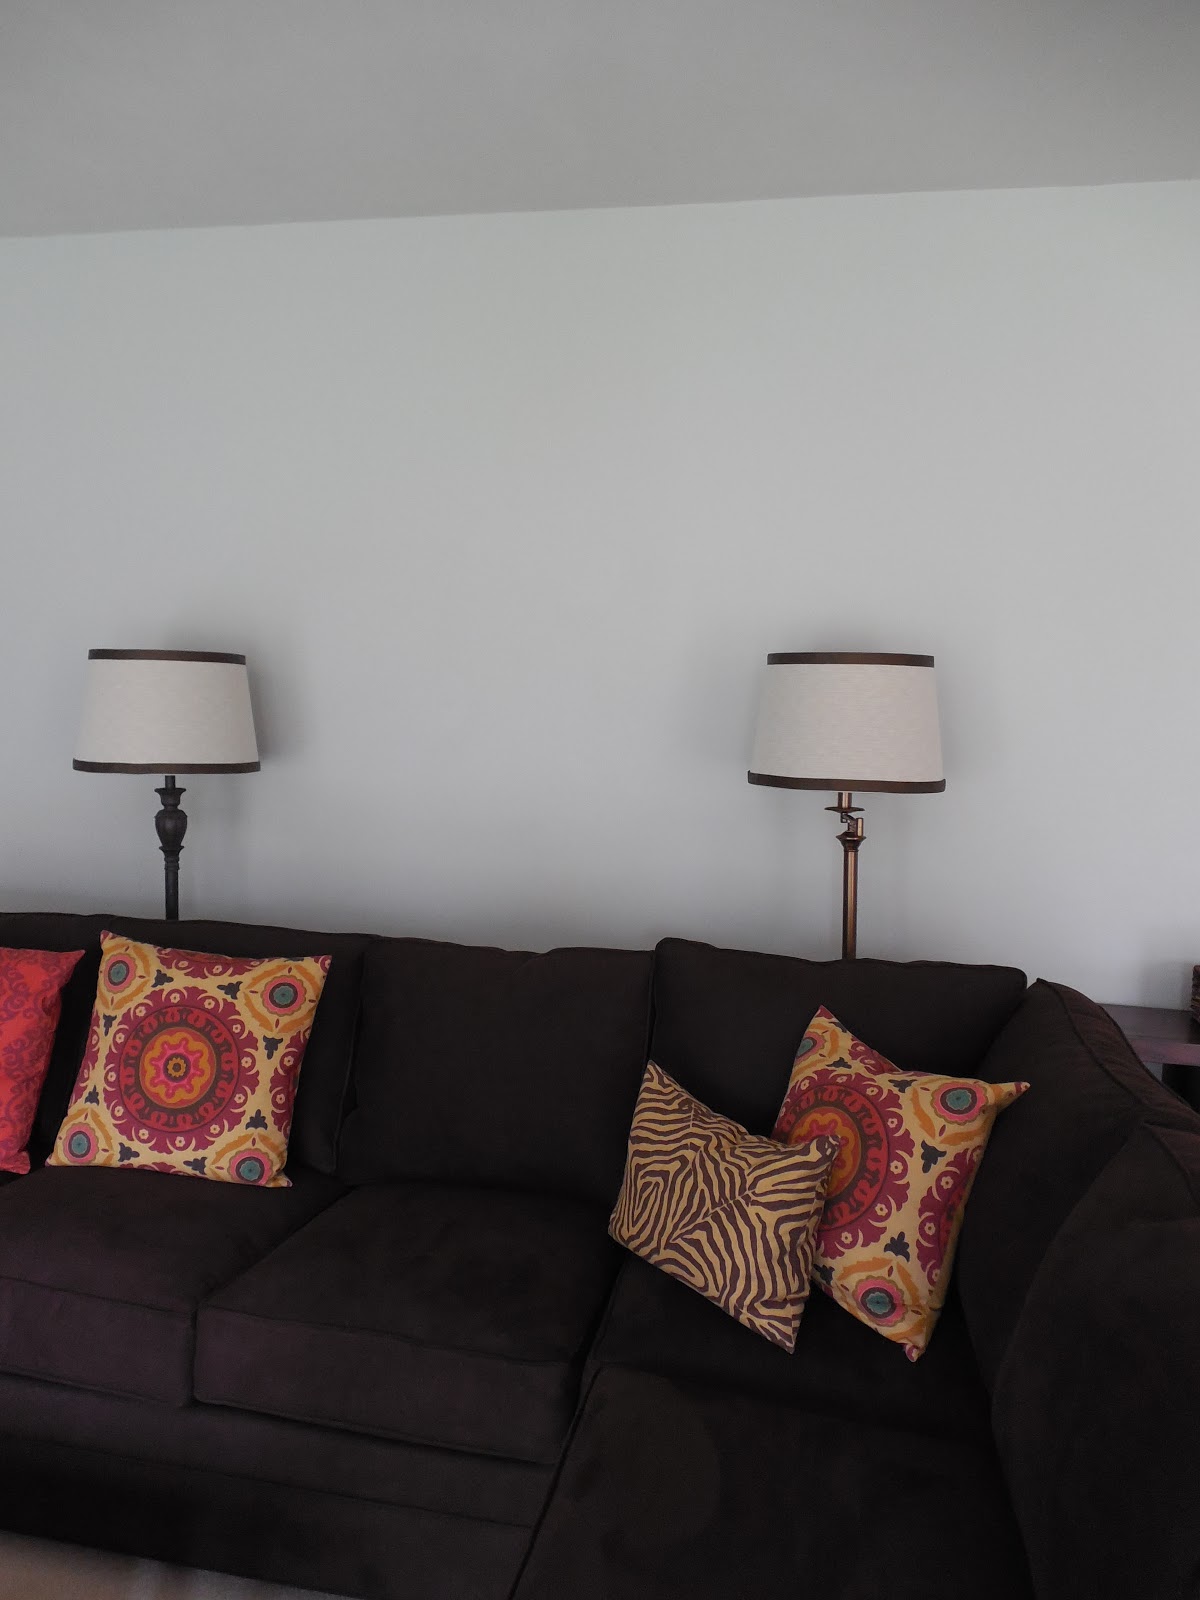
There are various dark wood tones in this room, so by painting the desk a lighter color, it brought a new bright, airy feel to the room. I chose a creamy gray/white color. She plans to use the other colors on this swatch for rooms throughout her home, so we kept it cohesive and stuck with a color from the same color strip. We also painted the bench legs in the same light color, too! Here is an after shot of the newly painted pieces…

After

There are still some accessories to add and paintings/art to move around, but we are so excited about this amazing progress! Never underestimate the power of paint for any space! Thanks so much to my client for allowing me to share these pictures.

Have you taken out your paintbrush lately??

More Basement Progress

May 13, 2013 by Amber Filed Under: basement, design, personal design style


I hope you wonderful moms had a great Mother’s Day! My mom came over and we had an amazing Mushroom and Sausage Risotto made by the hubby. It was a great day! I have some basement progress to show you! The walls have been painted and a special treatment has been done to one wall. Let’s get right to it…

Painted Walls

Soon to be Bookshelves

The walls have been painted Horizon by Benjamin Moore, which is a super pale blue/gray. We chose a light color because the basement is already dark and we wanted it to feel bright and airy. We have this color on our ceilings on the first floor and one shade darker for our kitchen, family room and master bedroom walls. So, the basement will flow with the rest of the home. There will be built in bookshelves for the space under the stairs and shelves along this long wall that you see in that last picture. You may have remembered a recent post where I discussed my shelf dilemma and whether I should opt for the gas pipe shelving unit or go with white cube (IKEA expedit look alike) built ins. I hope you’re not all going to be mad at me, but I chose the latter. I thought and thought about this and it really came down to the use for the space and the upkeep in this moisture rich basement. My husband is super supportive and still wants me to have my gas pipe shelves, so we’re going to work on it together and install them in our office! It will be a fun project and in the end, the office location will suit us better. In the beginning of the post, I mentioned a wall that will be getting a special treatment. And here it is… an entire chalkboard wall!!

One Coat of the Chalkboard Paint

It will be pretty dramatic when it’s complete! Maybe I could find the inner artist in me…

Source: edisonavenue.net via Sarah on Pinterest

With chalkboard paint, you can choose any color and have it mixed with the chalkboard paint. I chose Dragon’s Breath by Benjamin Moore, which is a deep gray/brown/black color. I already have this color on the interior side of our front door and love it! We will also use it on the doors downstairs and for the railings. {The doors and railings won’t be mixed with the chalkboard paint, though!} And in other related news, I have chosen the horse print for our family room wall! To recap, there is a giant empty wall space above our sofa that needs a giant piece of art. With much deliberation and so many great options to choose from, here is the winner…

via
The name of the print is “Once Upon A Dream” and I love it! It’s ordered, and I can’t wait to see it in person. And mom, if you’re reading this, I’m sorry that I forgot to tell you this when you were over!  ๐Ÿ™‚ I will make sure to take lots of pictures when she is framed and up on the wall! Thanks so much to all of you that weighed in on the decision! I was torn for a while on whether to go light or dark with the horse print, and with a darker frame, I think this will be a perfect compromise for our space. I say compromise because my husband is not too keen on this art idea, so with a washed out print on our light walls, it won’t stand out too much, yet still make the dramatic effect I was after. I just had to go with my gut on this one. Every room has to have a touch of the unexpected, right?? I hope Mike agrees when it’s up!  :)
I’ll be back later this week with a client’s painting project that you won’t want to miss!

{E-Design} Progress Pictures

May 8, 2013 by Amber Filed Under: design, e-decorating, e-design


My clients are the best! My last post showed an office design board that was completed recently. My client has already hung the chandelier and added some of the new accessories! Here are the progress pictures…

Office Progress

This space is already beautiful to begin with, with the tall ceilings, crown molding and great existing furniture pieces. I just came in to add some modern fun, with gold accessories and hints of texture. The first picture shows the stunning new coral chandelier. I love that it draws your eye up, allowing you to fully appreciate the height of the ceiling. Her existing wall art that is currently behind the desk will move to the dresser wall and will be a gallery of art with her burlap corkboard. The middle photo shows the grand, new ginger jar! I love the large scale of this piece. We have created a pretty desk vignette with her small ginger jar and a new gold vase. This vase holds pencils well and any small office supplies she may need. The desk and bench legs will also undergo a makeover with creamy white paint in a glossy finish. I love how this space is coming together!

I have also worked with this client to add some modern elements into her dining room. She has a pretty bar cart that we decided to revamp with a deep charcoal paint. After adding a new tray, vase and fresh flowers, this side of the room is so cheerful!

Dining Room Accessorizing

She did such a great job bringing the plans together in these spaces! Thanks to my client for letting me share these amazing progress pictures.

To work together to create a space you love, click on my ‘design services’ page at the top of my blog to get started. I have some spots left open for June!

{Office E-Design} Adding Hints of Gold and Sparkle

May 6, 2013 by Amber Filed Under: design, e-decorating, e-design, personal design style


It is no doubt that the gold/brass trend is here to stay for a long time. I wrote a post a while back for Design Shuffle about this trend, and I’m happy to see that it’s still going strong. So when my e-design client wanted to update her office with some modern accents, I quickly thought about using some gold accessories! I also took into account the style in her nearby rooms, as it’s important to create flow in your home. Each room will be a bit different, but when they can all be tied together through a common theme, there is continuity and it all makes sense. Here is the accessory board I came up with…

The Design Plan {click on image to make larger}

She is very excited about the plan! I can’t wait to see it all come together.

{Choosing Art} I Need Your Help!

May 2, 2013 by Amber Filed Under: art, design, family room, personal design style


I may have said this before, but I can be very indecisive when it comes to the decor of my own home. When working with clients, it’s easy for me to choose what I think is right for the space. My own spaces, on the other hand, can be a different story. Maybe it’s because I over think too much, when I should just go with my gut feeling. Maybe it’s because I will look at it everyday, so I better make sure it’s an investment worth having. Either way, I need your advice! We are back on the topic of the art above my sofa that I talked about here. I think I am looking for a hint of nature and one large piece, as opposed to a grouping of art. I love gallery walls as much as the next person, but I just took down our massive gallery wall and want a change. I am thinking about art that is at least 30×40 insize, which can get expensive. The below options, however, are very reasonably priced! To recap the space we are working with, here’s the massive empty wall that is begging for some art…

The Empty Wall

Here are some of the options, in no particular order…

Option 1- Equestrian Art

via
Option 2- Equestrian Art
via
Option 3- Equestrian Art

via
Option 4- Equestrian Art
via
Option 5- Equestrian Art
via
Option 6- Equestrian Art
via
If I am thinking about art that might be more meaningful to us, I could go with a snowy landscape, like the option below. After all, we do get snow here almost half of the year! How about that for meaningful art??
Option 7- Snowy Landscape
via
Coincidentally, this wintery landscape is from the same etsy shop as most of the above equestrian art. I guess I like her style!
It did occur to me though, that I have liked horses for a while. Here is our dining room…

So actually, it wouldn’t be that far fetched to add another horse to the mix! Seems I like them already and forgot I did!
Which one gets your vote? Brutal honesty is needed!!  ๐Ÿ™‚

Sectionals Can be Chic

May 1, 2013 by Amber Filed Under: design, family room, personal design style


Since we are moving our sofas into the (almost) finished basement, we bought a sectional! We have always loved the loungy feel you can get with sectionals. They just welcome you in and seem so cozy. That, to me, is what a family room should be, right? Sectionals sometimes get a bad wrap and I don’t know why. But I think there are so many great options that would fit any design style. Here’s proof that they are chic…

Source: decorpad.com via Amber B Interiors on Pinterest
Source: hisugarplum.blogspot.com via Amber B Interiors on Pinterest
Source: theglitterguide.com via Amber B Interiors on Pinterest
Source: smallshopstudio.com via Amber B Interiors on Pinterest

Here are some quick snapsots of our sectional, bought from a local furniture store…

It’s a deep brown color, and we love how soft and comfy it is! There is that huge empty wall staring me in the face, ready to get some new art. But, I really want to be patient with this art and find something we really like. Since I had so many wall holes from the previous gallery wall, I spent a few hours spackling and painting this entire wall, giving it a fresh start. I have learned the hard way, that just painting small patches on the wall gives a different sheen than the rest. Our local paint store clerk advised I just paint the entire wall when recovering patches. It might take the extra effort, but in the end, it’s a seamless paint job.

So now, comes the art! I am still thinking about the horse art. We’ll see…

Our Basement Progress Pictures

April 28, 2013 by Amber Filed Under: basement, design


As promised, here are some progress pictures on the basement. A lot can happen in one work week! The space has been fully framed, electrical was installed and all of the drywall is up! It is starting to resemble an actual room, now! Here we go…

Framing Stage

Stair Risers Are Up

Built In Shelving Spots

The last three photos above show the locations for the shelving that is going under the stairs and the wall of shelves.
Drywall Phase


We are moving right along and we couldn’t be happier! I can’t wait to see what this week will bring!

A Colorful, Liveable Dining Room E-Design Project

April 26, 2013 by Amber Filed Under: design, e-decorating, e-design, inspiration, painting


Thank you all so much for your support on my last post! Everyone unanimously voted to go with the pipe shelving! I truly appreciate all of your tips and encouragement. I will post some basement progress pictures this weekend, but today, I have an exciting e-design project to show. I have been working with this amazing client for a while on different rooms, and we have just completed the dining room. She already had the furniture pieces for the space and was looking to add some color, pattern and modern fun to the room. We want this dining room to flow with the other areas we recently finished in her home, as well as work with the nearby spaces she already completed herself. My client loves a color palette of blues, greens and oranges. Here is the accessory design board I came up with…

The Design

This might be one of my favorite projects to date. I love how fun and colorful this room will be, as well as the small, new details we will add to the space. The ceiling trim images shown at the bottom left side of the board is an idea I had for her ceiling. She also has crown molding around the perimeter of the room, so we will add this three inch band of trim all the way around the room. I can’t wait to see how that looks! I was inspired by this project by Tobi Fairley…

Inspiration

via
I also adore the new prints that will be hung on either side of her hutch. They are shown on either side of the lanterns on the design board. When I was pinning the artist’s work on pinterest, my client saw them and immediately e-mailed to tell me that’s what she wanted. That worked out great, because I was pinning them for her dining room! I love it when I am in sync with client’s ideas.
Happy Friday! I’ll be back this weekend with our basement updates! {Hint, hint… all of the drywall is up!}


My Contractors Think I’m Crazy

April 24, 2013 by Amber Filed Under: basement, design, personal design style


Have you ever had a brilliant (or so you thought) design idea, and others didn’t quite see your vision?? That’s kinda where I’m at with our basement remodel. In my last post, I mentioned we are refinishing our basement from the concrete jungle that it is now, to a fully finished lower level. We’re so excited! I had the idea to have the contractors install a huge open shelving unit with plumbing and gas pipes. I gave them a written description taken from this post and I printed out a picture of what it could look like. This is what I showed them…

via 

via
Now granted, the printed pictures were in black and white, so maybe that took away from the unique effect these shelves have. Here is how the conversation went…
Me: I have this great idea to have you guys install a shelving unit with gas pipes and stained wood planks. It will be a cost effective way to have a large shelving unit!
Contractor: You want to do what??
Me: Install shelves with gas pipes.
Contractor: Ma’am, that’s not going to look good.
Me: {Cricket, cricket} I think it will give an industrial, chic look!
Now all kidding aside, the contractors have been wonderful to work with. They are reliable, on time and do a great job at a great price. So, no complaints here. My bubble was a little bursted, though. They said they could do it, but the only problem might be the location. Since it’s a basement, they mentioned the gas pipes will rust over time, even after spraying them with rustoleum. The dampness that’s natually in a basement will make that happen, for sure. I am not one to give up on my vision very easily, but I’m not too sure I want to double check that every guest has had their tetanus shot before touching our shelves. And by looking on line, it seems as though every person who tried this project has theirs on a main level room. So it might be back to the drawing board. I haven’t given up all hope yet on the idea, and they said we still have time to decide. My sweet husband already knows about my quirky ideas, so he is on board with whatever! But, here are some other shelving solutions I have found along the way that can take its place…
via 

via 

via 

via
I like that these shelves are white, and I especially like the look of the symmetrical cubes. They can make these or stack together ready made cube units from Home Depot. (This is when I really wish I lived near an IKEA! I could have them install the Billy bookshelf or large Expedit and call it a day! If we do this, we would paint the walls first and then install the open shelving unit after. That would create a nice contrast. We will also add some trim, to mimic the look of true built in shelving, so no one would be the wiser!
So, that’s where we’re at now. Decisions, decisions!
Have you ever been looked at like you’re crazy when it comes to design ideas??

This is Happening…

April 21, 2013 by Amber Filed Under: basement, design, personal design style


We are undergoing some renovations around here! This is the first time that we have changed our house in a big way. Let’s see if you can guess what we are doing, with these inspiration pictures…

Source: bhg.com via Amber B Interiors on Pinterest
Source: images.meredith.com via Amber B Interiors on Pinterest
Source: flickr.com via Amber B Interiors on Pinterest
Source: husohem.se via Amber B Interiors on Pinterest
Source: obaz.com via Amber B Interiors on Pinterest
Source: 3.bp.blogspot.com via Amber B Interiors on Pinterest
Source: 25.media.tumblr.com via Amber B Interiors on Pinterest
Source: iainclaridge.co.uk via Amber B Interiors on Pinterest

You might have guessed it… we’re finishing our basement! We are so excited and ready for it all to begin. I have big plans for this space. I plan to get the walls painted a very pale blue gray, almost white color. We don’t get a lot of natural light down there, so that will help to brighten up the space. Also, we are going to install shelving for the space under the stairs. I showed the contractor the 6th image above {gotta love pinterest} and it will happen! I would also like a huge chalkboard wall. I have always loved that look! Also, we are installing industrial style shelving, like the last image above. It’s a cost effective way to have about 10 feet of shelving, using wood boards, plumbing conduit and gas pipes. Materials alone, that idea costs only $200, and I love the result! That just might be my favorite aspect of this design! More on that idea later. This is pretty big for us, since we have never had any major renovation work done in the house before. I will make sure to take before pictures, so you can see the concrete jungle that it is now! That will be quite the before and after.

Have you finished your basement?? Any tips, ideas to avoid??

  • « Previous Page
  • 1
  • …
  • 17
  • 18
  • 19
  • 20
  • 21
  • …
  • 26
  • Next Page »
Welcome!

Hi, I'm Amber... a wife, mom and interior decorator. I am the writer of Simple Dwellings and the designer behind Amber B Design. Blog topics are all things design, with the occasional DIY attempt! Thanks for stopping by Read more...

  • Bloglovin
  • Email
  • Instagram
  • Pinterest
  • Twitter

Blog Posts, Straight to Your Inbox

Popular Projects

A dining room with white walls and wooden table.
A black door with white curtains and a red chair
A staircase with black and white chevron pattern on the steps.

Blog Love

  • Addison’s Wonderland
  • A Thoughtful Place
  • Alison Giese Interiors
  • Amber Interiors
  • Bailey McCarthy
  • Caitlin Wilson
  • Chris Loves Julia
  • Classic Casual Home
  • Cottage and Vine
  • Design Indulgence
  • Dwell by Cheryl
  • Eddie Ross
  • Elements of Style
  • Emily A Clark
  • Emily Henderson
  • Gallery No Eight
  • Hi Sugarplum
  • House of Jade
  • Jana Bek
  • Juniper Home
  • Kate Marker Interiors
  • Lucy Williams
  • Monika Hibbs
  • Our Fifth House
  • Pencil and Paper Co
  • Rachel Parcell
  • Rambling Renovators
  • Pure Style Home
  • Sita Montgomery
  • Studio Mcgee
  • The Makerista
  • The White Buffalo Styling Co
  • the Zhush
  • Traci Zeller
  • Young House Love

Copyright Amber B Design © 2025 ยท Design by Britt Douglas