Amber B Design Studio

Interior Design & Decoration for the South Florida region

  • Home
  • About
  • Services
  • Portfolio
  • Blog
  • Press
  • Contact

Check Out This Painted Backsplash!

March 7, 2013 by Amber Filed Under: painting a tile backsplash, painting ceramic tile, painting grout


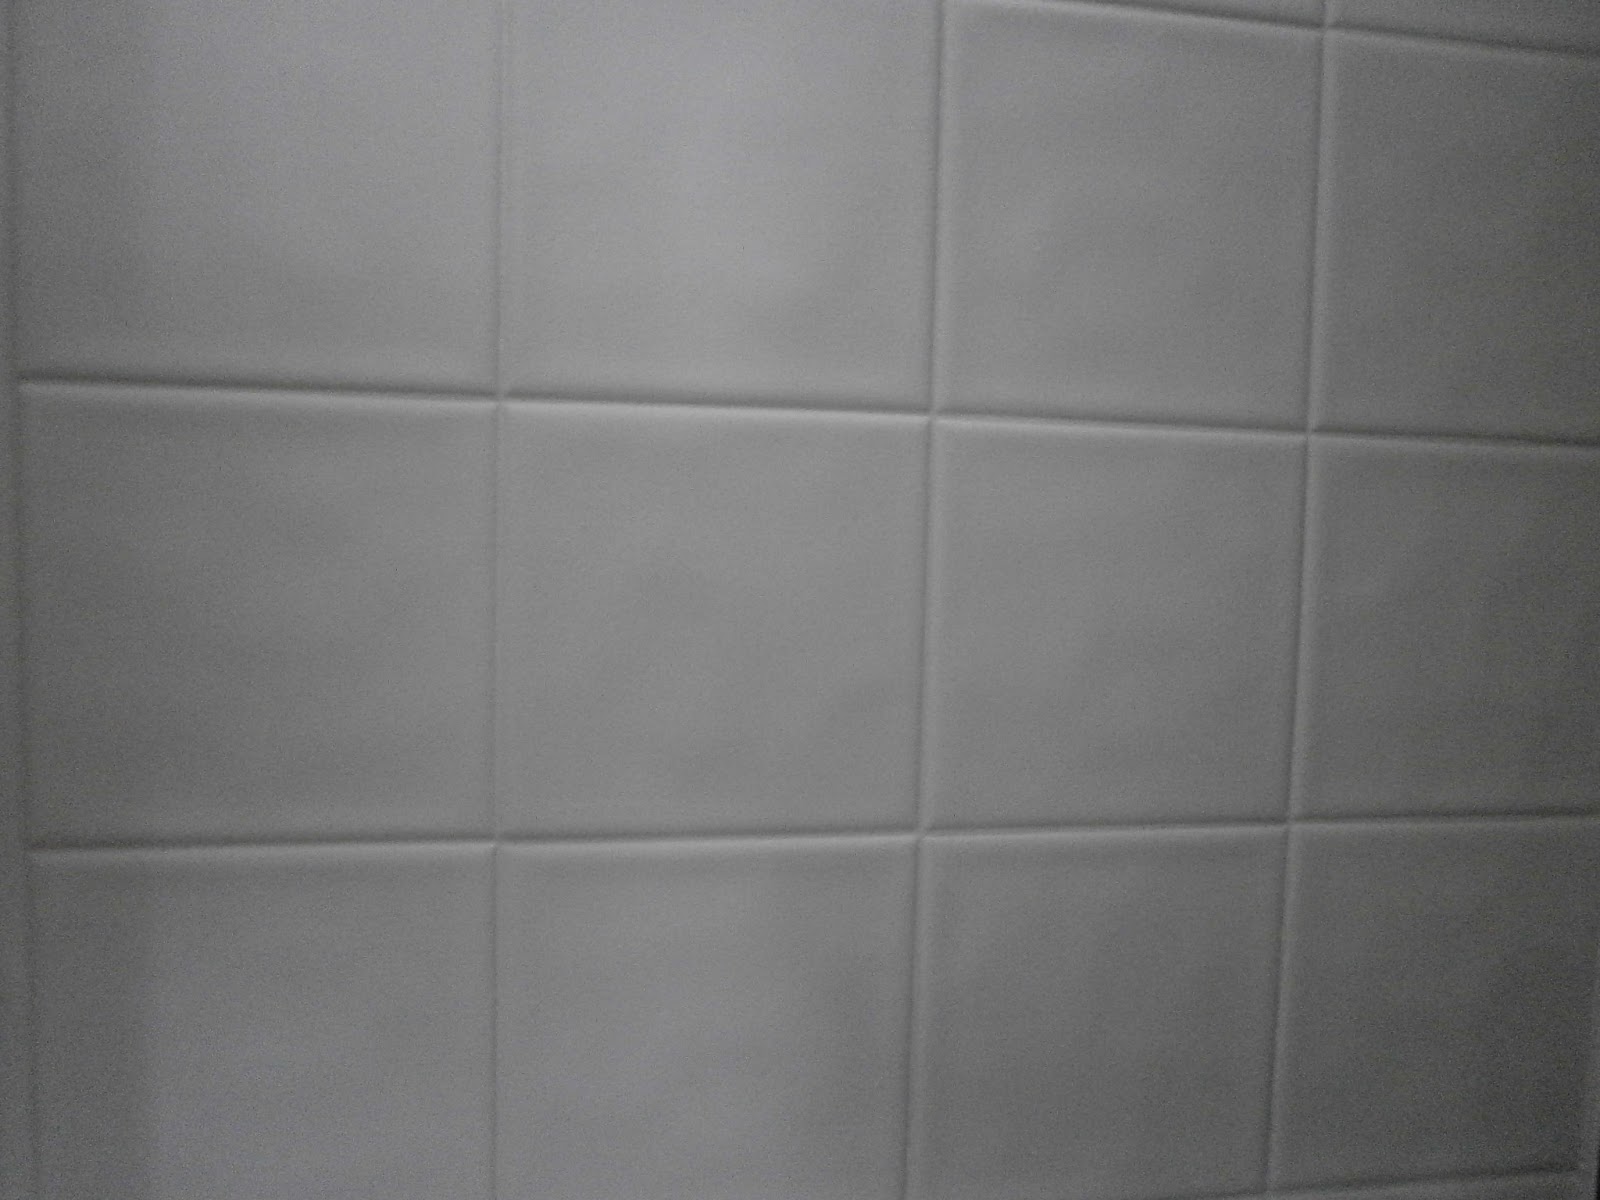
I would love to share an update about my painted backsplash… I have scrubbed it, cleaned it with kitchen cleaner and splattered sauce and oil on it- and it still looks as good as when I started! If you are living with tile that is not your favorite color or is covered in a design you don’t like… paint it! I was ecstatic to receive an e-mail from Lindsay, who writes the blog Living, Laughing & Loving. She had beige tile in her kitchen that she didn’t like from the beginning. She writes in her blog that while they were signing the papers with the realtor for the house, all she could look at was the beige backsplash! I am happy to announce that she has painted her tile white, and it looks amazing! Here is the before…

Before

 And here are the afters!

After

Kitchen Images Here

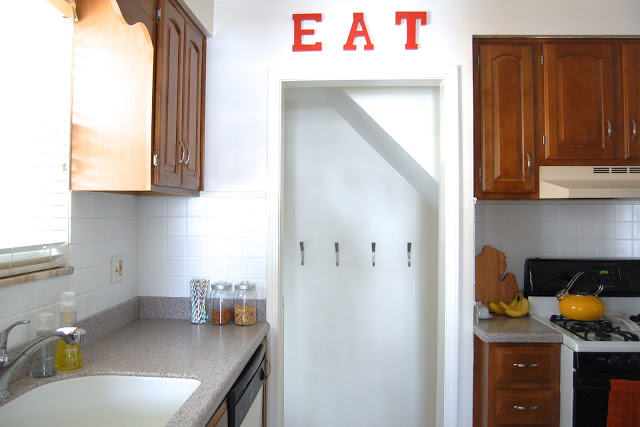
I love how this project looks nothing like paint- it truly looks like a newly tiled backsplash! To see how she completed this project and the materials she used, visit her post HERE. I’m so glad she went for it!

I was so happy to come across Lindsay’s blog. She has a beautiful home and the photos from her wedding are amazing! Here’s a little glimpse into what you’ll see over on her blog…

Living Room Image Here

Wedding Images Here
I look forward to following Lindsay’s blog! Stop by and say hello!

DIY: Painting A Ceramic Tile Backsplash

January 17, 2013 by Amber Filed Under: design, painting, painting a tile backsplash, painting ceramic tile, painting grout, painting tips


Well, the project is complete! I know you might be wondering if this was worth it and if I’m glad I did it… the answer is yes!! I was so excited to modernize my tiles a bit and go for a cleaner, more updated look.  My tiles were white, which was great, but they had flowers scattered throughout the backsplash.

Before

 (This is an old picture with our previous wall color.)
And here is the tile, all painted and flowerless!
After

I can’t even remember which tiles had the flowers! Here is a breakdown of the materials needed and some helpful tips:
– Scouring pad to lightly sand the tiles and smooth out the flower design. The flower tiles were a little bumpy where the design was, so I just used a Scotch Brite green scouring pad, and it worked fine.
– Microfiber dust cloth to remove the dust from the tiles after sanding.
– Blue painter’s tape and drop cloths to protect your counters. I made sure to tape after the grout, so I could paint the grout that met the counter. That way, it’s all uniform and looks realistic.
– 2″ paint brush (Don’t go cheap with this! Choose the best!)
– Small roller brush (Choose one that doesn’t shed and has a small pile. You don’t want to get paint trapped inside a fuzzy roller, causing a messy paint job.)
– A special bonding primer that bonds to glossy, special surfaces. The clerk at the paint store said this was the best option. (I always use Benjamin Moore paints for all of my projects!) Here is a close up picture of the primer:
Once you have two coats of this primer, your paint will stick very well. It will also be long lasting. My mom said it best:  With this primer on, you’re on the same playing field as your walls. Well said! Now, my paint will be washable, scrubbable, like any wall! 
– Color Matched Paint with a sheen.
To get the exact color match, I took one of my cabinet drawers to the paint store. They can color match it exactly. As we all know and I have learned the hard way in the past, there are a million different shades of white paint! The clerk mixed my color with this paint.
Helpful Tips:
– Once your counters are protected and materials are out, start with the paint brush and prime the grout, first. Use a little paint on the brush, to make sure you don’t full in the grout lines too much. It’s better to do thin layers a couple of times, rather than one goopey layer. (Is goopey even a word? Spell check says no!) In the end, you want to make sure your backsplash still looks like tile and not fiberboard, trying to be tile.
– Wait 24 hours before applying the actual paint. This is important, because the bonding primer needs to fully dry and cure. I was so tempted to just finish in one day, since all of the materials were out. But, patience will pay off.
– When you start your painting the next day, lightly sand the tile again with the scotch brite pad. For some reason, my primer made little bubble marks on some of the tiles. I was so nervous about that! Don’t worry, the sanding will help that and now- no bubbles!
– All in all, make sure you do at least 2 coats of primer and 2 of the paint. It’s a pain in the neck and can be tedious, but then you’re done!
Wow, this is a novel! It was a lot of work, but worthwhile projects always are.  ๐Ÿ™‚
Total cost for this project… $48.00! In the future, I’m sure we’ll replace it with something different, but I will enjoy this for a long time.
So how about you… would you try it??
I am linking this project up to Savvy Southern Style:

Painting Ceramic Tile {The Primer is On!}

January 16, 2013 by Amber Filed Under: budget saver, design, painting, painting a tile backsplash, painting ceramic tile, painting grout


Well… what’s done is done! I have started my painting project in the kitchen. Now, no turning back! A while ago, I posted about re tiling our backsplash and choosing a grout color. Well, I have taken this project into my own hands and decided on something entirely different. I have never liked our flower design on some of our backsplash tiles. I like that the tile is white, but the flowers made the backsplash more dated. White subway tile would be ideal, but I’m all about working with what you’ve got in 2013! There will be more details to follow, but as a money saver, I decided to paint the tiles with a special primer/ paint that adheres to tile! Here is an update, all primed and ready for the topcoat…

Sorry that the picture is grainy. It’s a phone picture on a cloudy day. After two coats of primer, I can hardly see the flowers! Yay! I had to let the primer cure overnight, so I will be back at this in a little while. We also have white cabinets, so I brought a kitchen drawer into the paint store to get a color match. I can’t wait to show completed pictures!

Have you ever painted tile?? Would you ever be as crazy as me and try it??

Welcome!

Hi, I'm Amber... a wife, mom and interior decorator. I am the writer of Simple Dwellings and the designer behind Amber B Design. Blog topics are all things design, with the occasional DIY attempt! Thanks for stopping by Read more...

  • Bloglovin
  • Email
  • Instagram
  • Pinterest
  • Twitter

Blog Posts, Straight to Your Inbox

Popular Projects

A dining room with white walls and wooden table.
A black door with white curtains and a red chair
A staircase with black and white chevron pattern on the steps.

Blog Love

  • Addison’s Wonderland
  • A Thoughtful Place
  • Alison Giese Interiors
  • Amber Interiors
  • Bailey McCarthy
  • Caitlin Wilson
  • Chris Loves Julia
  • Classic Casual Home
  • Cottage and Vine
  • Design Indulgence
  • Dwell by Cheryl
  • Eddie Ross
  • Elements of Style
  • Emily A Clark
  • Emily Henderson
  • Gallery No Eight
  • Hi Sugarplum
  • House of Jade
  • Jana Bek
  • Juniper Home
  • Kate Marker Interiors
  • Lucy Williams
  • Monika Hibbs
  • Our Fifth House
  • Pencil and Paper Co
  • Rachel Parcell
  • Rambling Renovators
  • Pure Style Home
  • Sita Montgomery
  • Studio Mcgee
  • The Makerista
  • The White Buffalo Styling Co
  • the Zhush
  • Traci Zeller
  • Young House Love

Copyright Amber B Design © 2025 ยท Design by Britt Douglas