Amber B Design Studio

Interior Design & Decoration for the South Florida region

  • Home
  • About
  • Services
  • Portfolio
  • Blog
  • Press
  • Contact

A New Basement Addition {Tee Pee Reveal}

March 4, 2014 by Amber Filed Under: basement, kids and design


I have a habit of promising the kids that I will tackle this amazing and cool project for them {that I found on pinterest}, only to freak out and realize that it might be beyond my DIY capabilities. I can’t leave them disappointed, after I was the one who brought it up in the first place. Case in point… giving them a super cool tee pee for the finished basement. I have always loved the look of tee pees and thought it would be such a great addition to the play area. I pictured hours of reading, imagining and just plain fun! I couldn’t justify purchasing one, when I might be able to make it myself. But when I started to look at some tutorials on line, my lack of sewing skills made me a little nervous. I know there are some no sew versions, but I wasn’t sure how that would hold up. So when I found an amazing tee pee on Joss and Main, I used my referral credits and scooped one up. It was meant to be! Here it is in our play space…

We set it up for them as a complete surprise and they were so excited!! I added a little creative spin to the tent, by adding some pom pom fringe. That counts as a DIY project, right??? I found three different strands of pom pom fringe at Jo Ann Fabrics {one yard each} and strung it around the top. I am so excited that their creative minds will have hours of fun. Well worth it, in my book! The sale is no longer going on at Joss and Main, but you can find similar versions HERE.

Our Quick Solution for Board Game Clutter

October 16, 2013 by Amber Filed Under: design, family room, kids and design, organize, shelf styling


If you’re a parent, chances are you have loads of toys! When creative, easy organizing tips come along to store those toys, I become a happy camper! A long while back, my blog friend Courtney posted about an easy solution for all of the puzzles and games we can accumulate. By using small mesh bags that are primarily used to machine wash delicates, you can throw away the bulky boxes and just keep the game with directions. This has been a life saver for storage! So, here is our shelving unit where this solution was used…

The top half of the shelves holds my fun accessories and books, while the bottom shelves are for the kiddos. But when the games are tucked away in cute burlap bins, it doesn’t scream out: KIDS TOYS HERE!! With the mesh bags, I have been able to fit so many more puzzles and games than before. We still keep some of the games in boxes, but storing half in bags cuts the bulk down a lot.

I found our mesh bags at Target and they sell for about $1.50 each. They were in the same aisle with the irons. 

Do you have any creative solutions for storing kid’s toys?? Please share!!

The Beginnings of a Reading Nook

September 18, 2013 by Amber Filed Under: basement, design, kids and design, shelf styling


Carving out that little space in your home to escape, have some quiet time and read a great book is a special gift! When that space is also a great spot for your kids to unwind and read, it’s a win win for me! Our finished basement has a wall of open shelving and I am finally getting around to making that space feel warm and inviting. With all 54 cube shelves finally styled {phew!}, I decided to add a personal touch to the outside of the shelves by hanging one of my favorite etsy prints…

horse print via

I have always loved the idea of layering your shelves and hanging mirrors and artwork to the outside of those shelves. It adds that little something extra and also provides an additional spot to hang art when space is limited in your home! When I purchased my large horse print for my family room, the etsy seller also gifted this beautiful piece. I have been waiting for the perfect spot for it, and I think I found it! In addition to fixing up the shelves, I also made this space more inviting by carving out a little seating area for the kids…

This space is not complete yet, but is off to a good start. I plan to hang a large piece of art above the chair, layer a patterned rug over the carpet and bring in some poufs for additional seating. A reading chair and ottoman to fit the adults is also an option. Since the top three rows have books for myself and my husband, this is a great spot for us all to read together! The baskets on the top row hide all of my fabrics for design projects, craft supplies and odds and ends that are not pretty enough to be shelf worthy! This small spot in our home is proof that a little getaway doesn’t have to include an entire room. One wall/nook in your home can be all you need for a quite retreat!

Do you have a little getaway space in your home to unwind??

Our Basement Shelf Style Reveal!

August 5, 2013 by Amber Filed Under: basement, design, kids and design, shelf styling


With the previous post being about the basement, I thought I should just jump right in and write about another finished area of the space. {Don’t you just love checking projects off the list?!?} This was a big project to tackle, as I had the contractors put together a 54 cube unit bookshelf. I will reveal the secret to how this was done, later in the post! As with any home, we needed additional storage… a place for our books and mementos and a spot for all of the kiddos books and treasures. I have always been a fan of bookshelves that hold more than just books! It’s also a great place to display family photographs, art, sculptural objects, etc. So here it is…

Bookshelves Hold More Than Books…………………  


As you can see, there were a lot of shelves to fill! For a while there, I wasn’t sure we would have enough books and stuff to fill it, but I was wrong. If you look hard enough in your home, you can find it! For these shelves, the top section is for our things and the bottom half holds all of the kid stuff. I love pairing the everyday {books} with something unique {sculptural pieces, objects, etc.} It adds depth to your shelves and tells more of a story about you! I also try to use the entire shelf… layering pictures either in front or behind books. That gives the illusion of more shelf space. And I also like to lay the books both horizontally and vertically. It pleases the eye to see different heights and proportions when looking at the shelf and makes it that much more interesting. When deciding what to do with the top row of shelves, I knew I wanted to add texture with woven baskets. Since we don’t have an IKEA nearby, I knew it would be pricey to find 9 of the same size baskets. So, I went to my trusty TJ Maxx and decided to just find 9 similar baskets with different shapes. I actually think I like it better than having them all the same. Each cube measures 12×12, so I just brought along my measuring tape to the store and measured as I shopped! I definitely recommend that when looking for a particular size basket. I was surprised to see that some of the baskets were too big, when I thought they would fit perfectly. It saved me a trip to the return counter! At the beginning of this post, I said I would reveal the secret to the way these shelves were made. Well… they are just 6 sets of the Martha Stewart cube shelving from Home Depot! I had the contractors buy these shelving units, remove the backs on them and build them into the wall. They connected them together and added the baseboard and crown molding to give them a true built in look. I also plan to add a framed piece of art or mirror to one of the outside shelves. I have always loved that look!

via
What have you checked off your project list lately??

Our Basement Kid’s Nook Reveal!

August 2, 2013 by Amber Filed Under: art, basement, design, kids and design


Our basement was finished in the middle of May, and I am excited to show the first complete nook in the space! The basement was renovated primarily as a fun place for the kids to play. It’s also great for us, because all of the toys can be relocated to this floor! So, I thought it would make sense to start with one of their spaces first. We had the contractors paint an entire wall with chalkboard paint as a great place to get creative and have fun! This zone is for drawing, crafting,and anything they can imagine up!  Enjoy!

Design With Kids in Mind……………………………..

Sorry for the large amount of photos! It was a sunny day, so I went a little crazy. Our windows are not very big in the basement, so it was great to be able to have this natural light stream in. We have had a lot of fun with this chalkboard wall. I wrote this bear quote from one of our favorite book series… The Berenstein Bears! When we’re ready to erase and draw something new, we just use a white sock. To really get it cleaned, I occasionally go over the chalkboard with a wet cloth. You might be wondering if the chalk mess is an issue on the carpet. To fix that problem, we only buy dust free chalk, which my mom found at Staples. {Thanks, mom!} When they really get coloring, some chalk dust falls to the baseboard. But, it is really minimal and easy to vacuum. Much easier than regular chalk would be! We keep the chalk and sock eraser in small plastic cups in a basket. The plastic cups can easily be washed out, when needed. The Oh The Thinks You Can Think quote was done on canvas as an inexpensive, whimsical way to add some art. I wrote about the simple process, HERE. The rest of the art has come from the creative kiddos. They love that it is truly their space and feel proud to show off what they have made! We love being able to have this extra square footage in the house and the kids love it, too.

Happy Friday!!

{DIY} Creating Your Own Canvas Script Art

July 18, 2013 by Amber Filed Under: art, basement, kids and design


Once we finished our basement, I already had tons of design ideas swimming around in my head. I knew the space would come together little by little, so I decided to focus on zones of the basement, in order to tackle each project a step at a time. Currently, it’s the chalkboard wall/kid’s area of the basement that’s getting some attention. I wanted to create a large piece of art on a small budget, so I started with a blank canvas (literally)! I bought a 24×36 size canvas board, with the intent to write a fun, kid friendly quote on the board as the art. We love reading Dr. Seuss books in our house, so I asked the kids to give me their favorite quote from the beloved Dr. Seuss book, Oh The Thinks You Can Think. It didn’t take them long to decide on one… together! I was so excited that they agreed, so I got right to work, before either could change their mind. In about 15 minutes time, here is the end result…

The Finished Product  … 

To recreate this project, this is what you’ll need…

The Materials …

– Deco Color Acrylic Paint Pen (The kids chose green.)
– 24×36 Canvas board from your local craft store.
– Measuring tape
– Pencil
– A favorite quote

Step by Step …

1. Lay your canvas board on a flat, workable surface. (I just chose our kitchen floor!)

2. Prep your paint pen by shaking it with the top on, removing the cap and then pressing the pen down on a paper towel. That gets the paint to flow. You could even practice your writing skills, too!

3. Use your tape measure to make small pencil marks along the side of your canvas. That will ensure your  lines are evenly spaced. I decided to make 4″ rows, so my words are big enough to read and more dramatic.

4. Have your book nearby and slowly copy the quote, one word at a time. Make sure you step back and check your work every few words. Once the word is written, there is no erasing!

5. Now, it’s time to hang your work and enjoy! I hung ours to the left of the chalkboard wall and surrounded it with my kids art. I hung the art with colorful duckling tape and they loved the result! They were giddy as they read the quote. Too cute!  ๐Ÿ™‚


All in all, the materials cost about $20! Not bad for a wall full of color. ๐Ÿ™‚ I hope to show more of this space soon, so stay tuned…

Styling Kid’s Bookshelves {Our Basement}

June 28, 2013 by Amber Filed Under: basement, design, kids and design, personal design style, shelf styling


When we had our basement finished, we decided to add tons of storage for books, kid stuff and anything that needed a home. The storage we decided on seemed too much at first, but who am I kidding? With kids in the house, it will fill up quickly. I am proud to say that there are more shelves filled now, than empty! The contractors built this shelving unit by connecting ready made cube units, with a total of 54 cubes in all! Since it goes up to the ceiling, we decided to keep the top three rows for our stuff and the bottom three for the kiddos, which is more in their reach. To make this a proper before and in progress, I’ll show where these shelves began…

Before

The above picture is a true before shot, since it is even before the carpet is installed. We have made a lot of progress since then, and I am happy to say that the kid’s shelves are pretty much complete.

After in Progress

Now I am very realistic, and I know these shelves won’t stay this organized for long. But it’s a great start, right?? Here are some tips when styling kid’s shelves (especially when you have 27 to do!!)

1. Mix it up by laying some of the books vertical and some horizontal. When the spine of the book is showing, they can see the title and it will still entice them to find their favorite!

2. Layer in some of their favorite stuffted animals and sculptural toys. It’s a great way to add texture and for them, it makes them smile to see their beloved items on display.

3. Face some of the titles out, so they can see the cover. It’s a great idea when you are low on books and have a lot of shelves to style. It also comes in handy for them to find a book that might have otherwise been lost on the shelf. I plan to switch these books up over time, so I can display ones that interest them at the moment or one they might have forgotten about. (For example, if the siblings are not getting along, you can display a book about sharing… in a very subtle way! hint hint!  )

We’ll see how long this lasts, but at least the books have found a great home and will be used a lot! That’s what it’s all about.

Happy Friday !!

Organizing the Basement

June 5, 2013 by Amber Filed Under: basement, design, kids and design, organize, personal design style


Now that our basement is finished, we have had fun using the space so far. It has become an additional family room for us… play zone, TV zone and loads of shelving/cubbies just waiting to get spruced up. For now, everything has just been brought downstairs, with no particular order or ryhme and reason. But, I have plans- big plans! Who says organizing kid’s toys can’t be fun and chic?!? Here is where our space is right now…

Currently

I would love a gallery wall down these stairs 

Organized baskets with labels, top half will be ours, bottom half for the kiddos 

Our massive chalkboard wall that needs a good cleaning
Luckily, we use dustless chalk that we found at Staples!
Dust free chalk = no messy clean up on the baseboards and carpet

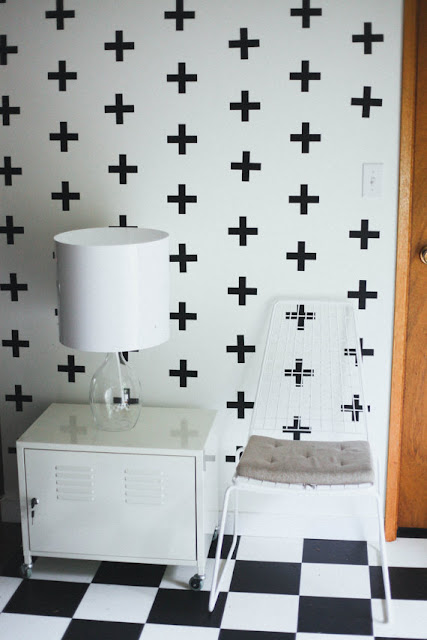
Oh, this is not how I pictured these shelves would look!  ๐Ÿ™‚ My plan is for some large bins with a graphic print or stripe on them. I also want to do some type of modern decal on the right side wall.
And now for the inspiration images! I have been gathering these rooms since we started thinking about the renovation. I plan to pick elements/ideas from each of them.
Inspiration
via
When I saw this image, I immedialtely fell in love with the striped bins. A small detail like that, takes this space to the next level.
via
The decal I plan to use is shown above. I love the graphic look to it, while it can also remind the kids to practic their math facts!  ๐Ÿ™‚ Urban Walls on etsy has so many great options for wall decals. And I love that there is a smaller commitment/effort than using a stencil!
 via

via
Did anyone see Kirsten’s Land of Nod playroom post yesterday? Head on over here to check it out! I love the way she added color, pattern and a tent to the room! The tent will also happen over here. Such a cute idea! I also love the Dr. Seuss picture and quote she put on the chalkboard wall. Maybe she can come over to draw on ours?? I’m not too sure I have the same artistic abilities!
via
via
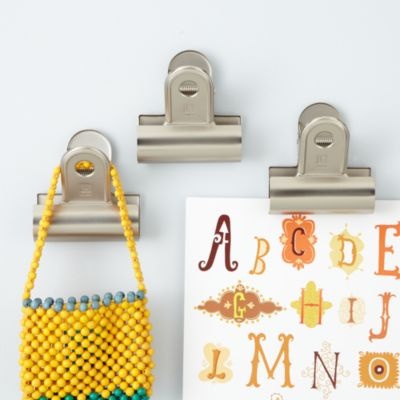
Since this is a space the kids will use often, I want to make a huge gallery wall of their art. We are running out of places upstairs to display the art, so this will be an extra spot to showcase what they have done. I wanted to hang it in a unique way, with jumbo clips/clipboards and colorful washi tape.
These are my thoughts for now. No idea when this will all happen, but it will happen! Next up, I will show the TV side of the space and my plans for all of that.
Wish me luck !!!

  • « Previous Page
  • 1
  • 2
Welcome!

Hi, I'm Amber... a wife, mom and interior decorator. I am the writer of Simple Dwellings and the designer behind Amber B Design. Blog topics are all things design, with the occasional DIY attempt! Thanks for stopping by Read more...

  • Bloglovin
  • Email
  • Instagram
  • Pinterest
  • Twitter

Blog Posts, Straight to Your Inbox

Popular Projects

A dining room with white walls and wooden table.
A black door with white curtains and a red chair
A staircase with black and white chevron pattern on the steps.

Blog Love

  • Addison’s Wonderland
  • A Thoughtful Place
  • Alison Giese Interiors
  • Amber Interiors
  • Bailey McCarthy
  • Caitlin Wilson
  • Chris Loves Julia
  • Classic Casual Home
  • Cottage and Vine
  • Design Indulgence
  • Dwell by Cheryl
  • Eddie Ross
  • Elements of Style
  • Emily A Clark
  • Emily Henderson
  • Gallery No Eight
  • Hi Sugarplum
  • House of Jade
  • Jana Bek
  • Juniper Home
  • Kate Marker Interiors
  • Lucy Williams
  • Monika Hibbs
  • Our Fifth House
  • Pencil and Paper Co
  • Rachel Parcell
  • Rambling Renovators
  • Pure Style Home
  • Sita Montgomery
  • Studio Mcgee
  • The Makerista
  • The White Buffalo Styling Co
  • the Zhush
  • Traci Zeller
  • Young House Love

Copyright Amber B Design © 2025 ยท Design by Britt Douglas