Amber B Design Studio

Interior Design & Decoration for the South Florida region

  • Home
  • About
  • Services
  • Portfolio
  • Blog
  • Press
  • Contact

DIY Chevron Stairs!

December 24, 2012 by Amber Filed Under: DIY, diy stencil, Featured


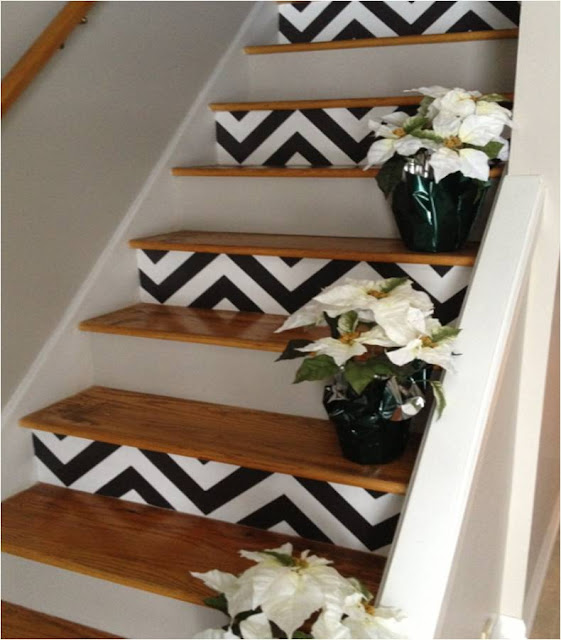
I wanted to check in and show you an amazing project my mom recently completed. This is one of those projects that I wish I could take credit for, but unfortunately, they are not my stairs. My mom painted these chevron stripes on the stairs, herself! I love the way they came out. It really stops you in your tracks the moment you walk in the front door.

Isn’t this project incredible?!? Chevron is no longer just for pillows and drapery! I also love this last image, which shows a glimpse into her wall stripes. I keep telling her she needs to start a blog and document these projects! I love that she painted every other stair. I think it’s the perfect amount of pattern. I also love that the alternating stairs are painted a soft gray, so there is not too much contrast. To follow the same step by step instructions she did, visit HERE.
Should I Go For It??

November 5, 2012 by Amber Filed Under: DIY, foyer, personal design style


Thank you all for your encouraging comments about my last post. I am happy to say that my writer’s block is dwindling and I am slowly getting my blogging mojo back in gear! I have been thinking about trying out a little project in our foyer, but not ready to commit. Here is where your input is key! This is what our foyer looks like as of right now:

Our Foyer

While I love the light that comes in from the sidelights, there is no privacy at the front of our house. I would like something that can be swept away, so the sidelights can still be used during the day. Here is what I found on pinterest that has me thinking…

Source: southernliving.com via Amber on Pinterest
Source: jonesdesigncompany.com via Amber on Pinterest

What if I installed a curtain rod and drapes? I could pull the panels back during the day and have the privacy I need at night. Here’s the dilemma and where I need your opinion…
I am trying to go for the less is more mantra and don’t want to crowd my spaces too much with things. I am worried that if I try this, it might look too busy in my little foyer nook, as the space isn’t that large to begin with. I love the way these two images look, but their foyers are also larger than mine. I also worry about drilling holes into the wallpaper, as that would be so permanent.

Any thoughts? What would you do??

An E-Design Before and After!

October 5, 2012 by Amber Filed Under: design, design services, DIY, diy stencil, e-decorating, e-design


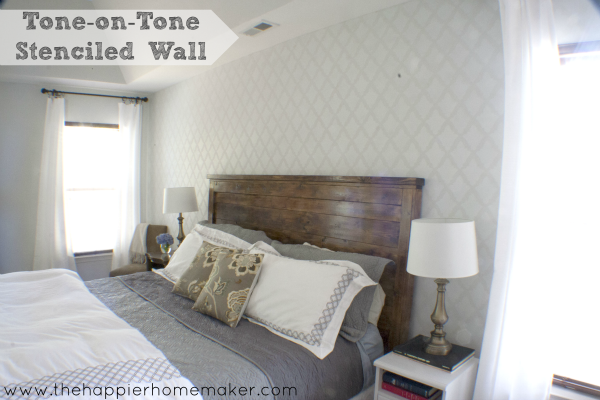
A while back, I ran a room design giveaway on my blog, and Melissa was the winner! She chose to make changes to her master bedroom, and she is well on her way! She has made so many great changes and accomplished a lot in a short time. Here is the before:

Before:

After in Progress:

After: Stencil Wall Complete!

Melissa has made amazing progress on her master bedroom! The stencil was tedious work, but she did a fabulous job. Originally, we were going to go with stripes for the bed wall. When Melissa had the opportunity to use a stencil, we went for it! I am so glad she took on this project- the results are so worth it! Melissa has a great DIY blog, The Happier Homemaker. Make sure to stop by and check it out. She discusses her stencil project HERE. She is currently running a stencil giveaway, so make sure to enter today!

Our DIY Painted Pumpkins

September 28, 2012 by Amber Filed Under: DIY, fall fix ups, pumpkin topiaries


Every year in the fall, I love to put out my painted pumpkins! I have been doing these topiary pumpkins for a few years now, and they are still going strong! They are artificial pumpkins that I decorate with paint and sponge brushes. Through the weather changes, they need some touch ups every now and then. Here is what the front porch looks like this year:

What I love about these pumpkins, is that I can keep them up throughout the fall season, including Thanksgiving! When I change out the wreath and take off the spider/webs, it becomes a great festive porch for the entire season! I love decorating for this time of year, and I smile when I pull into the driveway. To see what the pumpkins looked like last year and for the full DIY tutorial, go HERE.

DIY: Hemming Your Curtains – The No Sew Way!

September 16, 2012 by Amber Filed Under: design, DIY, project


I meant to show you this DIY project last week, but I fell a bit behind. I recently added new drapery panels to our master bedroom, but they were too long. 84″ panels would have been too short and 95″ panels (the size I bought) were too long. Well, I don’t sew, so I needed to figure out a cost effective way to handle this dilemma. My chosen option… stitch witchery! This is the first time I ever used this, and I loved it! It can also be called ‘hemming tape’ and it’s a no sew option for adding decorative trim, hemming panels or for any fabric project. Here is the finished product: (They still need to be steamed, but hey- some day!)

Here is my DIY tutorial:

1. I first hung my panels on the curtain rod and pinned them to the desired height. That way, I didn’t have panels that ended up being too short! I wanted to make sure they puddled about 1-2 inches on the ground. Then lay your drapery panels out and measure how much you want to hem. I hemmed up about 8 inches.

2. Next, place a couple strips of stitch tape on your panels. I tried to place them towards the top and bottom of the hem, making sure they held up well.

3. Then, bring your panel up to the desired height and press down with a damp cloth, then warm iron. Make sure you continue to move the iron, using small movements.

4. Gently pull back on the part you hemmed, to ensure you have a strong bond. And there you have it- hemming the no sew way!

Pretty soon, I hope to show more of the room, including some new pillows! Stay tuned…

Wall Writing – Take 2

April 2, 2012 by Amber Filed Under: DIY


A little while back, I tried a DIY experiment on my walls. I loved the idea, but didn’t quite love the result. So… I had to try it again! If at first you don’t succeed, try try again, right?? I had written here about a couple blog posts that had me inspired to write on my wall! When I tried it the first time, I didn’t take my time and measure, ensuring it would be straight. So of course, it was a little crooked and cramped. (Sometimes taking the short cut doesn’t make the project finish any faster!) But this time, I measured the wall and made little 5 inch pencil marks where I wanted each line to start. I think the finished product this time around is easier to read, clearer and much straighter!

Luckily, I had some extra paint leftover. I quickly added a couple coats to cover the words, then gave the paint about a week to cure. The next week, I was back at it again- this time carefully making sure I had each line straight. I would step back after every few words and check my work. The first time, this quote fit three entire times. This time, it barely fit once! Since I recently repainted the wall, I will wait about a week to erase the pencil marks, making sure the paint has enough time to settle. This time, I think it’s much easier to read and doesn’t feel so cramped. Here is a photo of the first time around:

Before:

And here it is now (one more time):

After:

Much better, I think! To see the quote in its entirety and read about the first wall writing experiment, go here!

Have you recently tried an experiment that you had to do over???

I Just Had To Try This!

February 27, 2012 by Amber Filed Under: DIY


I have seen this creative project a couple places and I knew I had the perfect wall to try it out for myself! I first saw this cool idea of writing on the wall from Courtney’s blog A Thoughtful Place. It came out great and looked pretty simple to do! Then just last week I saw some inspiring wall images from the blog Coco Cozy. I thought it was so clever and unique that I had to try it! The best part about the project is that you can write whatever you want, making it meaningful and personal to you! I chose an inspiring quote that I found on pinterest. As I’m trying to figure out what I want to do and the career path I want to take, this will definitely continue to inspire me! Also, I thought the quote would be a great jump start to every day, while also looking pretty sweet on the wall:

Source: wherethesidewalkbegins.blogspot.com via Simple on Pinterest

And here is the quote on our family room wall:

I used Elmer’s Painters Marker in White, with a medium tip for writing. It’s a permanent pen, so the writing should not smear away. I wanted the script to appear subtle, so it didn’t jump out at you too much. I was able to fit the quote almost 3 times and used just one pen to finish! I wanted the look to appear as if it was an ongoing script, so when it came time to finish a word at the end of the wall, I didn’t try and smoosh the word to fit. I just wrote what I could, then continued on the next line. (That only happened a couple times.) I also decided to make all letters lowercase and not use punctuation.

My Tips for Wall Writing
– As you write, push down on the pen. (I learned this the hard way, as I had to go back and darken some words). When you push down as you write, the words come out clearer and darker.
– If you’re going to try this, go for the whole wall! I think it makes you take notice and becomes like wallpaper art!
– After every line, it’s a good idea to take a step back and make sure you like how it looks and that it is straight. I wish I did that a little more often, but it’s an original!  ๐Ÿ™‚ I should have tried Courtney’s suggestion of making pencil lines with a level, then erasing after!
Are you ready to take out your pen and start writing???

I’m linking this post to Kim’s amazing blog, Savvy Southern Style!


DIY – Adding Fabric Trim to Lamp Shade

January 16, 2012 by Amber Filed Under: DIY, guest room


With the holidays behind us, it’s always fun to change up some things around the home with simple and quick projects! I recently added some new grosgrain trim to my lamp shade, giving a little pizazz to our guest room corner.

Here are the quick and easy steps:

1. The only materials I needed for this project are grosgrain ribbon and fabric glue.

2. Before cutting the trim, I placed it around the shade, making sure I left a little extra to work with. (I could always cut the extra ribbon later.)

3. At first, I applied the glue to the trim, but ultimately ended up appyling right on the shade. It worked out better that way.

4. I continued to make my way around the shade, pulling the trim tight while also pressing firmly on the shade.

5. With one ream, I had enough trim for the top and bottom of the shade, with some left over! And here are some more afters:

This tacky glue is very strong and stays really well, even on this overlapping fabric shade. If you look really close, you might see some waves, but it’s pretty secure. I hope this simple project inspires you to add some trim to your lamp shade!

Will you be tackling any projects at the start of the New Year??

  • « Previous Page
  • 1
  • 2
Welcome!

Hi, I'm Amber... a wife, mom and interior decorator. I am the writer of Simple Dwellings and the designer behind Amber B Design. Blog topics are all things design, with the occasional DIY attempt! Thanks for stopping by Read more...

  • Bloglovin
  • Email
  • Instagram
  • Pinterest
  • Twitter

Blog Posts, Straight to Your Inbox

Popular Projects

A dining room with white walls and wooden table.
A black door with white curtains and a red chair
A staircase with black and white chevron pattern on the steps.

Blog Love

  • Addison’s Wonderland
  • A Thoughtful Place
  • Alison Giese Interiors
  • Amber Interiors
  • Bailey McCarthy
  • Caitlin Wilson
  • Chris Loves Julia
  • Classic Casual Home
  • Cottage and Vine
  • Design Indulgence
  • Dwell by Cheryl
  • Eddie Ross
  • Elements of Style
  • Emily A Clark
  • Emily Henderson
  • Gallery No Eight
  • Hi Sugarplum
  • House of Jade
  • Jana Bek
  • Juniper Home
  • Kate Marker Interiors
  • Lucy Williams
  • Monika Hibbs
  • Our Fifth House
  • Pencil and Paper Co
  • Rachel Parcell
  • Rambling Renovators
  • Pure Style Home
  • Sita Montgomery
  • Studio Mcgee
  • The Makerista
  • The White Buffalo Styling Co
  • the Zhush
  • Traci Zeller
  • Young House Love

Copyright Amber B Design © 2025 ยท Design by Britt Douglas