Amber B Design Studio

Interior Design & Decoration for the South Florida region

  • Home
  • About
  • Services
  • Portfolio
  • Blog
  • Press
  • Contact

When the Blog Comes Before the Business

May 3, 2013 by Amber Filed Under: blogging, e-decorating, e-design


I have been thinking about this topic for some time! When I started my blog back in 2011, it was with the intent to nurture my love for design and possibly open my own on line decor shop. I thought it would be fun to start a blog and ‘chat’ with so many like minded individuals who could talk about pillow fabrics and wall colors to abandon. I went back and forth on what to name my blog. Some of the earlier names I had pondered were: The Painted Chair, The Chic Farmhouse, Posh Dwellings, Blend to name a few. Hey, Blend would have actually been pretty cool. But, I digress… I decided on Simple Dwellings and that was that. I have been very happy with that name, but as I decided to shift from an on line store to on line decorating services, the blog name got in the way. For the first year, my design business was called Simple Dwellings Interiors, to match the name of my blog. As I started to grow my business, I wanted to name it after myself. I just liked the personal aspect of that. So I decided to go for it and name the business Amber B Interiors. I liked the ring to it and it feels more me, if that makes any sense. I would like to grow my business further and am thinking about a web site with my blog link off of the site. In doing that, my thoughts go to turning everything to Amber B Interiors, rebranding the busniess. I already have all of my social sites as this name already, so it’s just the blog that is different. My blog friend Abby is going through this same process, and I could totally relate to her recent post here on the topic. I will make sure to update you on this journey, but right now, it’s more of an idea for the future. I’m probably focusing on this and worrying much more than I need to, but it’s been on my mind. And maybe you have gone through similar business changes that you would like to share! 

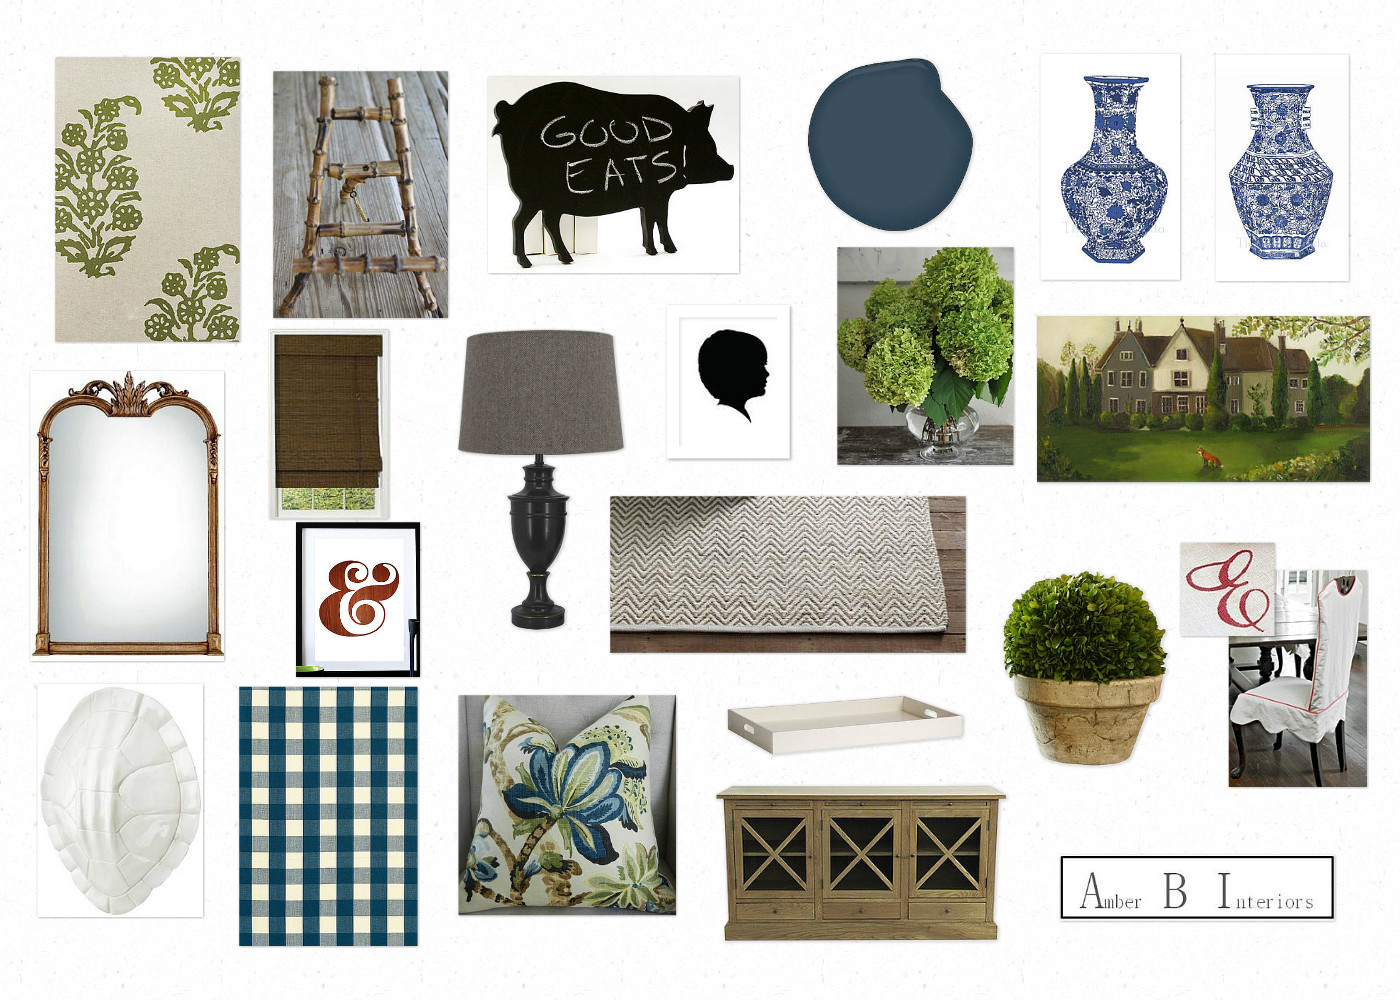
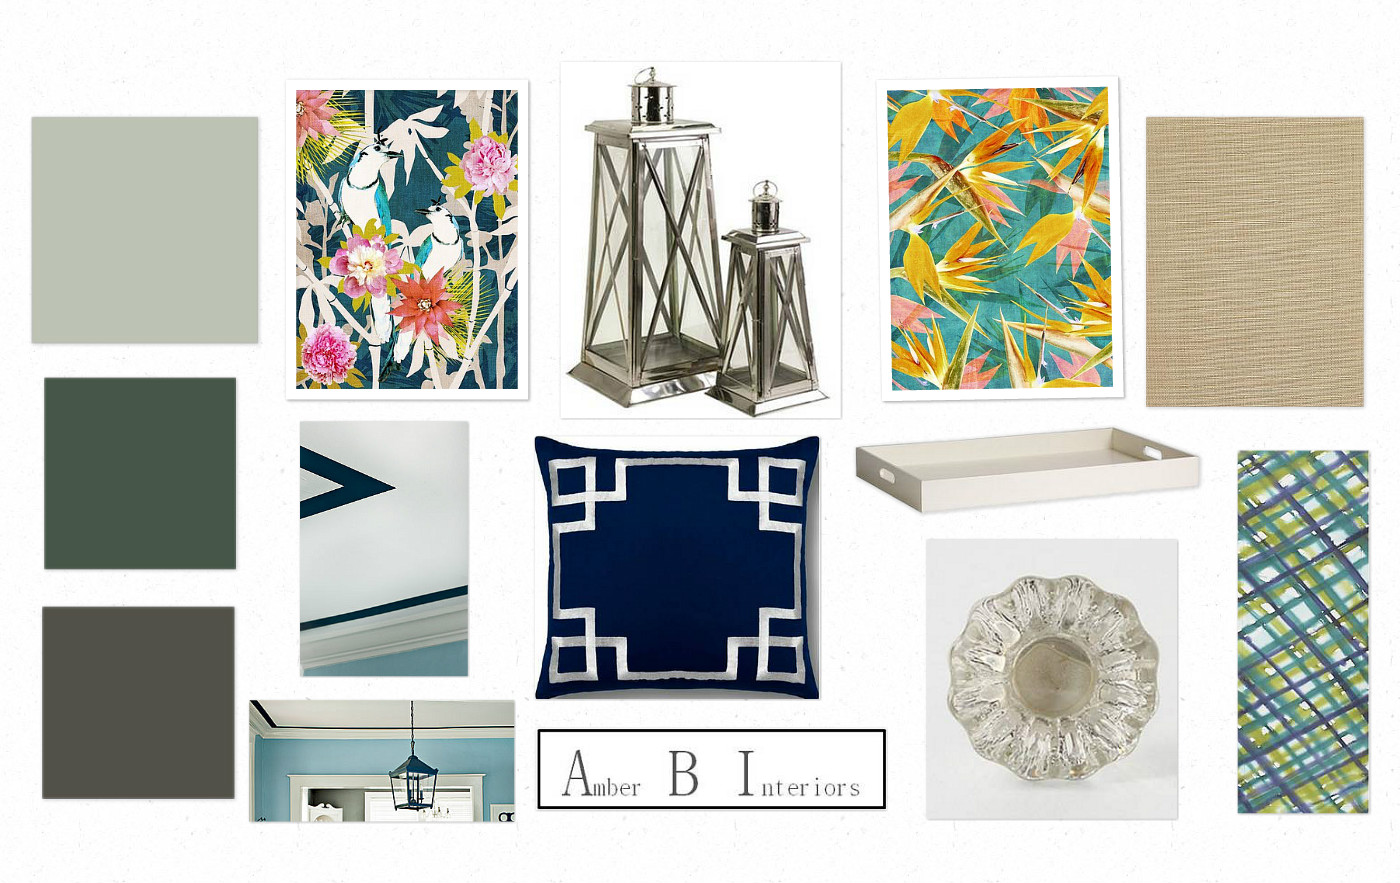
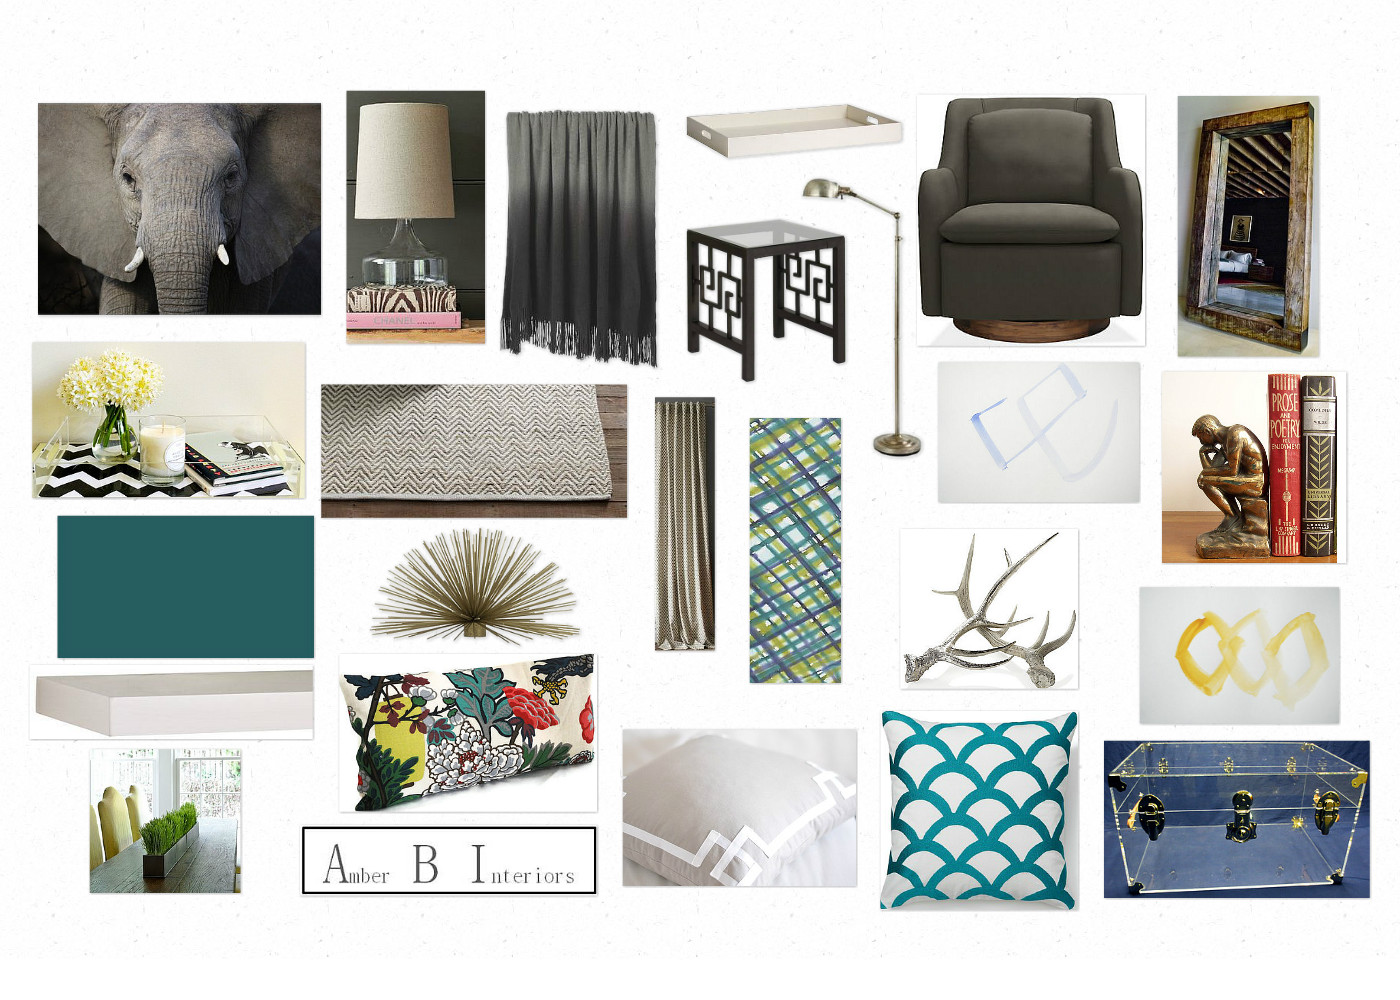
I will leave you with a recent dining room e-design that I completed for a client. She was looking for a rustic farmhouse style.

{click on image to make larger}
She is very happy with the design. We are going to make minor adjustments to the gallery wall, but keep the overall look and feel the same. We are on to her living room, next!
Have a happy weekend and see you back here on Monday!


A Colorful, Liveable Dining Room E-Design Project

April 26, 2013 by Amber Filed Under: design, e-decorating, e-design, inspiration, painting


Thank you all so much for your support on my last post! Everyone unanimously voted to go with the pipe shelving! I truly appreciate all of your tips and encouragement. I will post some basement progress pictures this weekend, but today, I have an exciting e-design project to show. I have been working with this amazing client for a while on different rooms, and we have just completed the dining room. She already had the furniture pieces for the space and was looking to add some color, pattern and modern fun to the room. We want this dining room to flow with the other areas we recently finished in her home, as well as work with the nearby spaces she already completed herself. My client loves a color palette of blues, greens and oranges. Here is the accessory design board I came up with…

The Design

This might be one of my favorite projects to date. I love how fun and colorful this room will be, as well as the small, new details we will add to the space. The ceiling trim images shown at the bottom left side of the board is an idea I had for her ceiling. She also has crown molding around the perimeter of the room, so we will add this three inch band of trim all the way around the room. I can’t wait to see how that looks! I was inspired by this project by Tobi Fairley…

Inspiration

via
I also adore the new prints that will be hung on either side of her hutch. They are shown on either side of the lanterns on the design board. When I was pinning the artist’s work on pinterest, my client saw them and immediately e-mailed to tell me that’s what she wanted. That worked out great, because I was pinning them for her dining room! I love it when I am in sync with client’s ideas.
Happy Friday! I’ll be back this weekend with our basement updates! {Hint, hint… all of the drywall is up!}


{Before and After} E-Design Gallery Wall

April 19, 2013 by Amber Filed Under: before and after, design, e-decorating, e-design, gallery walls


I have really been in the before and after mood when it comes to my recent posts. I think we all love to see how a space can come together, especially when you’re able to see where it began. My client wanted to add some modern elements to her beautifully finished basement. She already had the television and most furniture pieces, but wanted to make the space truly complete.

Before

When I saw her TV wall, I immediately thought of surrounding it with a symmetrical gallery wall of framed art. Here are the inspiration images I used…

Inspiration

Source: centsationalgirl.com via Amber B Interiors on Pinterest
Source: hookedonhouses.net via Amber B Interiors on Pinterest

My client did an amazing job hanging this symmetrical gallery wall. I love great symmetry! Here are the afters…

After

The new bench can be pulled out for additional seating when needed and also helps fill this space when not in use. The framed botanical prints are actually from a wonderful coffee table book. I suggested that she use the prints she liked best and that best matched the color scheme for the room. Over time, this gallery wall can also continue to grow with more botanical prints and make the art extend towards the floor. I think the new art wall does a great job taking your eye away from the built in wall speakers. My client is so happy with the results and glad that she hung the gallery wall. I am so happy that it worked out!

If you would like to work together to create a space you love, visit my design services page to get started! I am currently booking clients for the summer and even have a couple of spots open in May.

{Before and After} A Master Bedroom E-Design Project

April 16, 2013 by Amber Filed Under: before and after, design, e-decorating, e-design, personal design style


As I’ve said before, I love getting after shots of completed e-design projects. These pictures are great to share, since this room is already so beautiful to begin with. This e-design client was looking to add some texture and pattern to her master bedroom. She already had all of the main furniture pieces. I just came in to help add some fun accessories. Here is her space before…

Before…

First, we added some driftwood art for the wall space above the bed. I originally posted about that part of the room here. The art took us in a coastal, masculine, rustic, chic direction, which is a great style for a master bedroom retreat. Here are the afters…

After…

My client is so happy with the space and I love the calm, serene feel the new accessories bring. She did a great job bringing the design vision together. The ottomans beside the dresser are so versatile… when my client wants a change, she can easily move them to the foot of the bed or use them as foot rests with her ikat chairs. I actually cannot take any credit for the last image (ikat chairs vignette). My client already had the ikat chairs and shell and they made the tree stump table themselves! I love the texture it brings to the room. She did a great job taking the pictures, because the mirrors above the dresser beautifully reflects the other side of the room. Thanks so much to my client for allowing me to share these pictures!

{E-Design Before and After} The Basement

April 11, 2013 by Amber Filed Under: before and after, design, e-decorating, e-design


You are all in for a treat today! I have the most amazing clients ever and was happily surprised to see loads of after photos in my inbox this week! First up, I will show some beautiful pictures of a basement e-design I worked on over the winter. This client has done a tremendous job putting her spaces together and she has been such a joy to work with. Her basement is a great space and gets loads of natural light. Since the basement is such a large space, I will show just the bar/seating area today. Before contacting me, they already had plans to add a bar to this side of the basement. My client had great ideas for this zone and we worked together to select the bar stools and paint color for the bar. I also helped add some color and finishing touches to give the rooms a modern edge. Here are some before shots of the space…

Before

The existing pillows on her sofa {from the other side of the basement} had pretty shades of blue, orange and green, so I wanted to carry that color scheme into the rest of the basement. Here is the design board I came up with…

The Plan

We made minor adjustments here and there but kept the overall concept the same. There are pieces from this design board that you will see later, since I am only focusing on the bar/seating area today.

So without further adieu, here are the afters…

After

I am so excited for this client! She has done a wonderful job putting it all together. The contractors building the bar also made this space shine! I love the way it turned out, and I’m pretty sure my clients love it too!  ๐Ÿ™‚ To see my last post about this project with progress photos, go here.

{E-Design} Adding the Accessories

March 27, 2013 by Amber Filed Under: design, e-decorating, e-design, personal design style, styling


As I’ve written in past posts, putting a room together is really all about the accessories. I recently wrapped up an e-design project where the client had the main furniture pieces for her master bedroom, but just needed to add the fun details. We started with her nightstands. I wanted to create a his and hers side, to make the space feel more meaningful and work with their own personal styles. Here are the options I gave…

Option 1

Option 2

Both options include a vase of fresh flowers, because I think that’s a great way to bring warmth and personality to any space. Both options also include whimsical, rustic and glam elements, to create both a masculine and feminine style. Adding accessories that are unique and fun take a space to the next level. You can find great vintage accessories like these from this great shop.

Next up, we chose blankets for the foot of the bed. I gave options that were both serene and calming and those infused with color. Here is the board I presented…

I also threw in a great pillow option for good measure, because you can never go wrong with this textile line.

We also styled the dresser. Here are the two options I presented…

The room is already beautiful, so we wanted to accentuate that by adding texture and unique accessories.

She is thrilled with the boards and has already started the fun accessory shopping!

Styling Tips and Tricks

March 19, 2013 by Amber Filed Under: design, e-decorating, e-design, personal design style, shelf styling, styling


When putting together e-design boards for my clients or decorating my own home, my focus is always on the accessories. They are the icing on the cake and take a space to the next level. The accessories are usually what gets noticed when company is over and can be a great way to show your personal design style. They are also great when updating a room on a budget, because amazing accessories can draw your eye away from an old sofa or outdated furniture. Here are my tips and tricks for styling!

Layering is Key
When thinking about shelves, art can lean on the shelf while smaller accessories sit in front. Layering your accessories adds depth and dimension to your shelves. And they actually make your shelves look bigger!

Our Family Room
Balance and Texture
When restyling your shelves, it’s best to take everything off and start fresh. {Which is also the time I dust the shelves!} Shop around your home for unique finds with different shapes and textures. I always tell clients to pair something flat with something sculptural and the everyday with something unique. A tried and true styling trick is to pair a stack of books with a pretty sculptural piece on top!

Source: bstylewise.blogspot.com via Amber on Pinterest

The picture above also shows how you can color code your books to give that rainbow effect. It’s a great trick when you have so many colorful books. All of a sudden, it’s well put together and thoughtful!

Turn Your Books Around
If you want to give your shelves a more neutral look, turn your books around so the pages show! It’s a subtle look and creates a softer, more subdued feel in the room.

via
Line the Back of Your Shelves
To bring texture and another color or pattern to your shelves, line the back with pretty paper! You could go as easy as attaching craft/wrapping paper with double stick tape or line the back with wallpaper. You could also paint the back of the shelves, like the image below. If the back of the shelves were the wall color in this room, the accessories would not stand out as much.
Source: google.com via Amber on Pinterest
via
Mix Tall and Small Pieces
This is a great way to get that layered, collected over time look to your shelves. Pairing tall vases with small accessory pieces adds more depth and looks great!
via
I am in the process of choosing something fun to line the back of my secretary shelves. Since this is an antique piece and I love the wood’s finish, I don’t want to paint or permanently cover the back in any way. I am thinking of using some type of paper and attaching it with double stick tape. Any thoughts on color or pattern?
Our Living Room
I saw a faux bois paper that might work. Also, if you have any other better suggestions instead of using double stick tape, I’m all ears! Whatever you think is best to preserve the wood.

{A Basement Project} E-Design Progress Pictures

March 10, 2013 by Amber Filed Under: e-decorating, e-design


I love seeing an e-design project well on its way! This client is adding new modern features to her finished basement and will also be installing a brand new bar area. Today, I can show you the progress on the wall color, new pieces and the start of something fabulous! Let’s back up and look at the design board…

The Plan

The basement is basically broken up into three separate areas in an open concept floor plan. My client loves a blue and orange color scheme and already has some furniture and accessories to work with! We just added some more decor, a new seating zone and pops of fun color. Here are the amazing progress shots…

The walls now have a soft gray color that the client loves. The picture above shows the newly striped walls and the new seating area! There will also be a new bar being built to the right of this picture, which will take up more space and be a great spot for entertaining. The new slipper chairs face the bar area and will work well for gathering and spending time with guests!

The above console is a great find from my client. It’s not too deep, so it allows for great flow into the TV area. We just styled it up and hung her meaningful art above the console. When guests are here, my client can place food platters and snacks on this console!

For this small wall space, I proposed square concave mirrors, and my client was able to find these beauties while out shopping. I think they work so well on this wall and add great texture and shape!

On the center right side of the board, I reference a large scale photography print. This is the idea I have for my client for the wall space above the sofa. Large scale photography print is meaningful and adds a personal touch to the space. The inspiration photo I used on this board can be found here.

I have more to show in the future, so stay tuned! A special thanks to my client for allowing me to share these beautiful progress pictures!

A Very Special E-Design Project

March 6, 2013 by Amber Filed Under: e-decorating, e-design


There are some design projects that come by where I feel so lucky and fortunate to be a part of. This particular project is a great example of that. A little while back, I was contacted by a young couple looking to rebuild their condo and put their lives back together after Hurricane Sandy. There was damage to their home and they had to part with meaningful pieces that they were not able to salvage. When they found me, they were mostly finished with the construction side and it was time to unpack and start fresh. The client was so sweet and mentioned in her initial e-mail that she wanted to do this for her husband, who had already worked so hard putting their lives back together. They wanted to finally focus on the fun part of this renovation and put the hurricane behind them. My heart sank and I couldn’t wait to help with this project. They were looking for some new accessories and some furniture for their living and dining rooms, since they were able to salvage most of the main pieces in these spaces. They like neutral with pops of color, and this is what I came up with…

The Plan

The client’s husband is able to make some pieces with reclaimed wood, so he will be building a mirror similar to the one seen at the top right side of the board. I can’t wait to see how it turns out! They loved the plan and I couldn’t be happier with their response! I am so excited for them that they can finally have fun with their space again! Thank you so much to my clients for letting me share their inspiring story.  ๐Ÿ™‚

{Client After} DIY Art

March 3, 2013 by Amber Filed Under: art, DIY, e-decorating, e-design, project


I have another after photo to show from one of my recent projects! I love being able to see projects come to life. This is for a client looking to add new modern touches to her lower level space. We are adding a gallery wall of photos on her stairway going down into her basement. Here is our inspiration for that…

Source: blog.foundstyle.net via Amber on Pinterest

I love that gallery wall image- gets me every time! With a large collection of photos on the stair wall, I wanted the wall at the end of the stairs to have a graphic impact with typography art. I thought that would balance well with all of the family photos. I instantly thought about a DIY subway sign project! Since this is a space to gather and entertain friends and family, why not greet them with personal art once they walk downstairs! She loved this idea, because she could make the piece meaningful by adding places they have lived and traveled. Here is the completed subway sign:

After…

Didn’t she do a great job?!? She said the project was super simple. In my design presentation, I included a tutorial from my blog friend, Courtney. When Courtney completed this project, she gave a full explanation of what to do and the materials to use on her blog.

Since this photo has been taken, the walls have been painted a gorgeous gray color! I can’t wait to show you more soon. I might just have to try this project myself. It would be so much fun to look at all of the places we have lived and traveled in one piece of art.

So how about you… have you ever made your own art??

  • « Previous Page
  • 1
  • …
  • 4
  • 5
  • 6
  • 7
  • 8
  • …
  • 10
  • Next Page »
Welcome!

Hi, I'm Amber... a wife, mom and interior decorator. I am the writer of Simple Dwellings and the designer behind Amber B Design. Blog topics are all things design, with the occasional DIY attempt! Thanks for stopping by Read more...

  • Bloglovin
  • Email
  • Instagram
  • Pinterest
  • Twitter

Blog Posts, Straight to Your Inbox

Popular Projects

A dining room with white walls and wooden table.
A black door with white curtains and a red chair
A staircase with black and white chevron pattern on the steps.

Blog Love

  • Addison’s Wonderland
  • A Thoughtful Place
  • Alison Giese Interiors
  • Amber Interiors
  • Bailey McCarthy
  • Caitlin Wilson
  • Chris Loves Julia
  • Classic Casual Home
  • Cottage and Vine
  • Design Indulgence
  • Dwell by Cheryl
  • Eddie Ross
  • Elements of Style
  • Emily A Clark
  • Emily Henderson
  • Gallery No Eight
  • Hi Sugarplum
  • House of Jade
  • Jana Bek
  • Juniper Home
  • Kate Marker Interiors
  • Lucy Williams
  • Monika Hibbs
  • Our Fifth House
  • Pencil and Paper Co
  • Rachel Parcell
  • Rambling Renovators
  • Pure Style Home
  • Sita Montgomery
  • Studio Mcgee
  • The Makerista
  • The White Buffalo Styling Co
  • the Zhush
  • Traci Zeller
  • Young House Love

Copyright Amber B Design © 2025 ยท Design by Britt Douglas